

Sacred Geometry
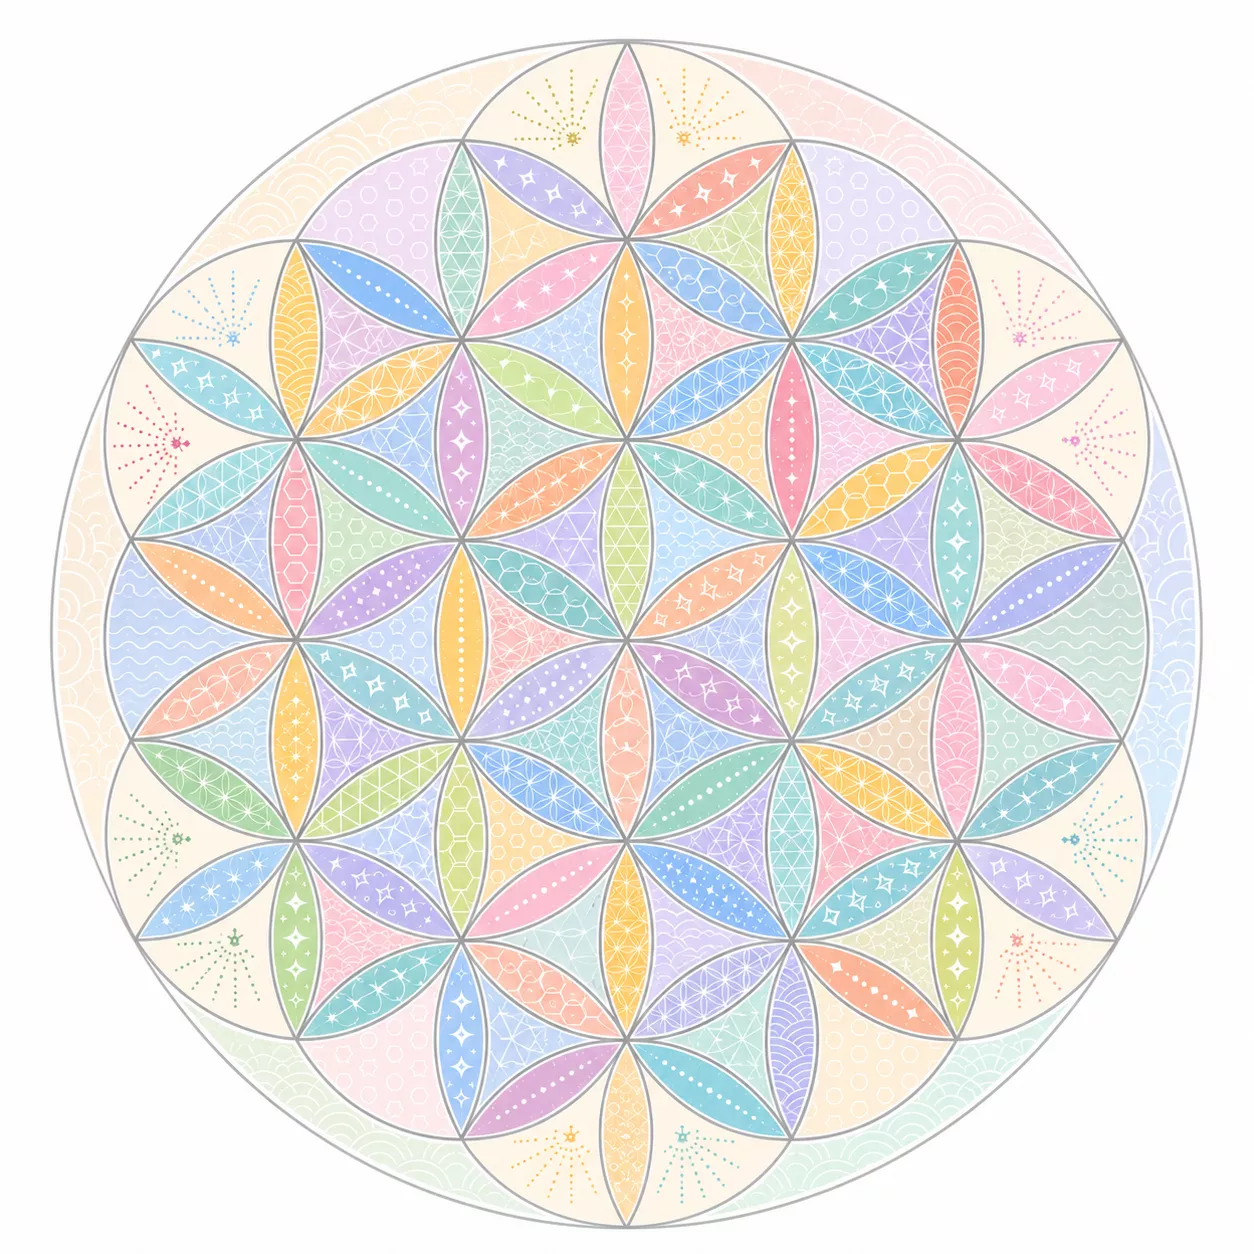

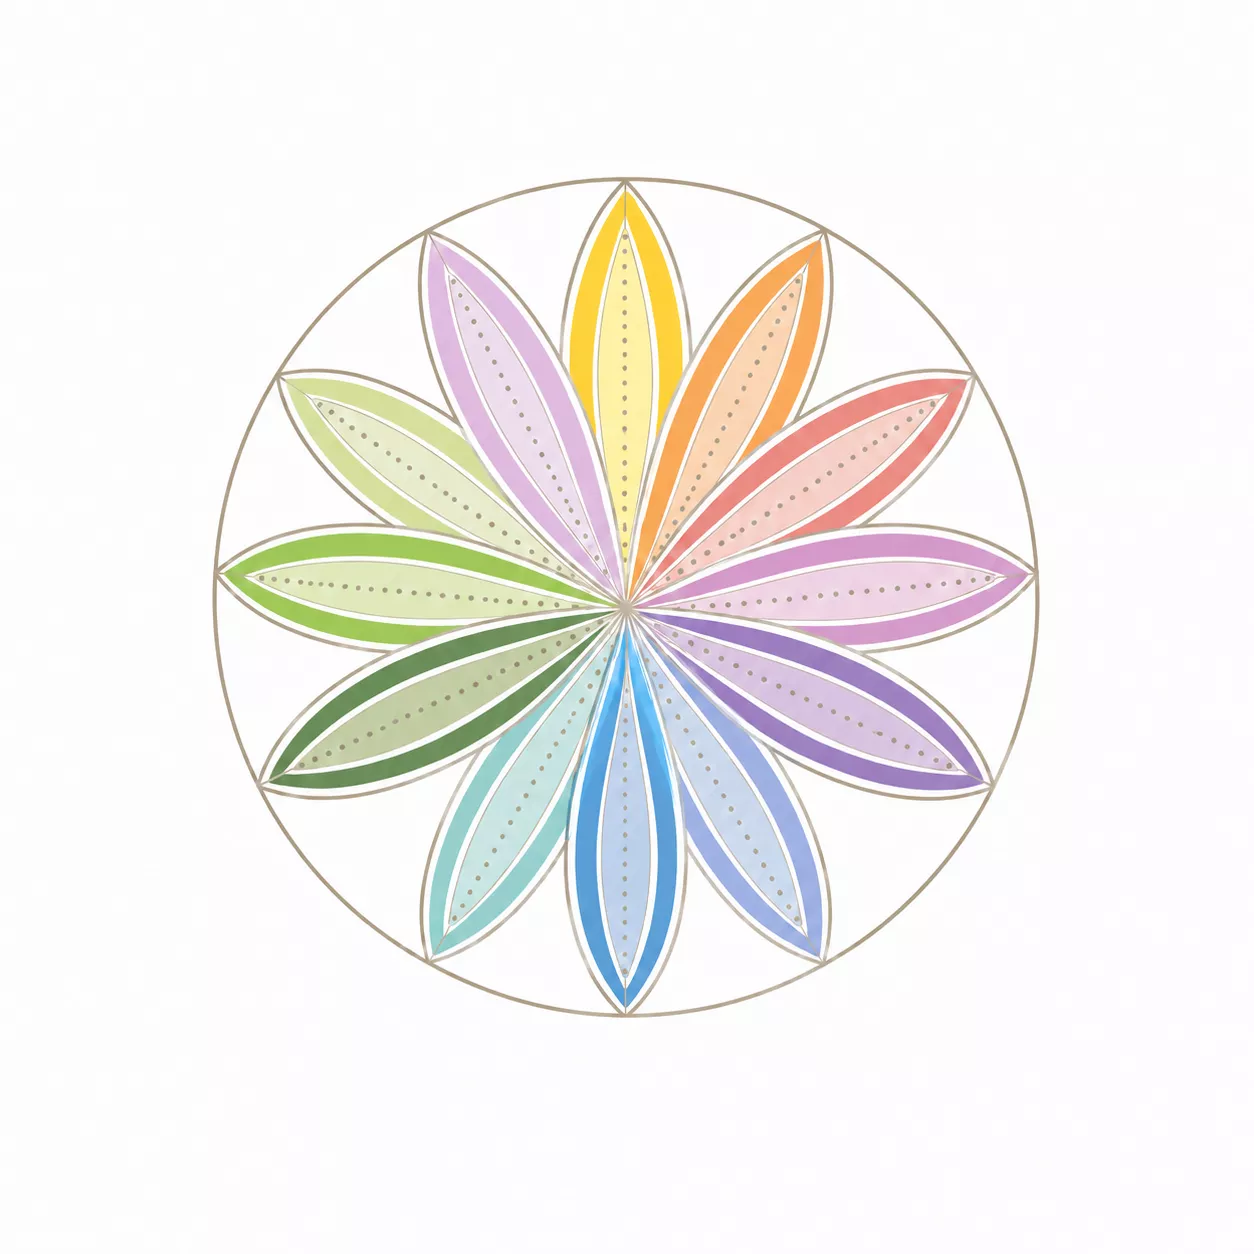


Construct, Colour & Explore
Using simple tools such as a pencil, ruler and compass, you can construct circles, grids, mandalas and geometric forms one careful step at a time.
Choose any activity above and work through it at your own pace. Some take only a few minutes. Others gradually build into more intricate designs.
Orin approves. Orderly, precise and surprisingly magical is very much his sort of thing.

At a Glance
Get it. Print it. Make it.
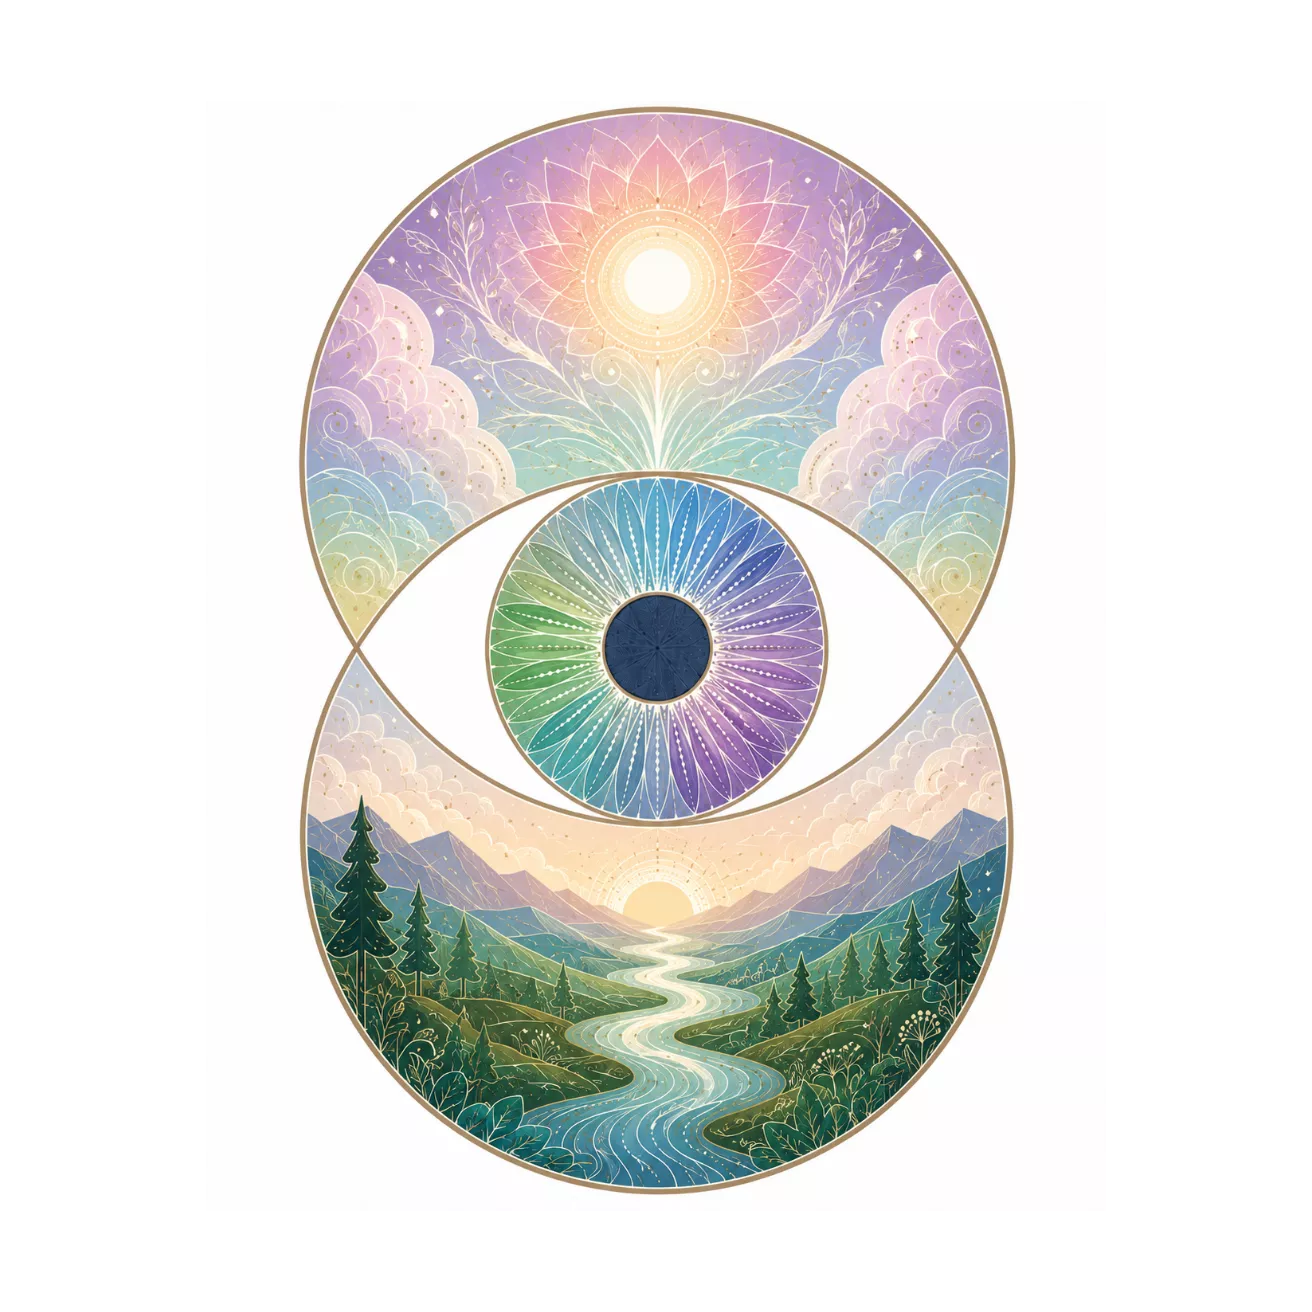
The Eye
At a Glance
Get it. Print it. Make it.
The Eye
In this activity, you’re going to make an eye out of… circles.
Circles?
Yes. Circles.
Start with two circles, look at the shape where they overlap, and something surprising begins to appear.
“Eye see,” giggled Smudge.
Biscuit rolled his eyes at the terrible joke.
Let’s see if they’ve spotted something interesting.
Steps
Draw Your Guide Line
Use your ruler to draw a light vertical line down the page.
This is your guide line. It helps your circles sit neatly on the page.

Draw the First Circle
Place the compass point on the guide line nearer the bottom.
Draw a circle.
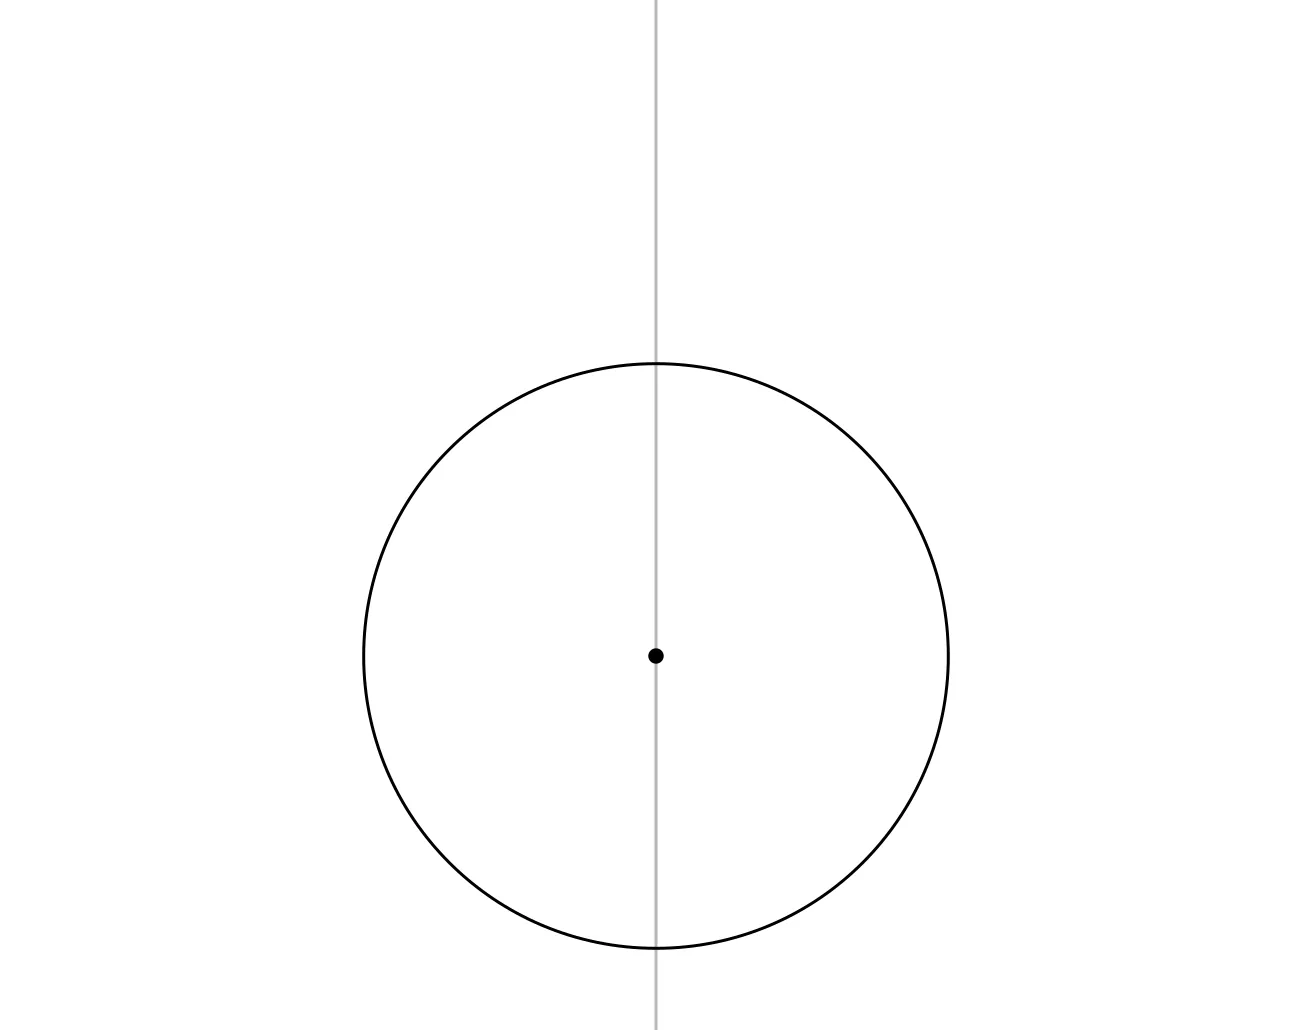
Draw the Second Circle
Place the compass point where the first circle crosses the guide line at the top.
Draw a second circle using the same compass width.

The almond shape where the two circles overlap is called a Vesica Piscis.
Draw the Centre Line
Find the two points where the circles cross on the left and right sides.
Use your ruler to draw a horizontal line through those two points.

Where the two guide lines cross, you’ve found the centre of the eye.
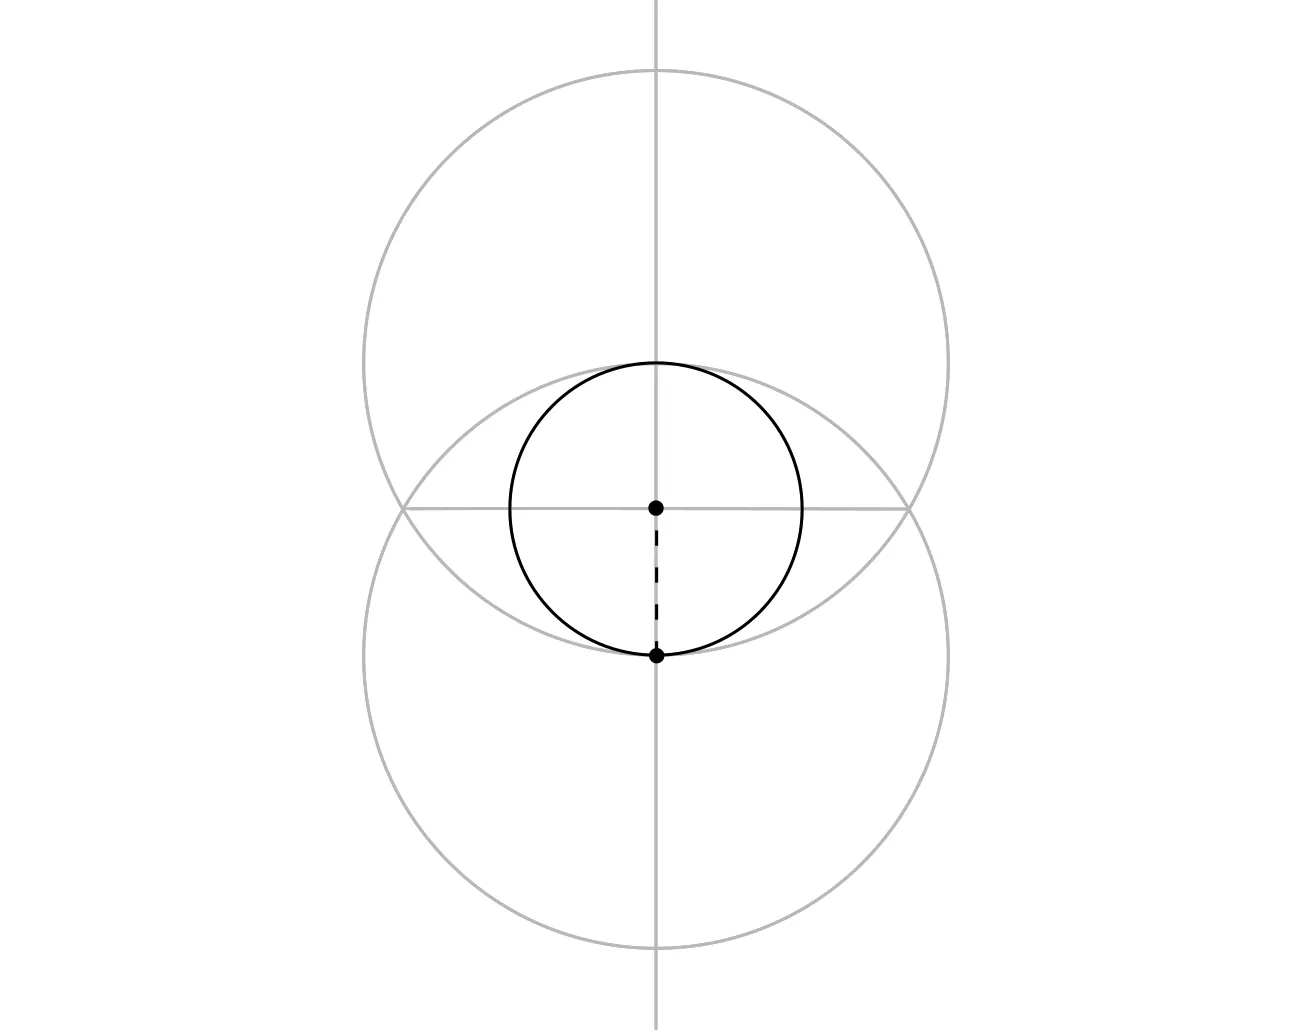
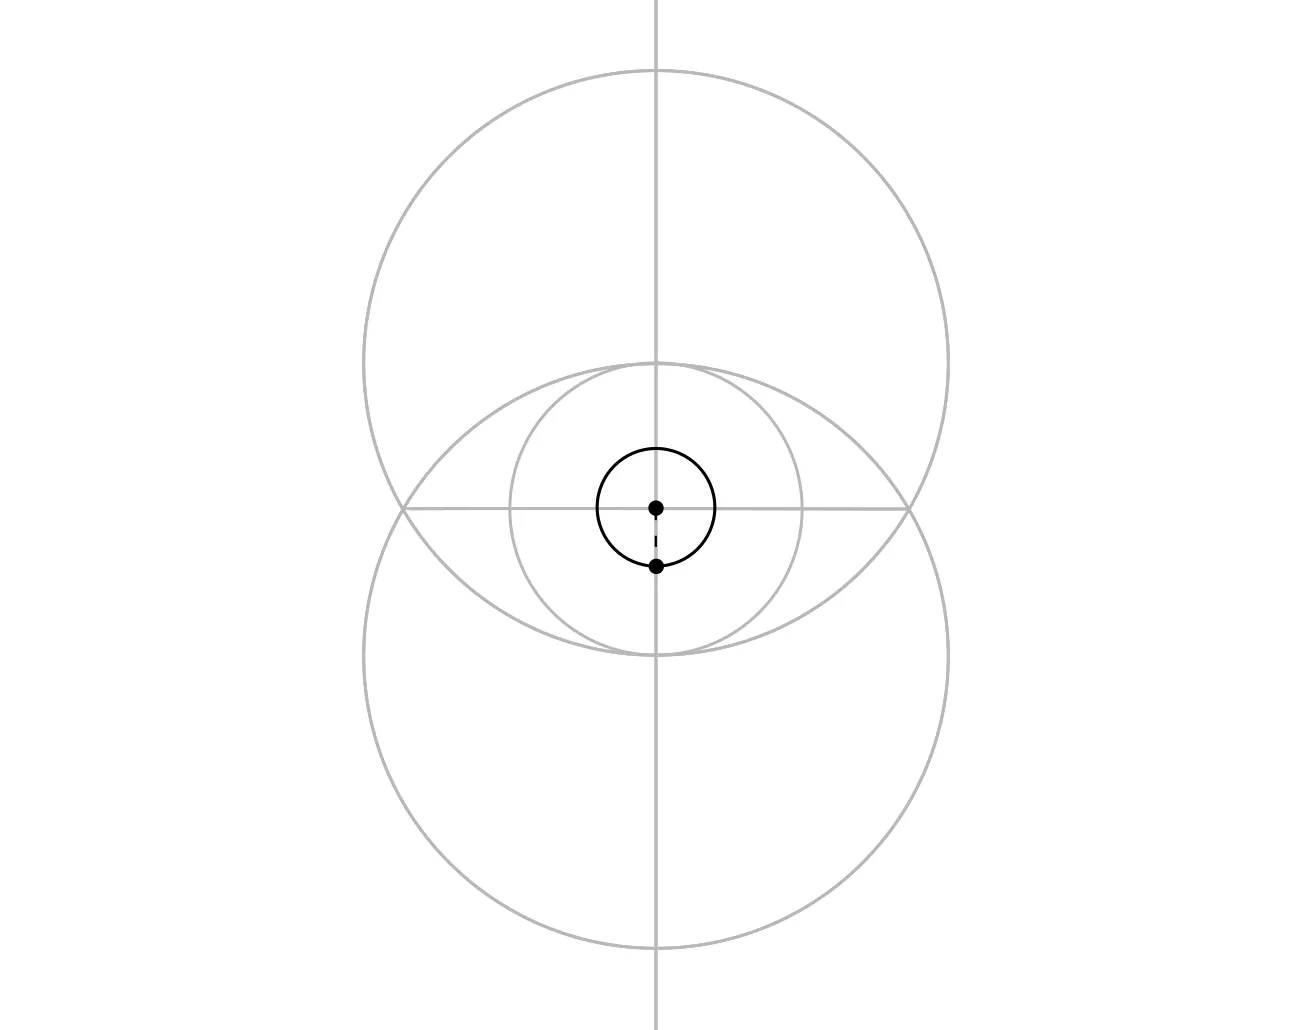
Draw the Iris
Place the compass point where the vertical and horizontal guide lines cross.
Adjust the compass so the pencil reaches the bottom edge of the Vesica Piscis.
Draw a smaller circle.
Draw the Pupil
Keep the compass point at the centre of the eye.
Make the compass width even smaller, then draw one more circle.
Take It In
Pause for a moment and look at what you’ve made.
You can erase the construction lines you no longer need, or leave them faintly visible to show how you built the eye.
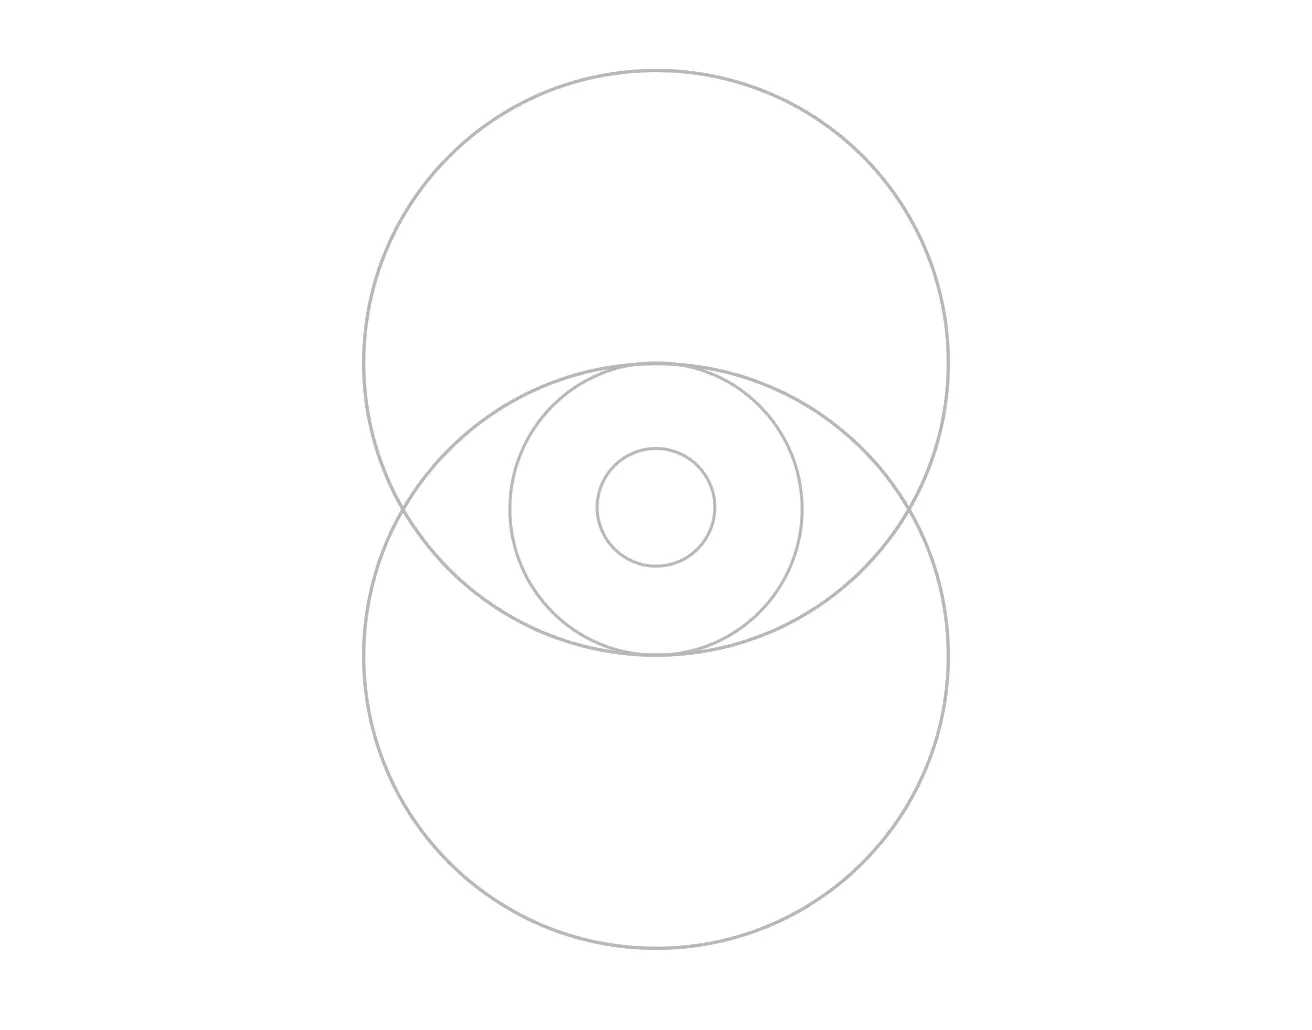
You started with two circles.
Now there’s an eye looking back at you.
Need Another Go?
If your eye looks a little wonky, good news: that’s exactly what practice is for.
Check the Tool Tips, make any small adjustments you need, and try again.
Smudge calls it “an eye for detail.”
Make It Yours
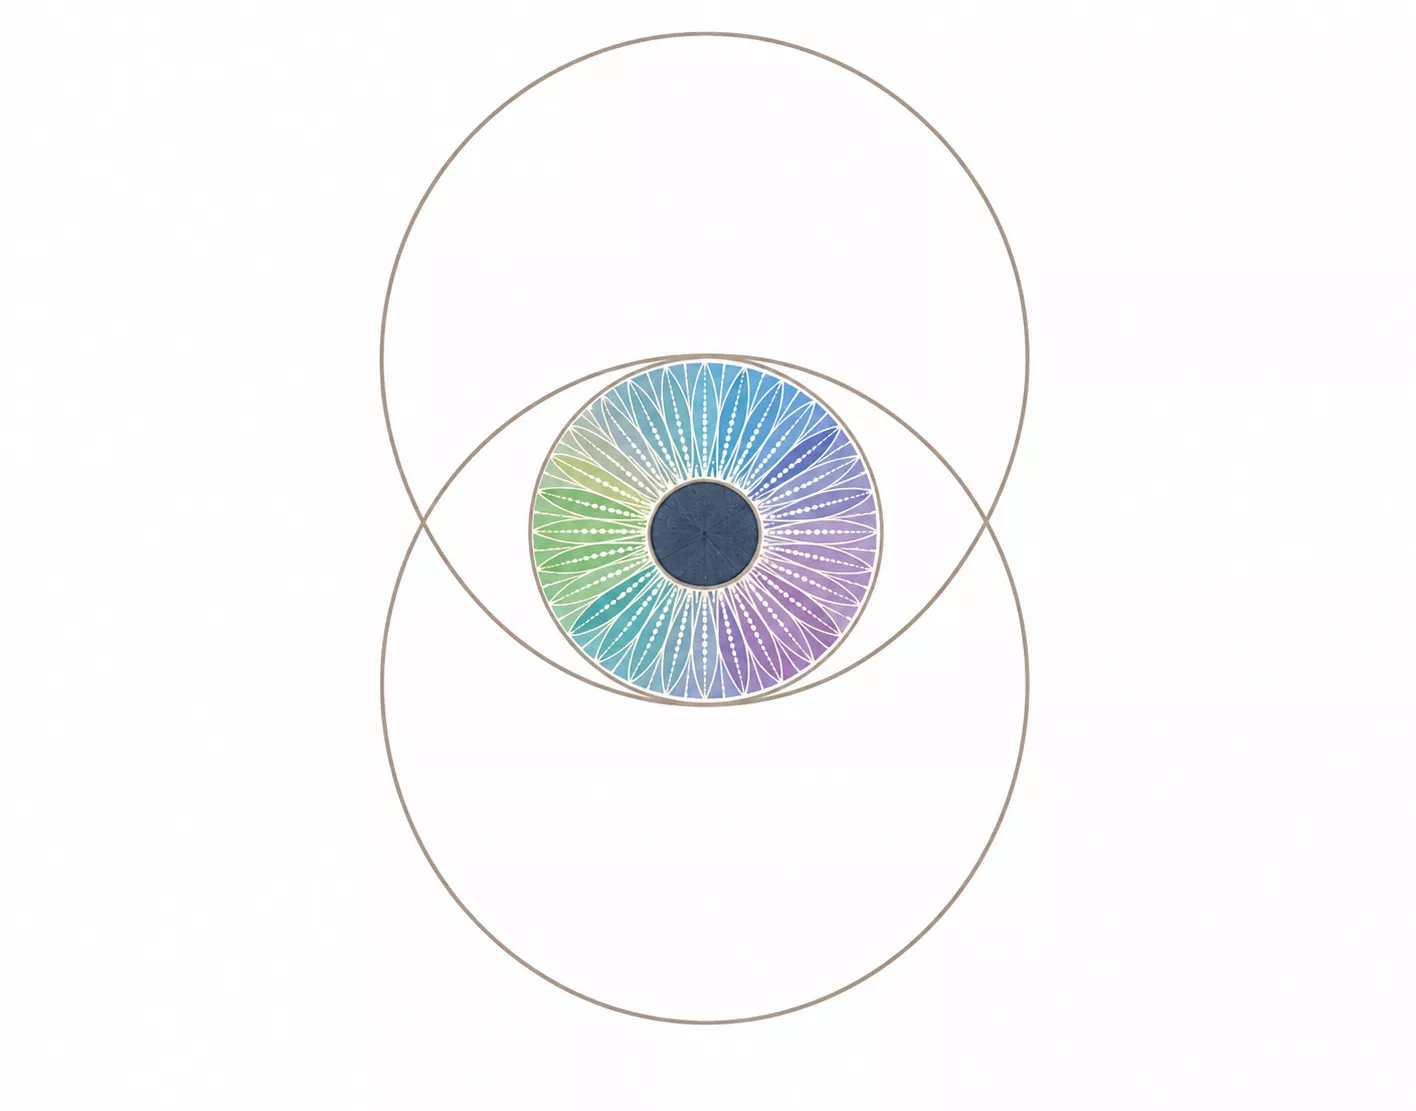
Colour the iris, add patterns, use the outer circles, or turn it into the eye of a creature nobody has seen before.
It could belong to a dragon, an owl, a giant, a robot, or something entirely of your own invention.
Where Next?
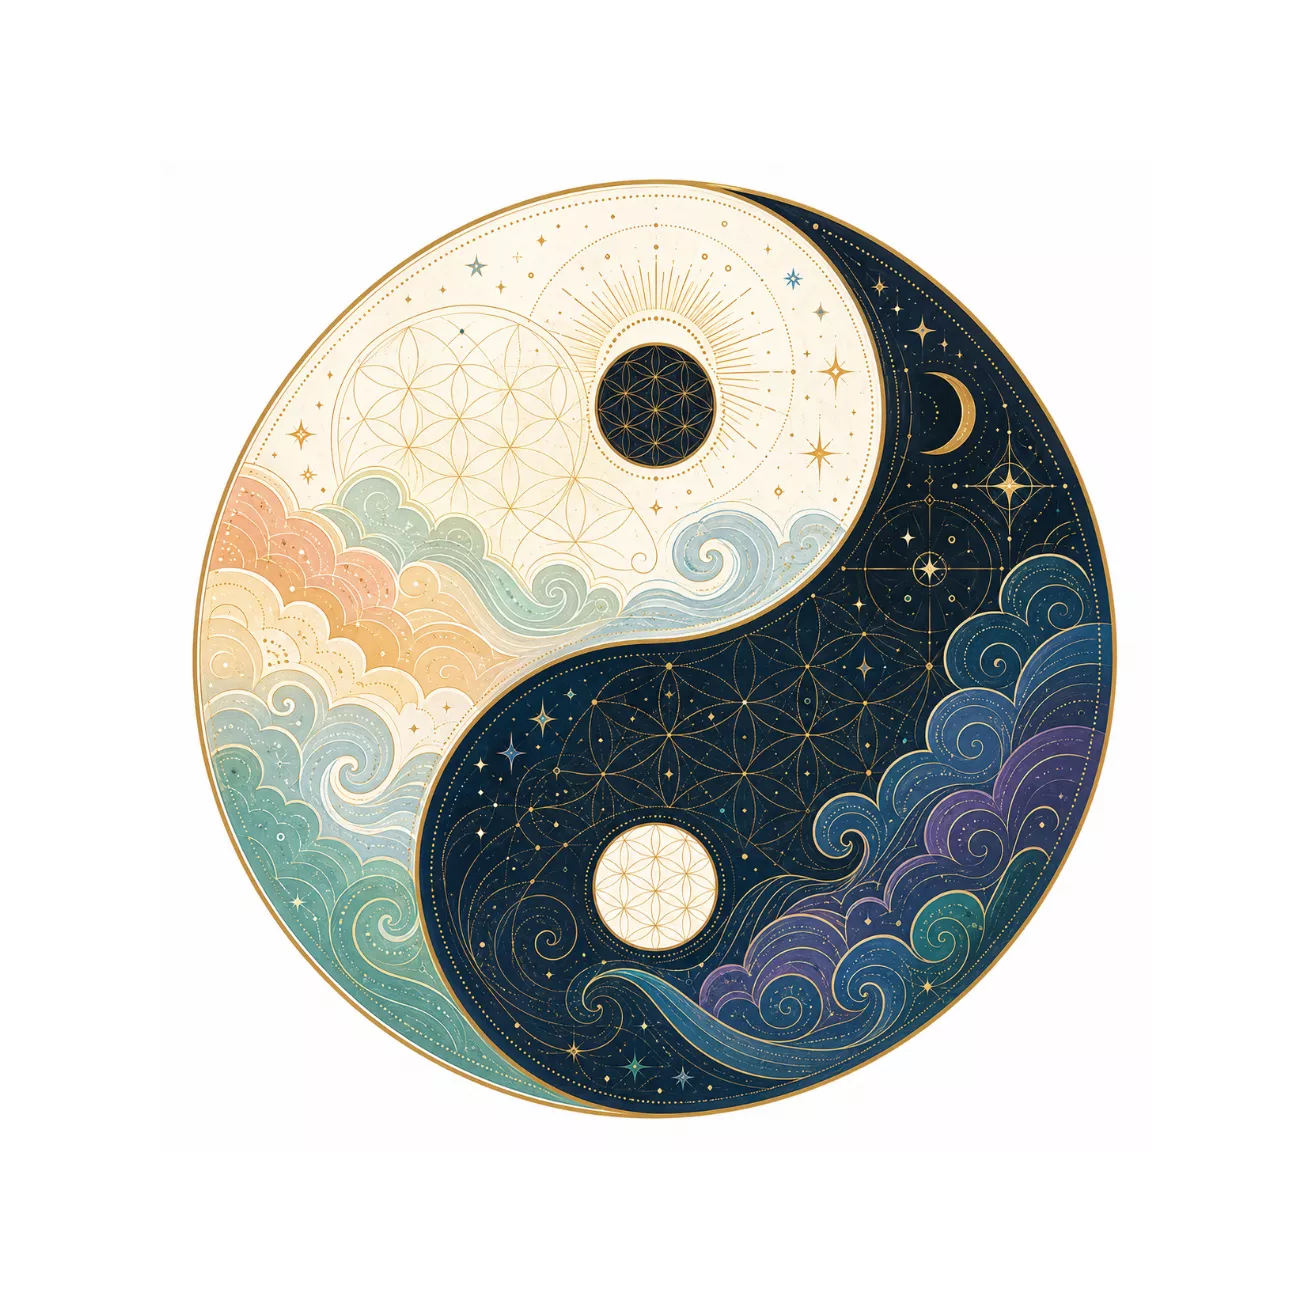
Yin Yang
At a Glance
Get it. Print it. Make it.
Yin Yang
The Yin Yang is one of the most recognisable symbols in the world.
It looks smooth, balanced, and slightly mysterious, which is usually a sign that circles have been involved.
In this task, you’ll build the symbol from scratch using a centre line, a few carefully placed circles, and a little patience.
The printable version gives you the construction to work through on paper at your own pace.
Need a hand with your compass or ruler? Check the Tool Tips before you begin.
Steps
Draw the Centre Line
Use your ruler to draw a light vertical line down the page.
This line will guide the whole symbol, so make it long enough to give yourself room.

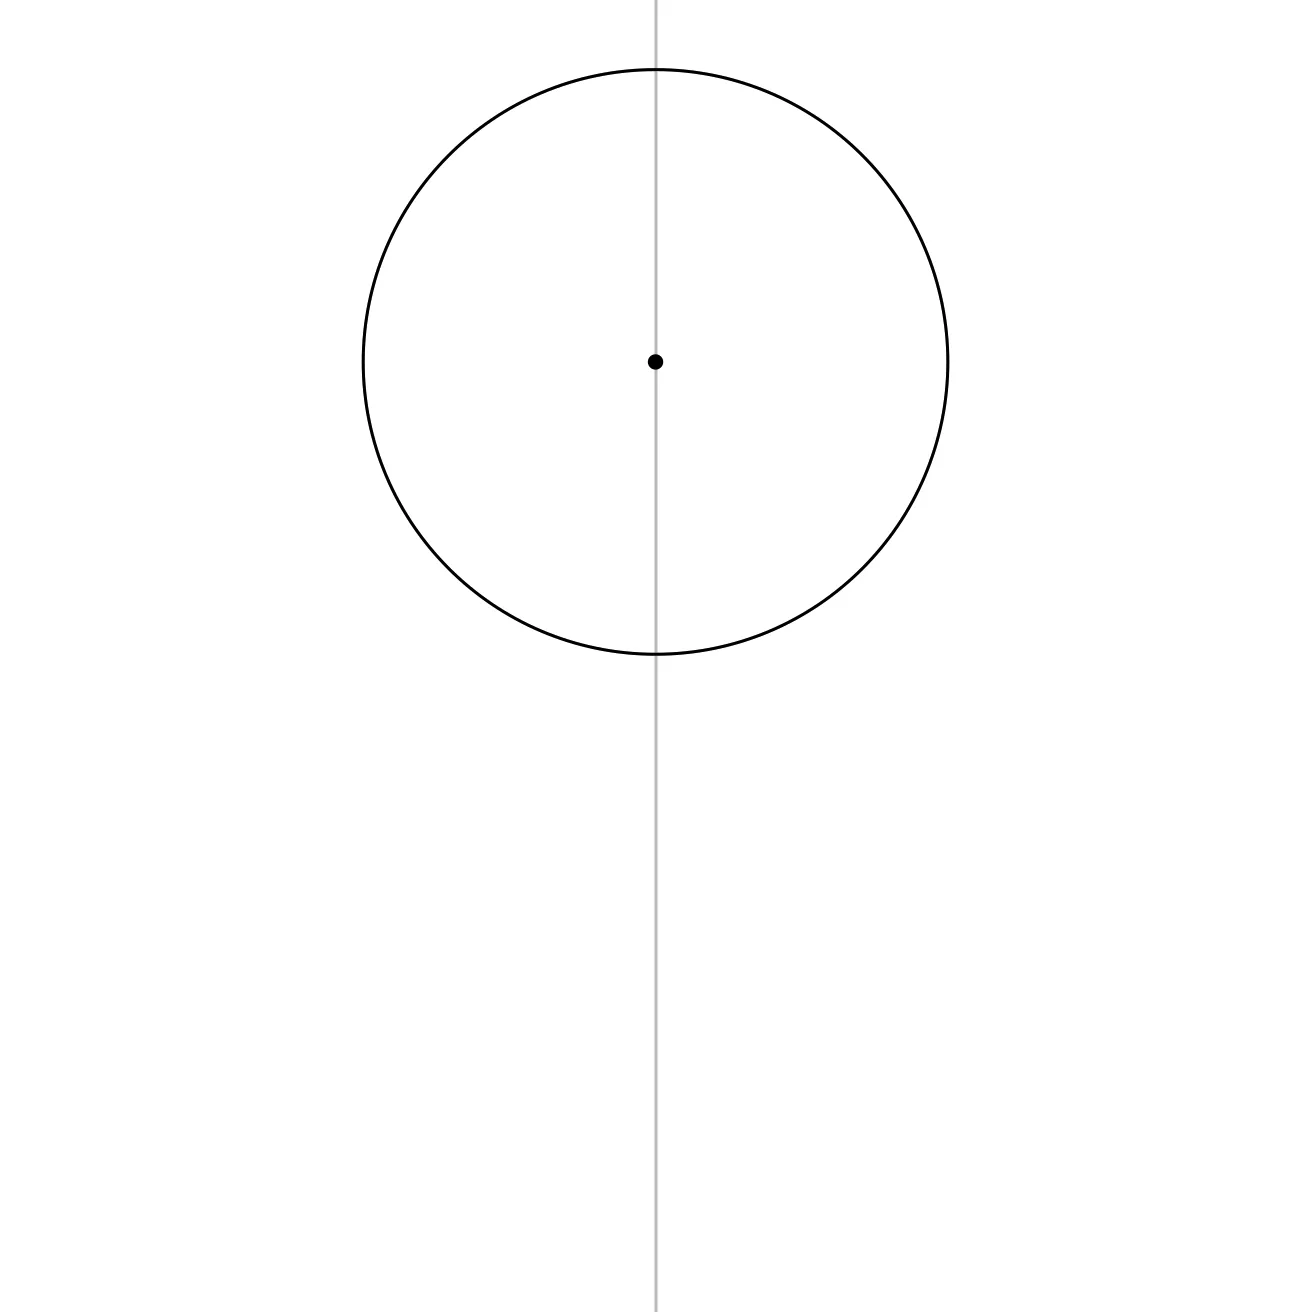
Draw the First Circle
Choose a point higher on the vertical line.
Place your compass point there and draw a circle.
This is the first half of the inner construction.
Add the Second Circle
Keep the same compass width.
Place the compass point below the first circle so the two circles touch at the centre point.
Draw the second circle.
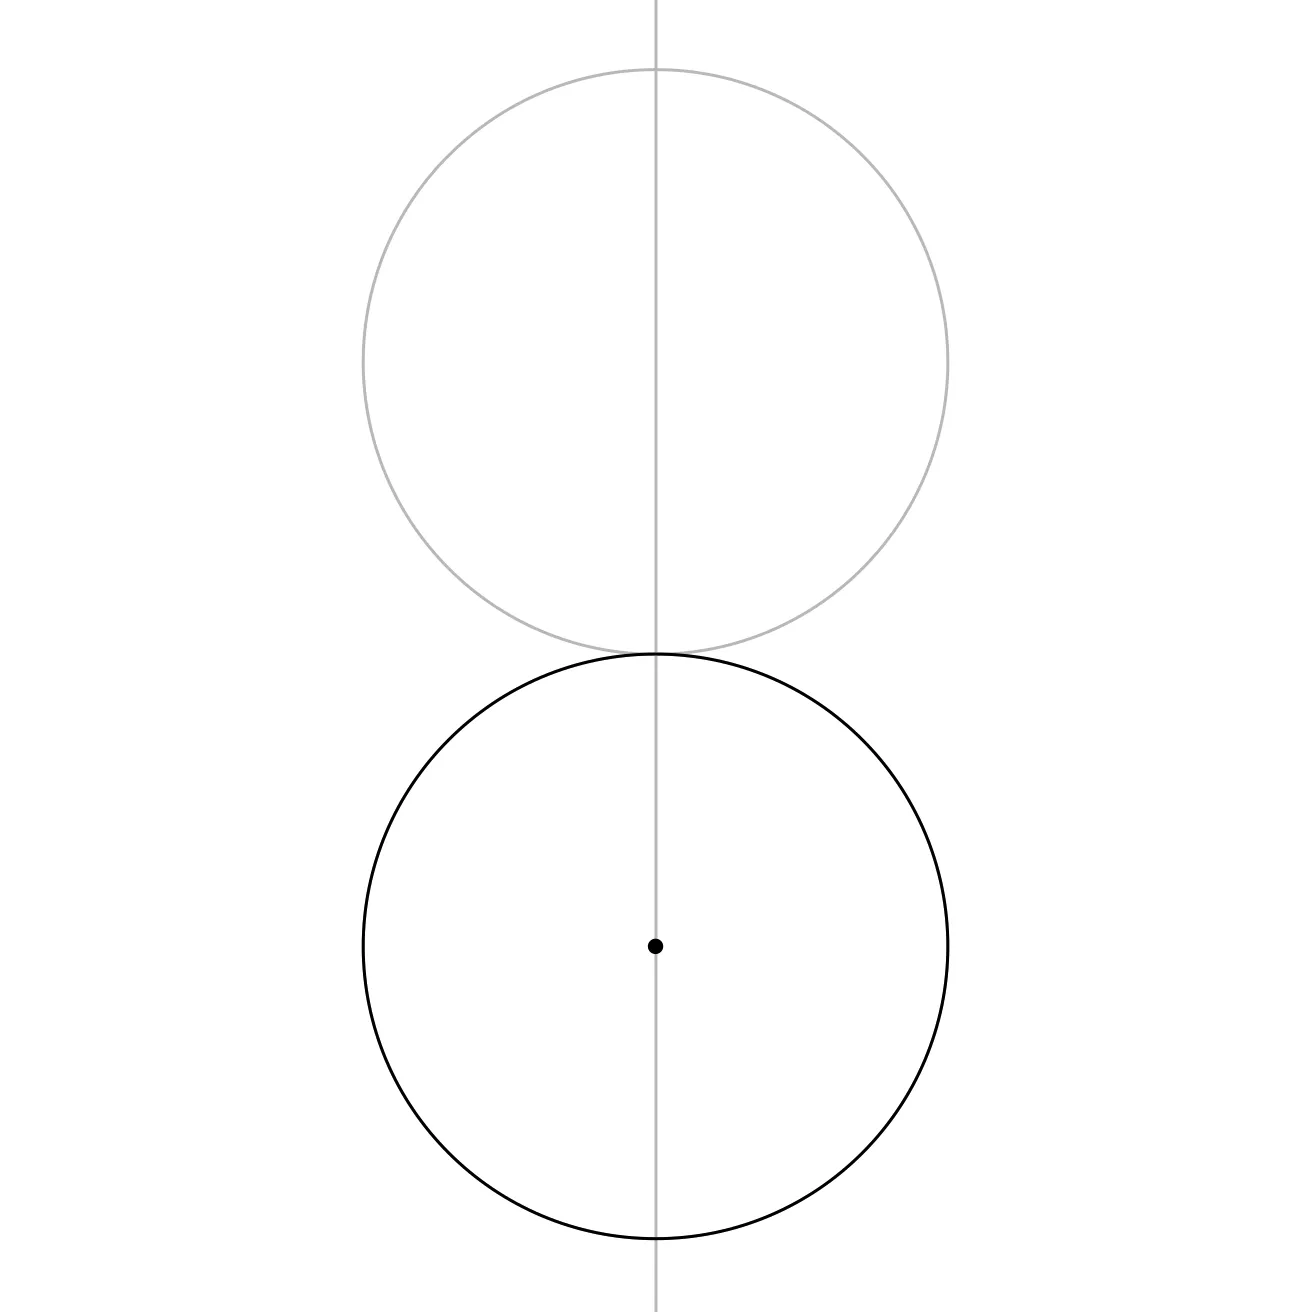
You should now have two equal circles stacked on the vertical line.
Draw the Outer Circle
Place the compass point where the two smaller circles meet.
Open the compass so the new circle surrounds both smaller circles.
Draw the outer circle.
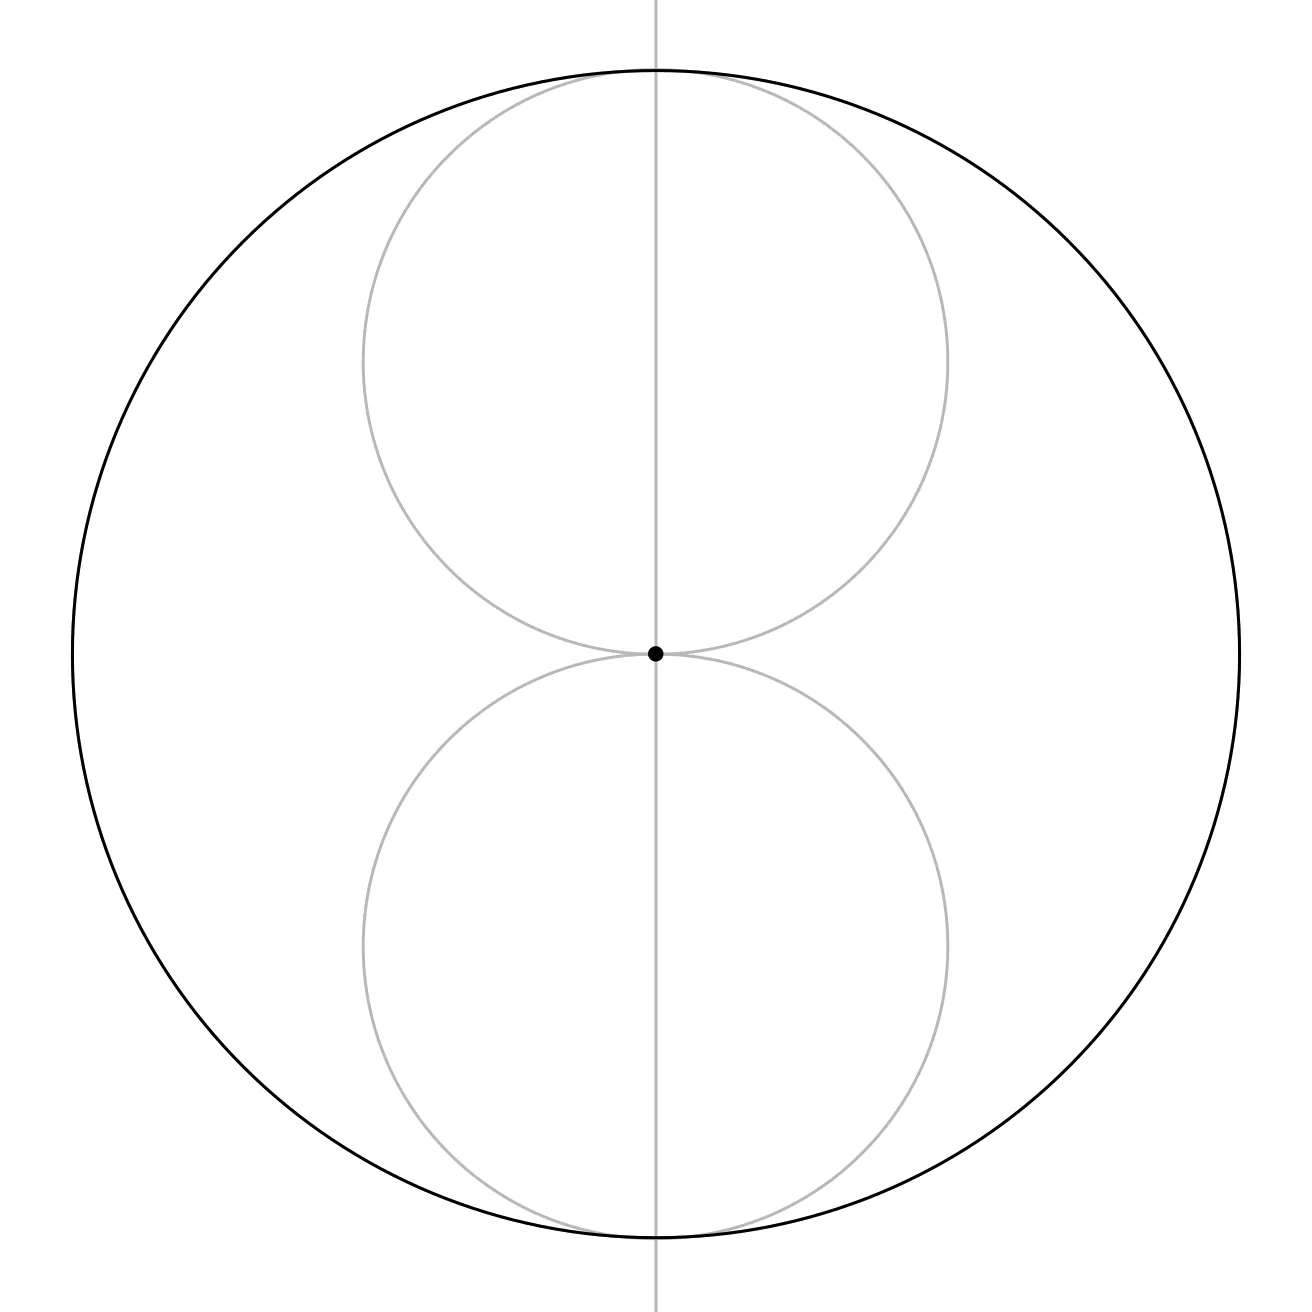
This outer circle holds the whole symbol together.
Very responsible behaviour from a circle.
Add the Two Small Circles
Draw a small circle in the centre of the top circle.
Then draw another in the centre of the bottom circle.
These small circles become the two dots inside the Yin Yang symbol.
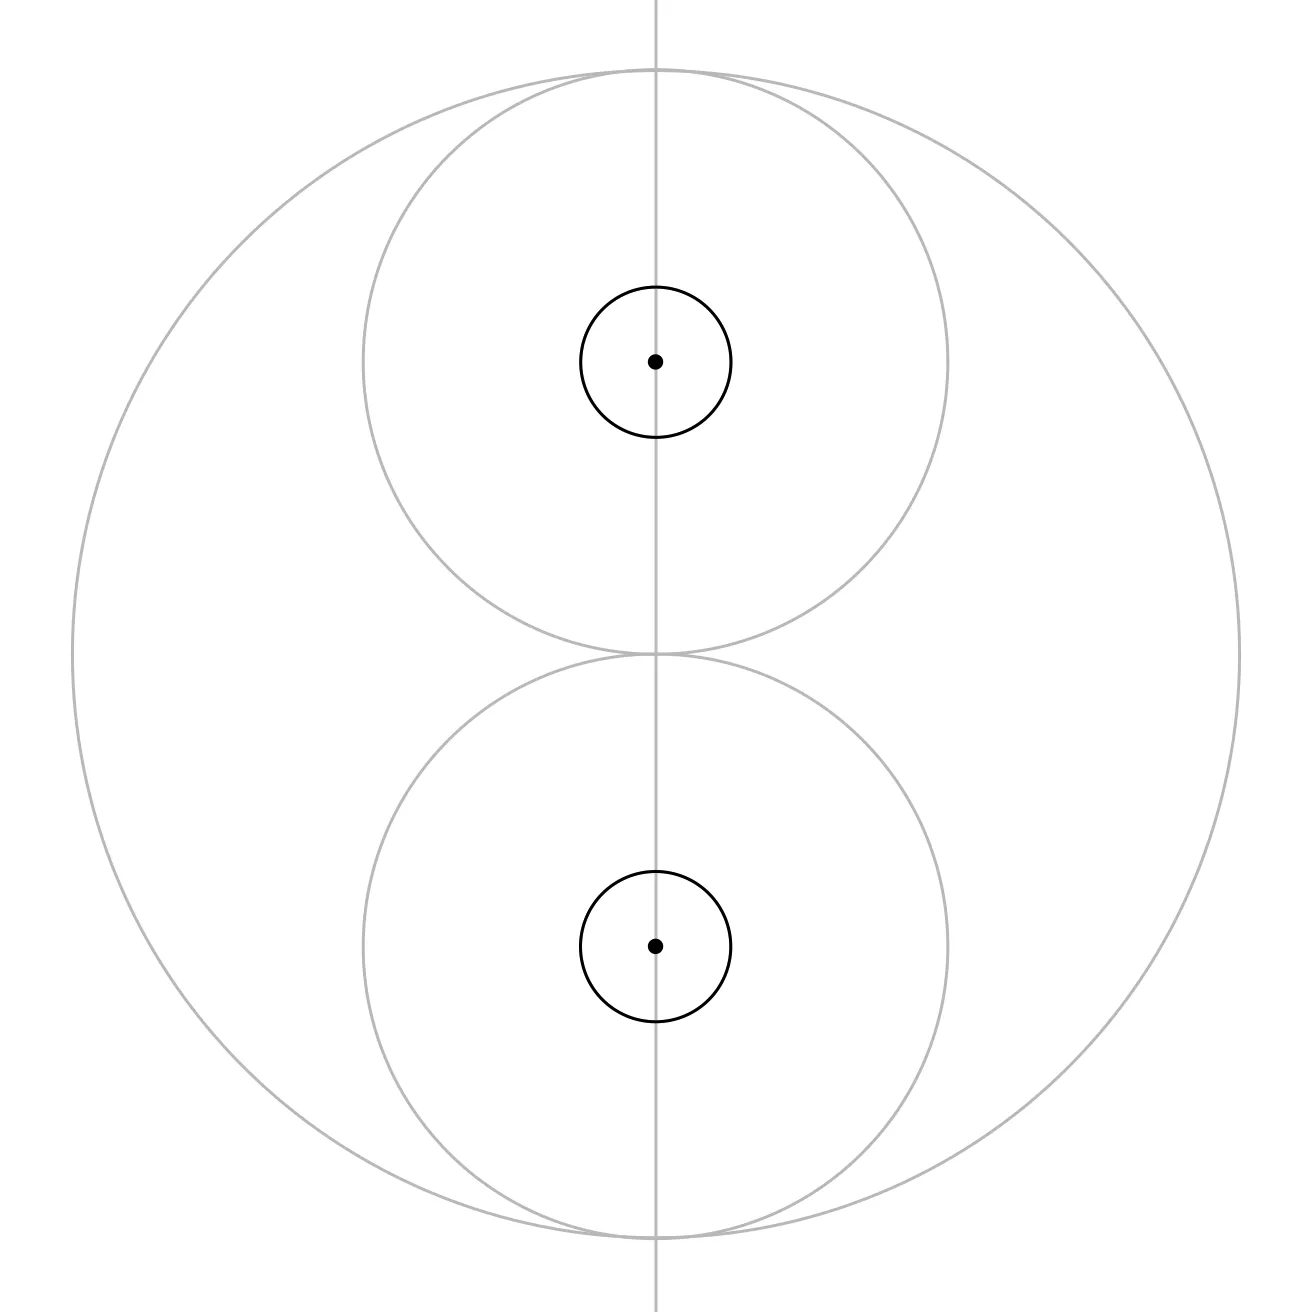
Trace the Final Shape
Now choose the final lines.
Keep the outer circle, the flowing S-shaped curve made by the two inner circles, and the two small circles.
Lighten or erase the construction lines you no longer need.
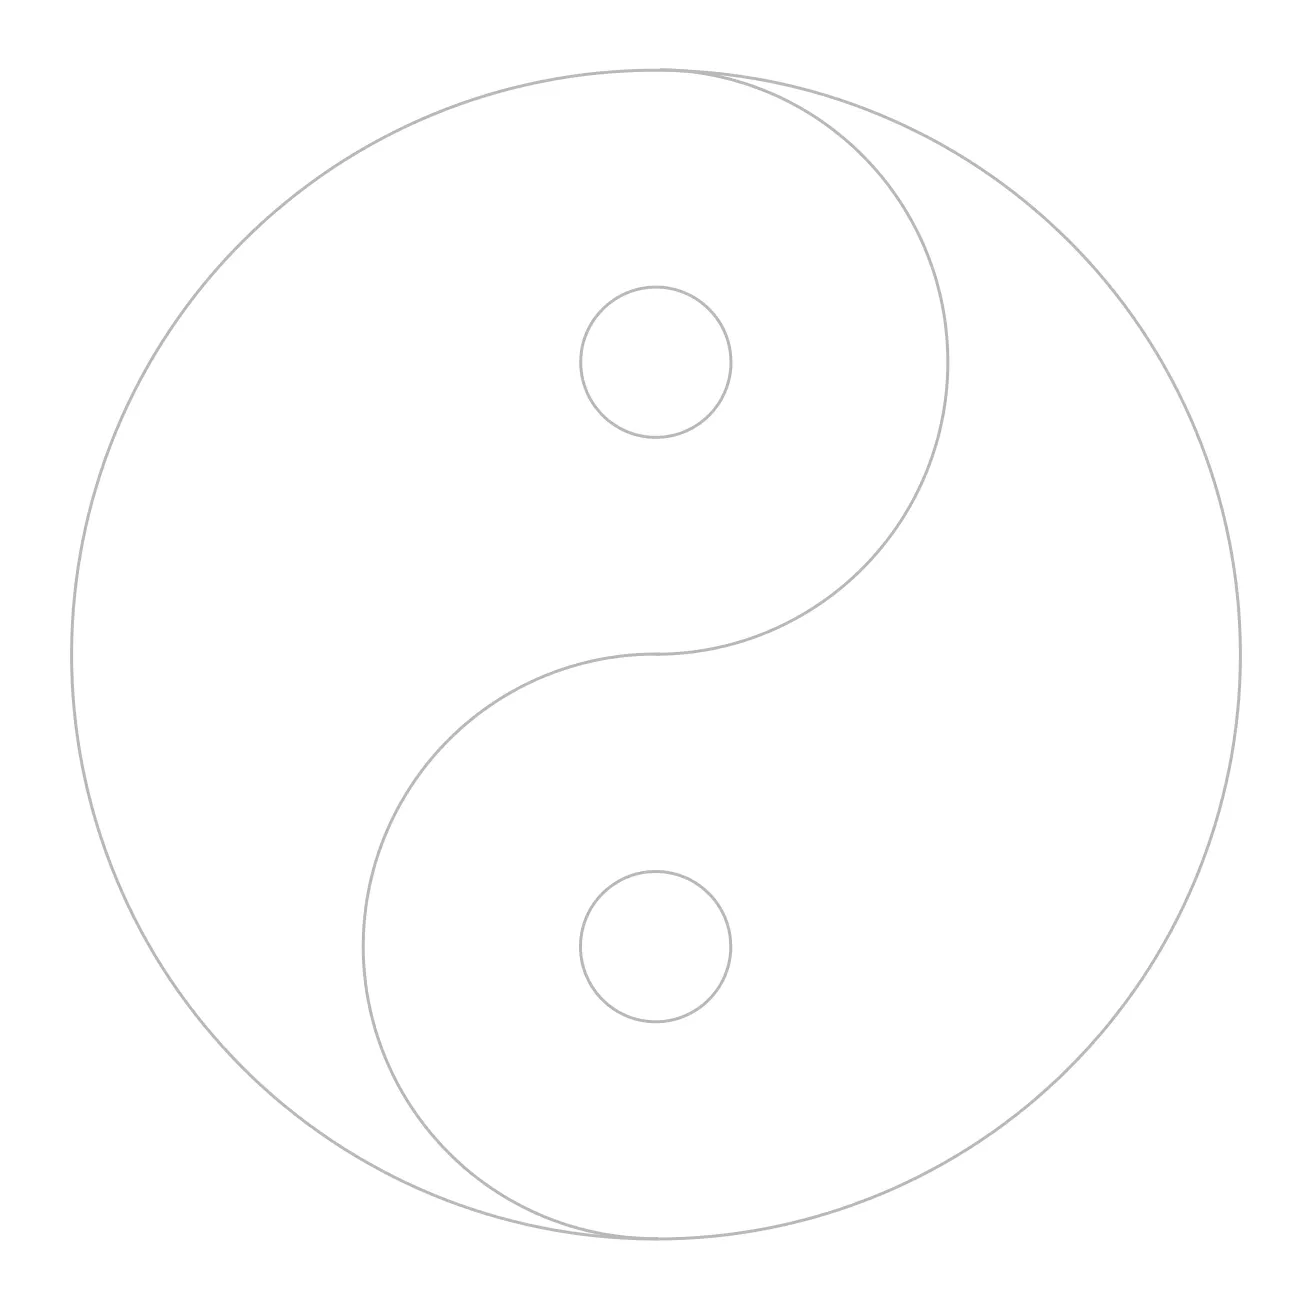
The Yin Yang symbol should now be clear.
Take It In
Pause for a moment and look at what you’ve made.
You started with a straight line and a handful of circles.
Now there’s a balanced symbol on the page.

Need Another Go?
If your symbol looks uneven, check that the two inner circles are the same size and sit neatly on the vertical line.
The centre of the outer circle should be where the two inner circles meet.
If that point is off, the symbol can lose its balance.
Make It Yours
You can try the classic version by colouring one side dark and leaving the other side light.
Then colour the small dots the opposite way.
You can also experiment with two colours, two patterns, or two textures.
The important idea is contrast: two different sides that still belong to one whole.
Where Next?
Little Flower
At a Glance
Get it. Print it. Make it.
Little Flower
In this task, you’ll begin with one simple circle. Then you’ll repeat the same compass width twice more.
That’s all.
Three circles.
One shared measurement.
And somehow, a flower appears.
The printable version gives you the construction to work through on paper at your own pace.
Need a hand with your compass? Check the Tool Tips before you begin.
Steps
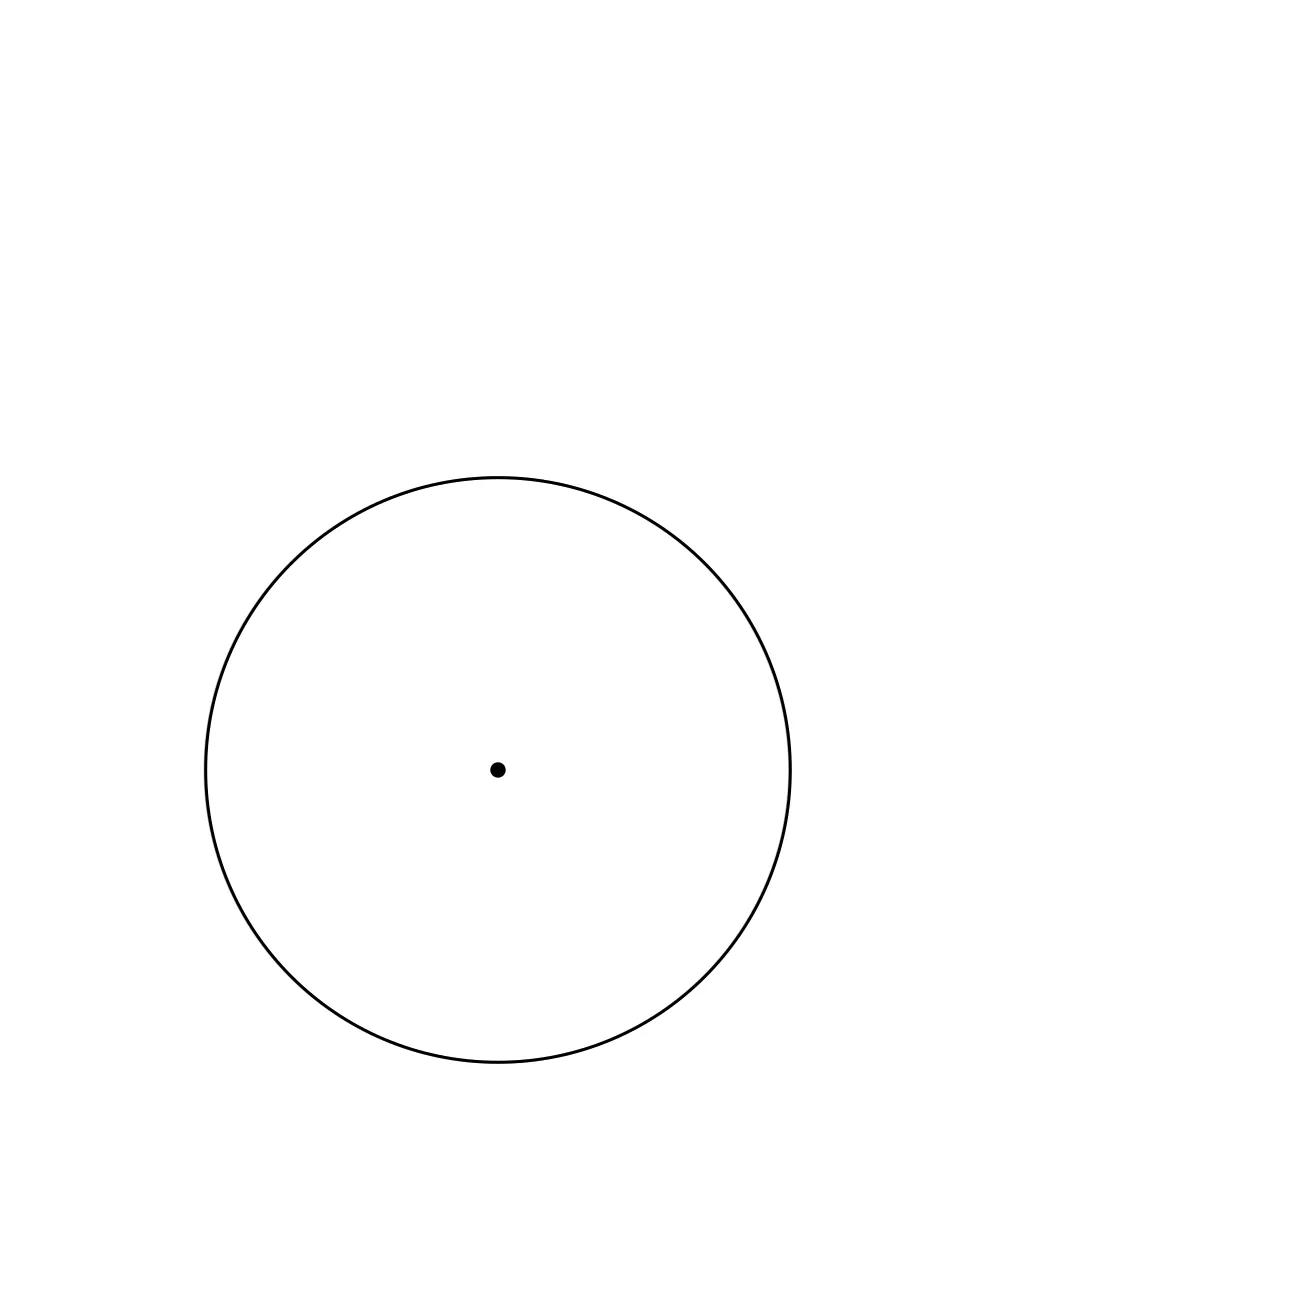
Draw the First Circle
Choose a point near the middle of the page, ever so slightly toward the left and bottom.
Place the compass point there and draw a single circle.
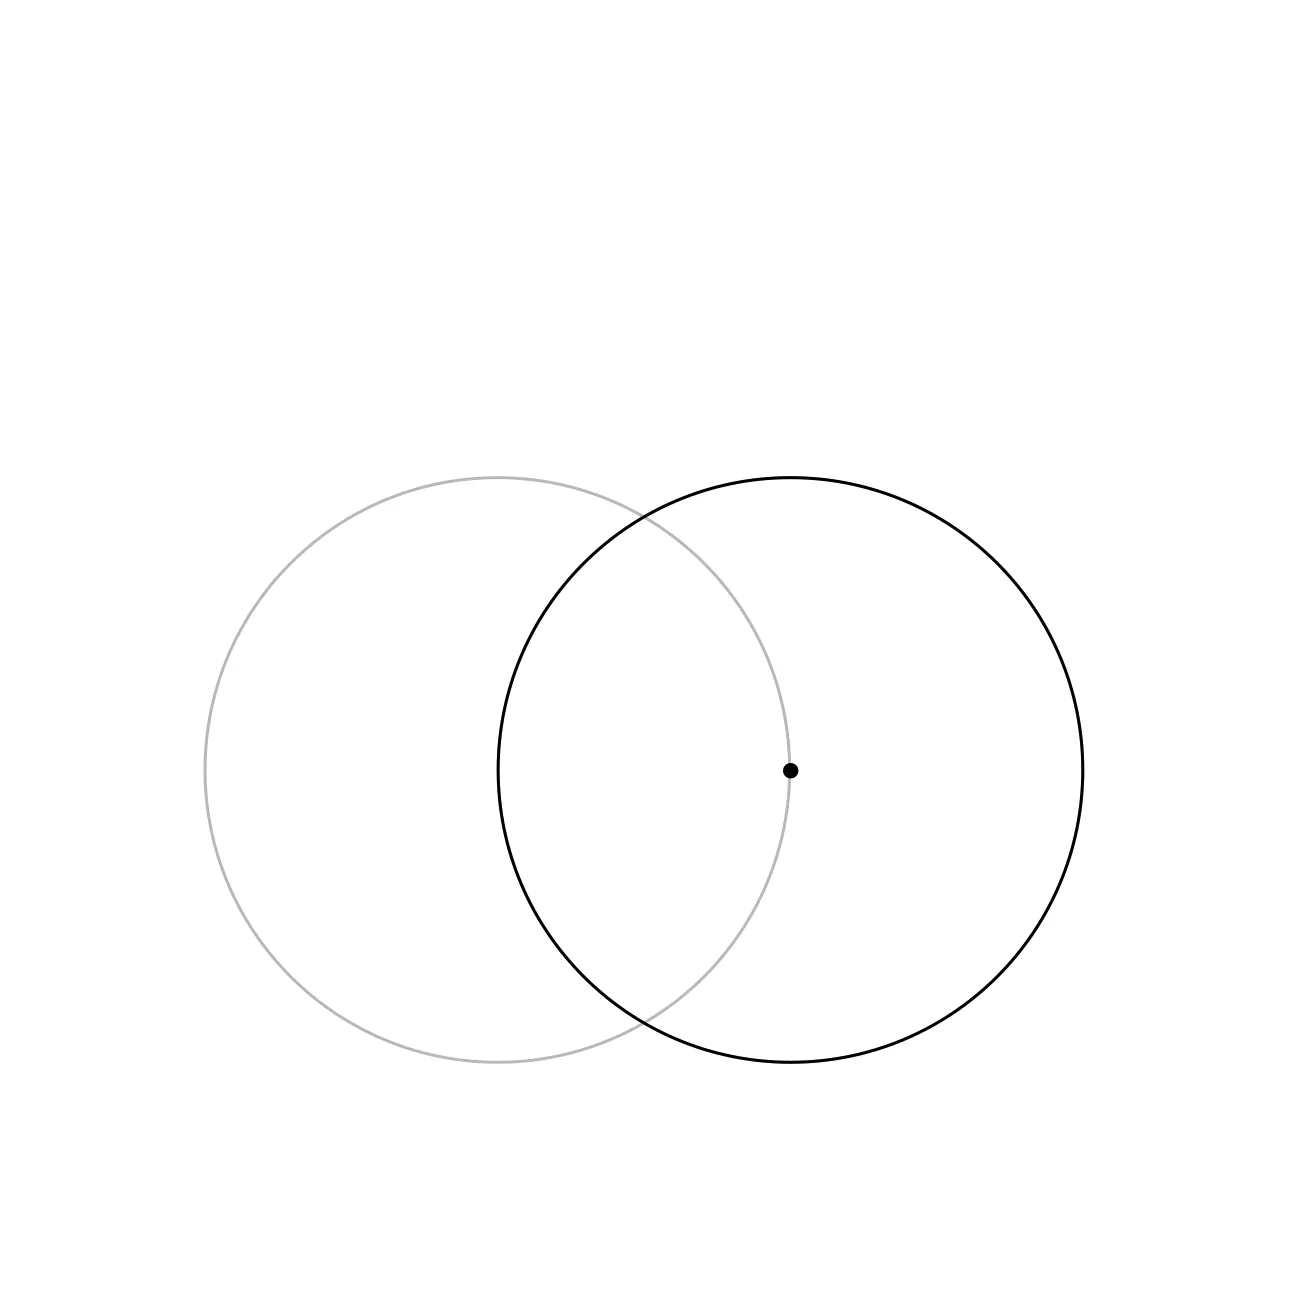
Add the Second Circle
Without changing the compass width, place your compass point on the right edge of the first circle.
Draw a second circle.
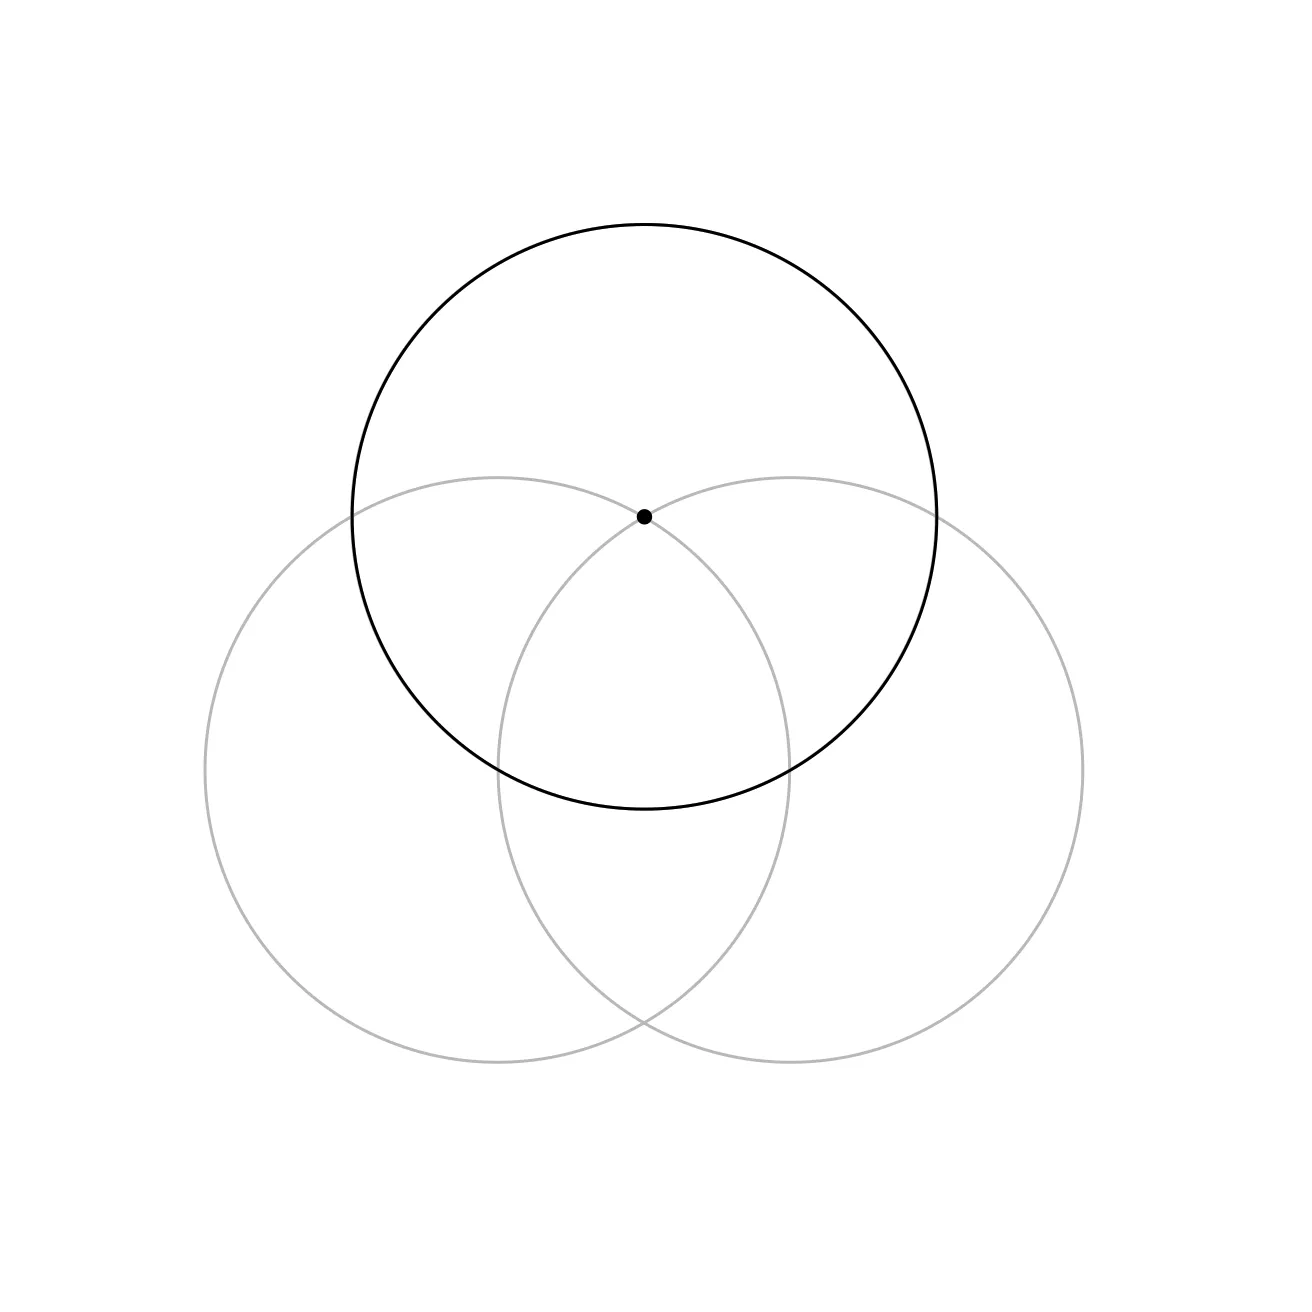
Add the Third Circle
Look at the point where the two circles cross at the top.
Place your compass point there.
Draw a third circle, using the same compass width.
Take It In
Pause for a moment and look at what you’ve made.
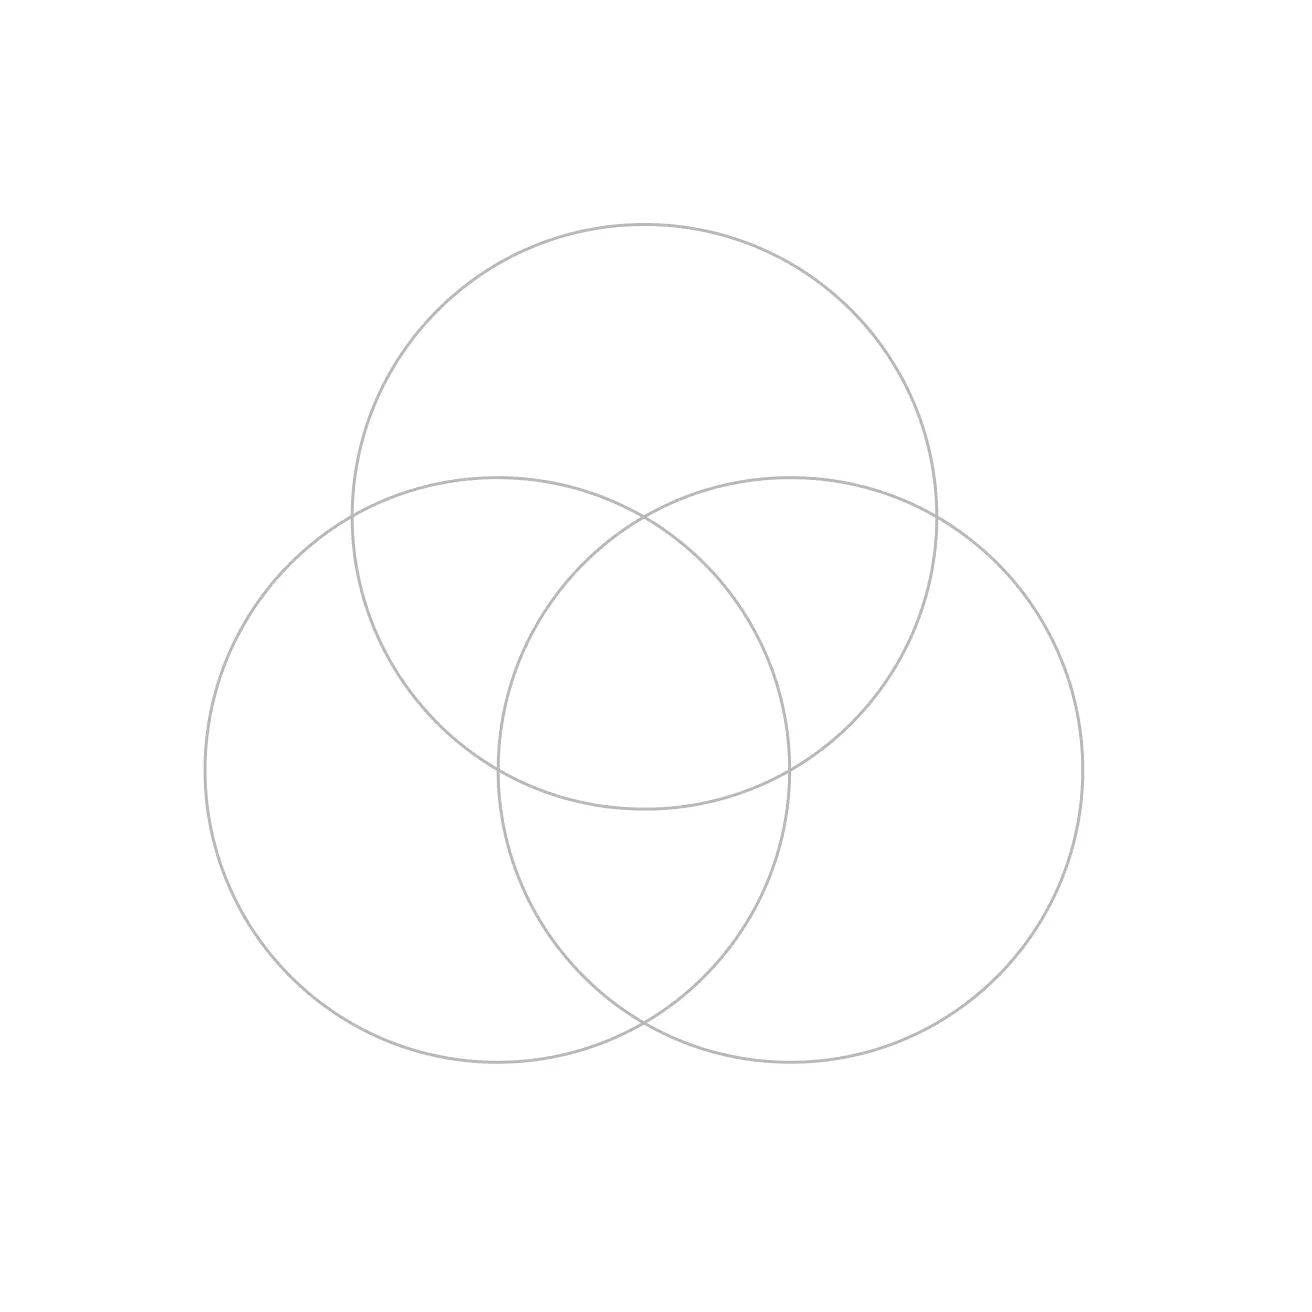
Three equal circles have created a little flower.
Simple rules. Beautiful results.
Smudge is quietly impressed.
Biscuit is checking whether this counts as gardening.
Magic!
Need Another Go?
If the flower looks uneven, check your compass width. All three circles should be the same size.
The trick is to set the compass once, then keep that same width.
If something looks slightly off, don’t worry. Look again, adjust carefully, and redraw where needed.
Make It Yours
Colour the petals, add a small centre, or decorate the outside.
You could make your flower soft and simple, bright and bold, or slightly mysterious.
Where Next?
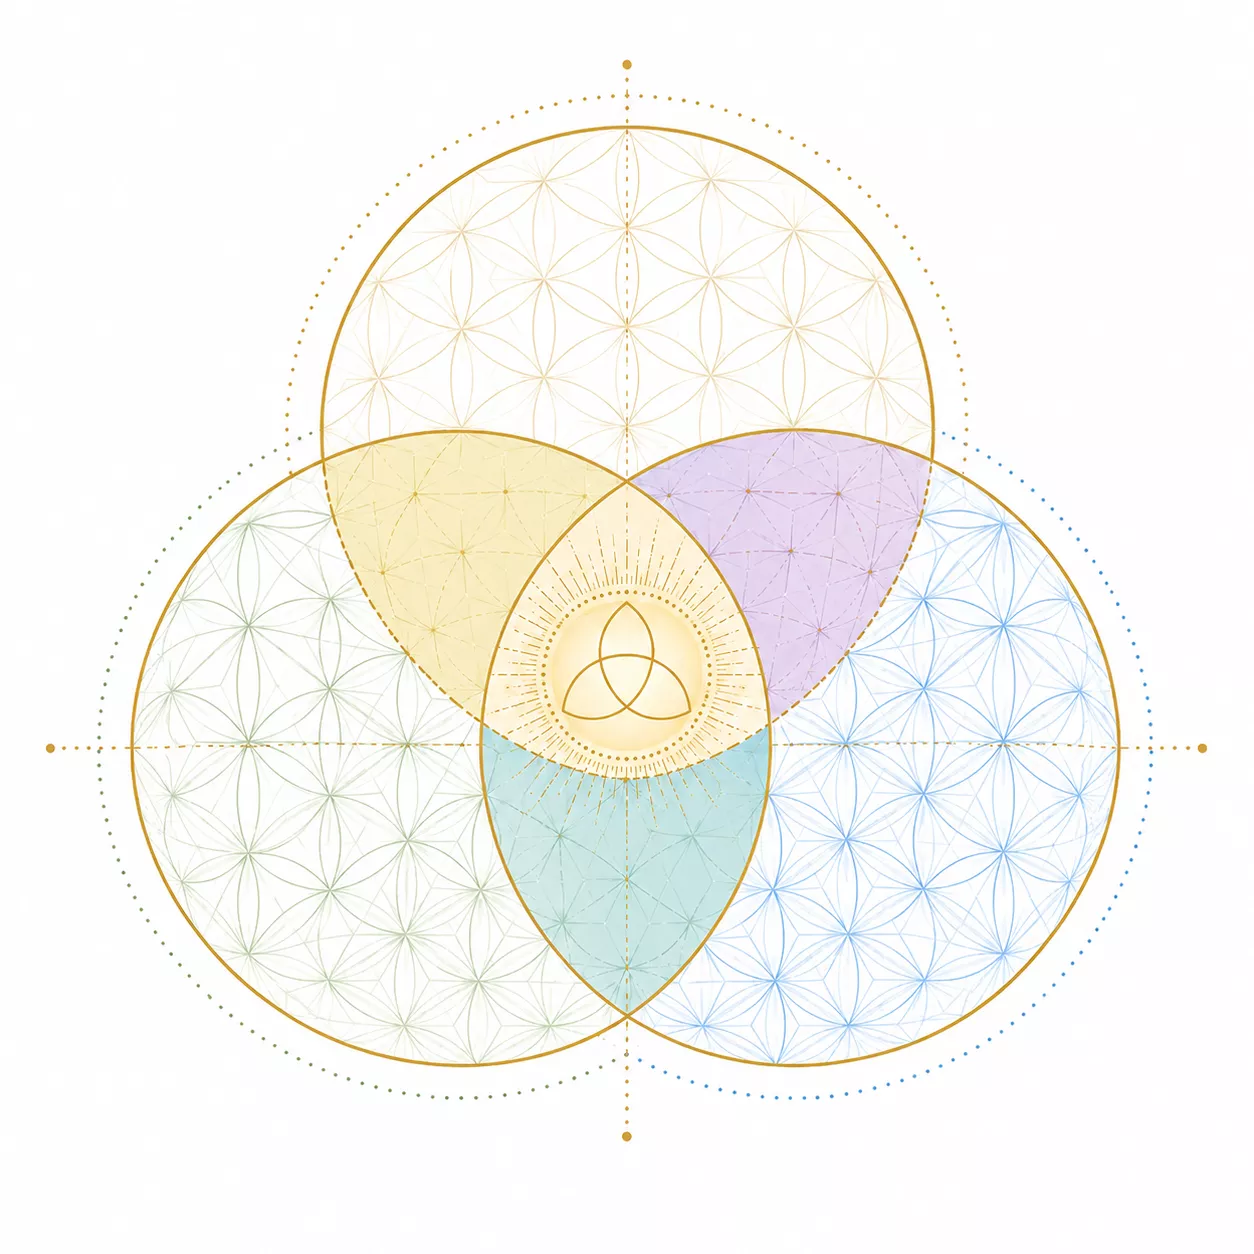
Flower of Life
At a Glance
Get it. Print it. Make it.
Flower of Life
The Flower of Life is a flower-like pattern with sixfold symmetry. It looks complicated, but it's really not.
It's made by doing one simple thing again and again: placing the compass point on a crossing point, then drawing another circle with the same width. That's it.
You begin with the Seed of Life. Then you keep growing the pattern outward. Easy!
The printable version gives you the construction to work through on paper at your own pace.
Steps
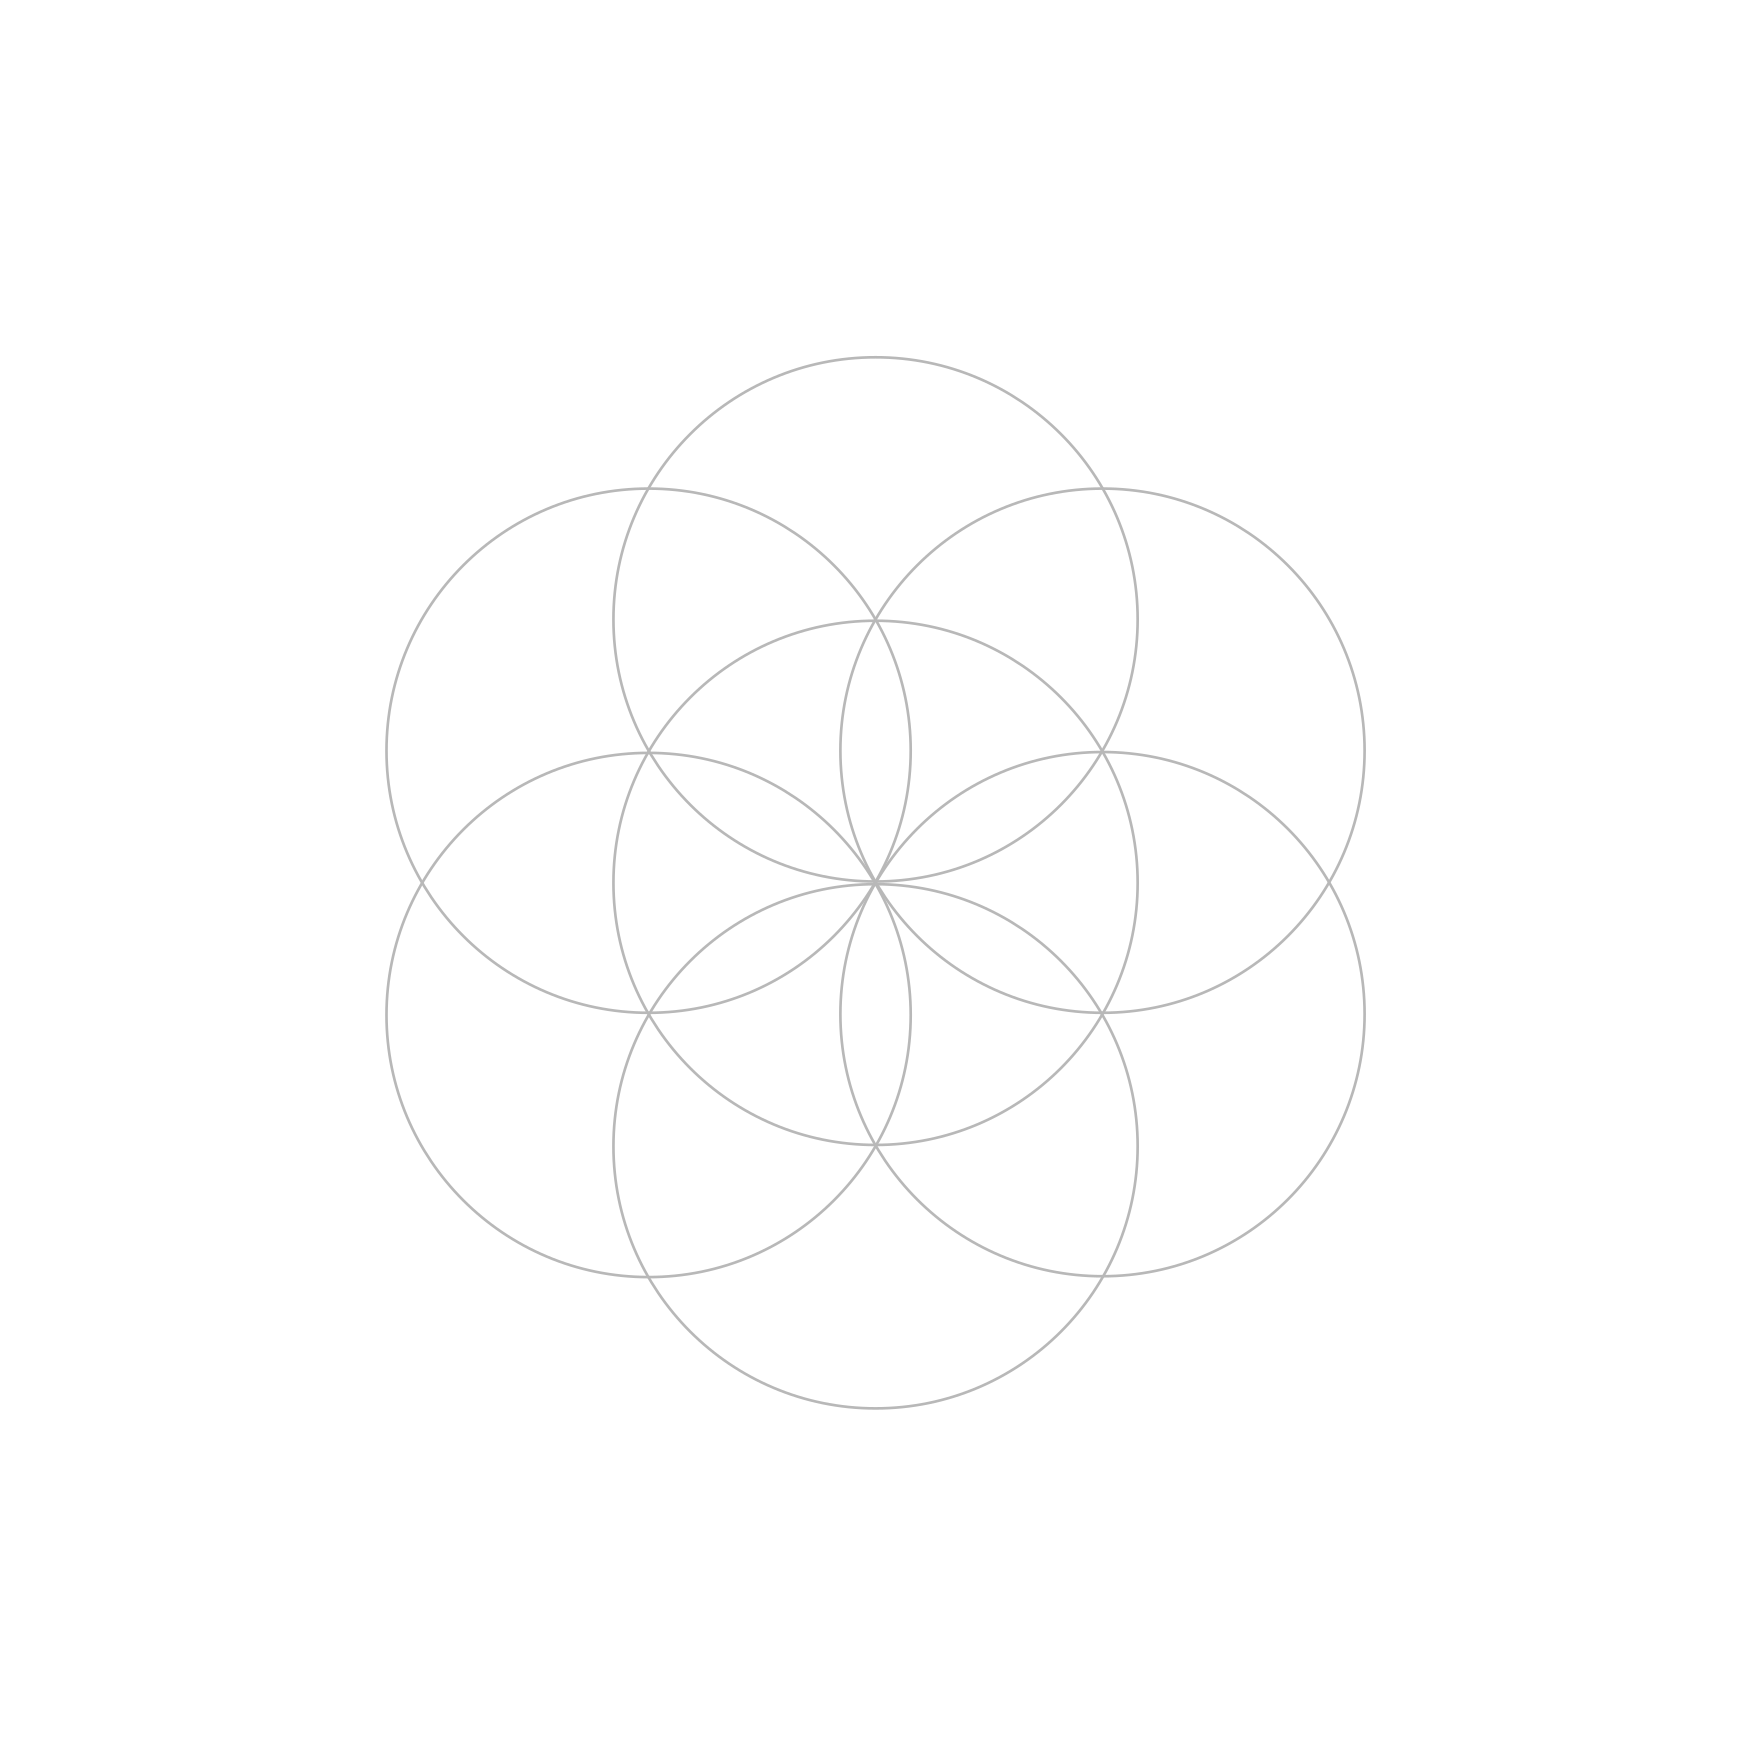
The Seed of Life
Begin with a neat Seed of Life pattern.
You should have one circle in the centre and six circles around it, all drawn with the same compass width.
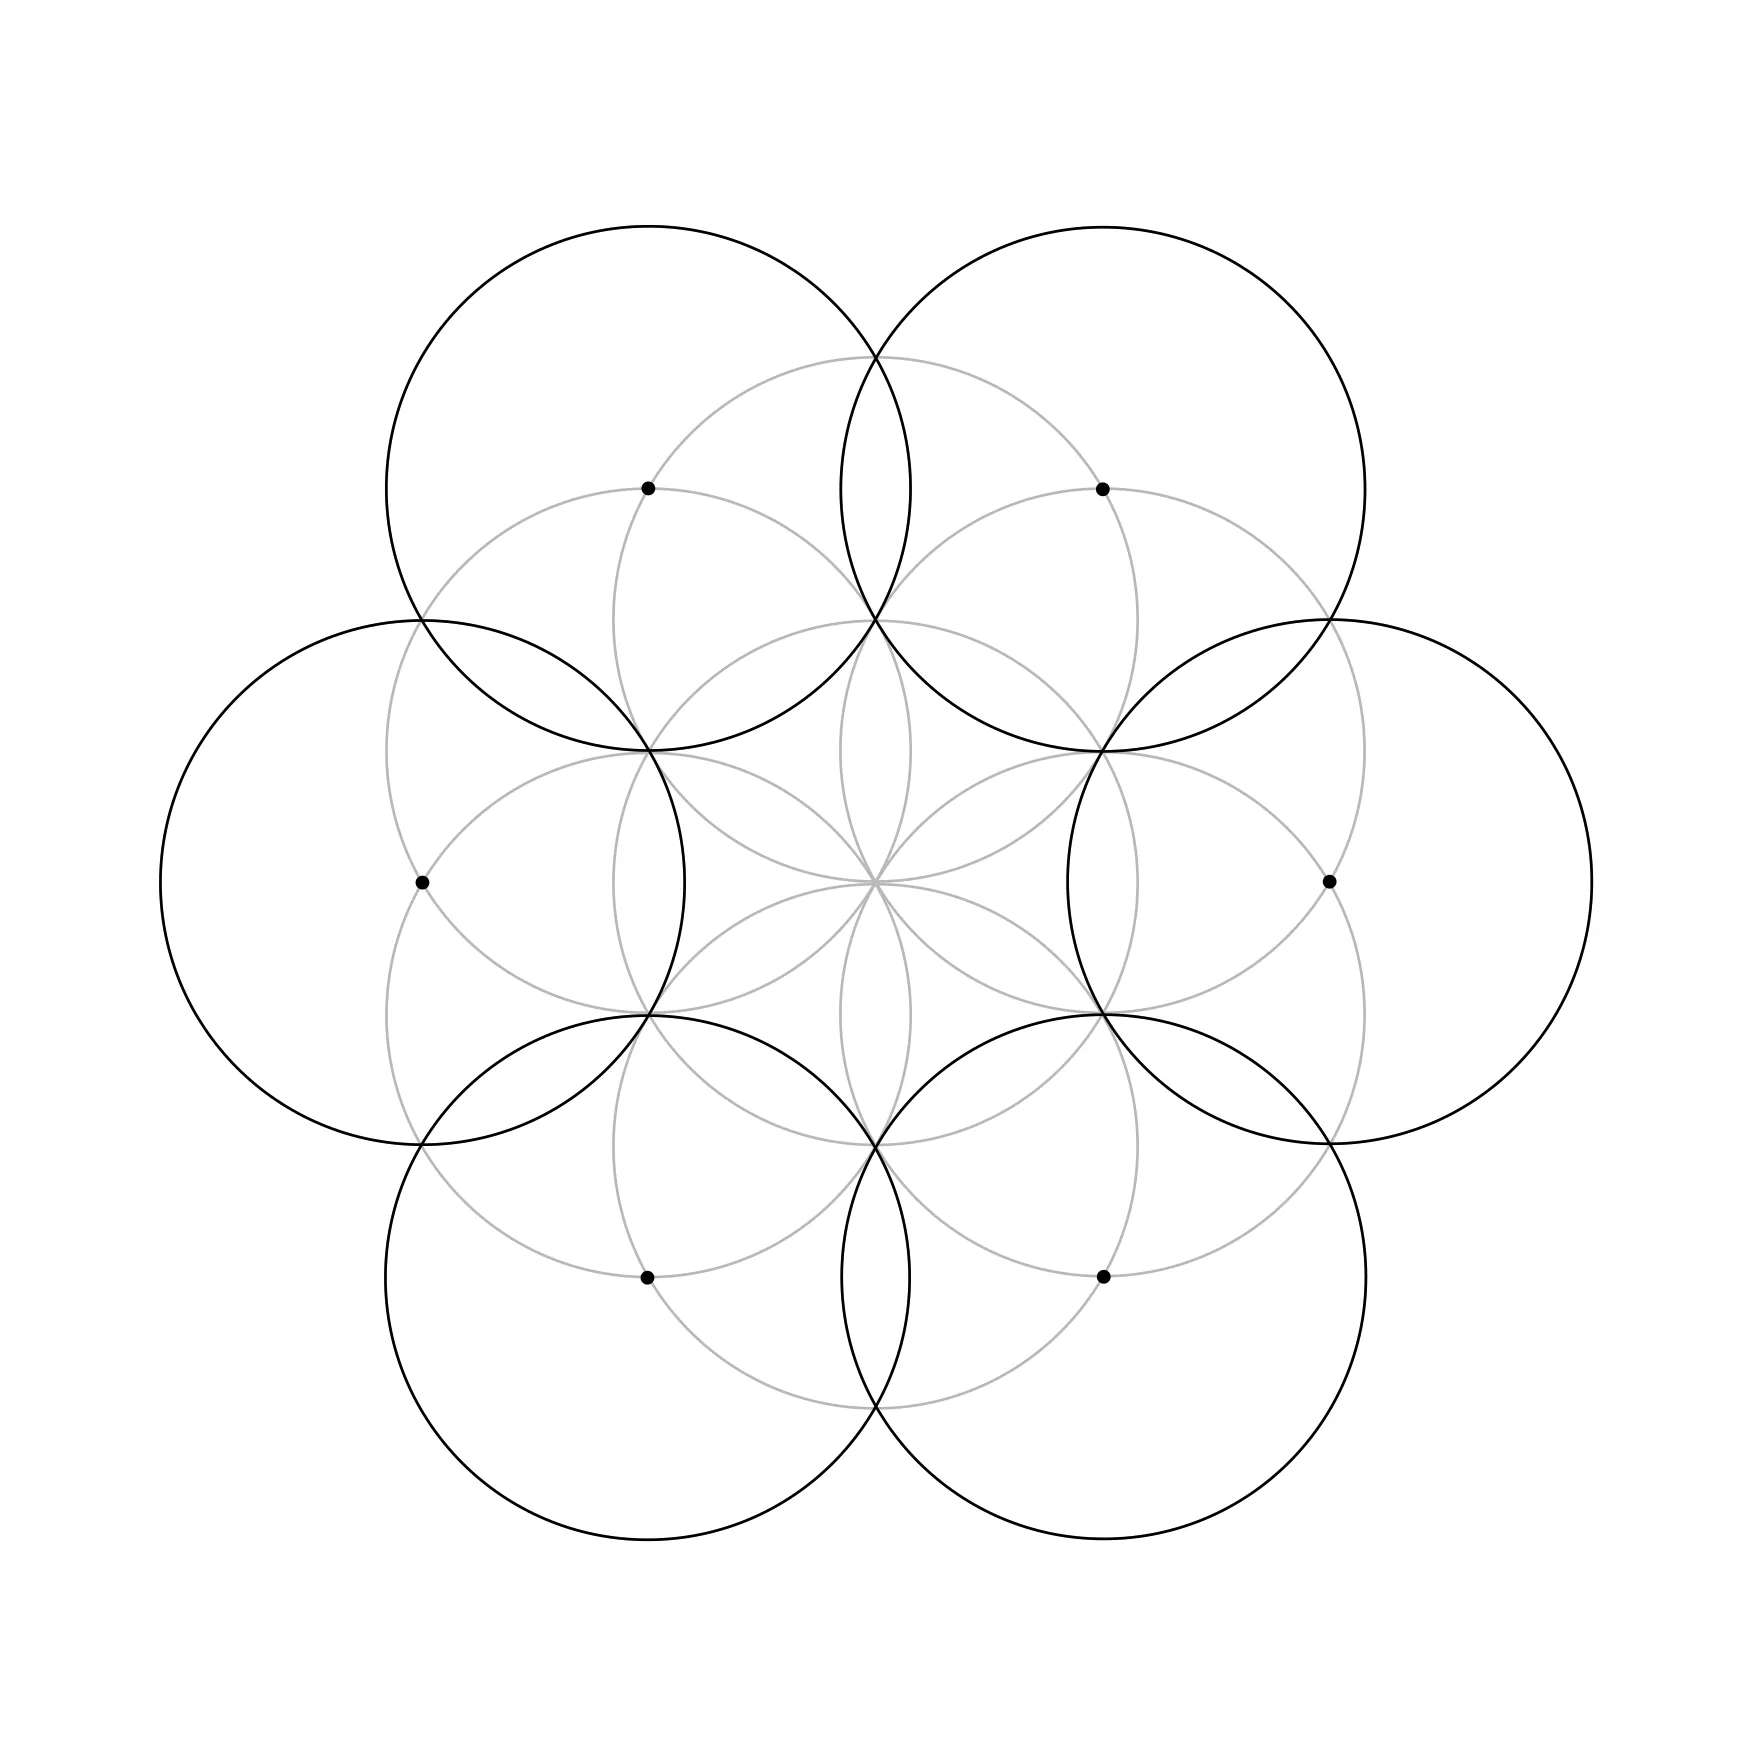
Add the Outer Circles
Look for the crossing points around the outside of the Seed of Life.
Place the compass point on one of those crossing points and draw a new circle.
Repeat this all the way around the outside of the pattern.
Fill the Gaps
Now use the next set of outside crossing points.
Place the compass point carefully on each marked point and draw another circle using the same compass width.
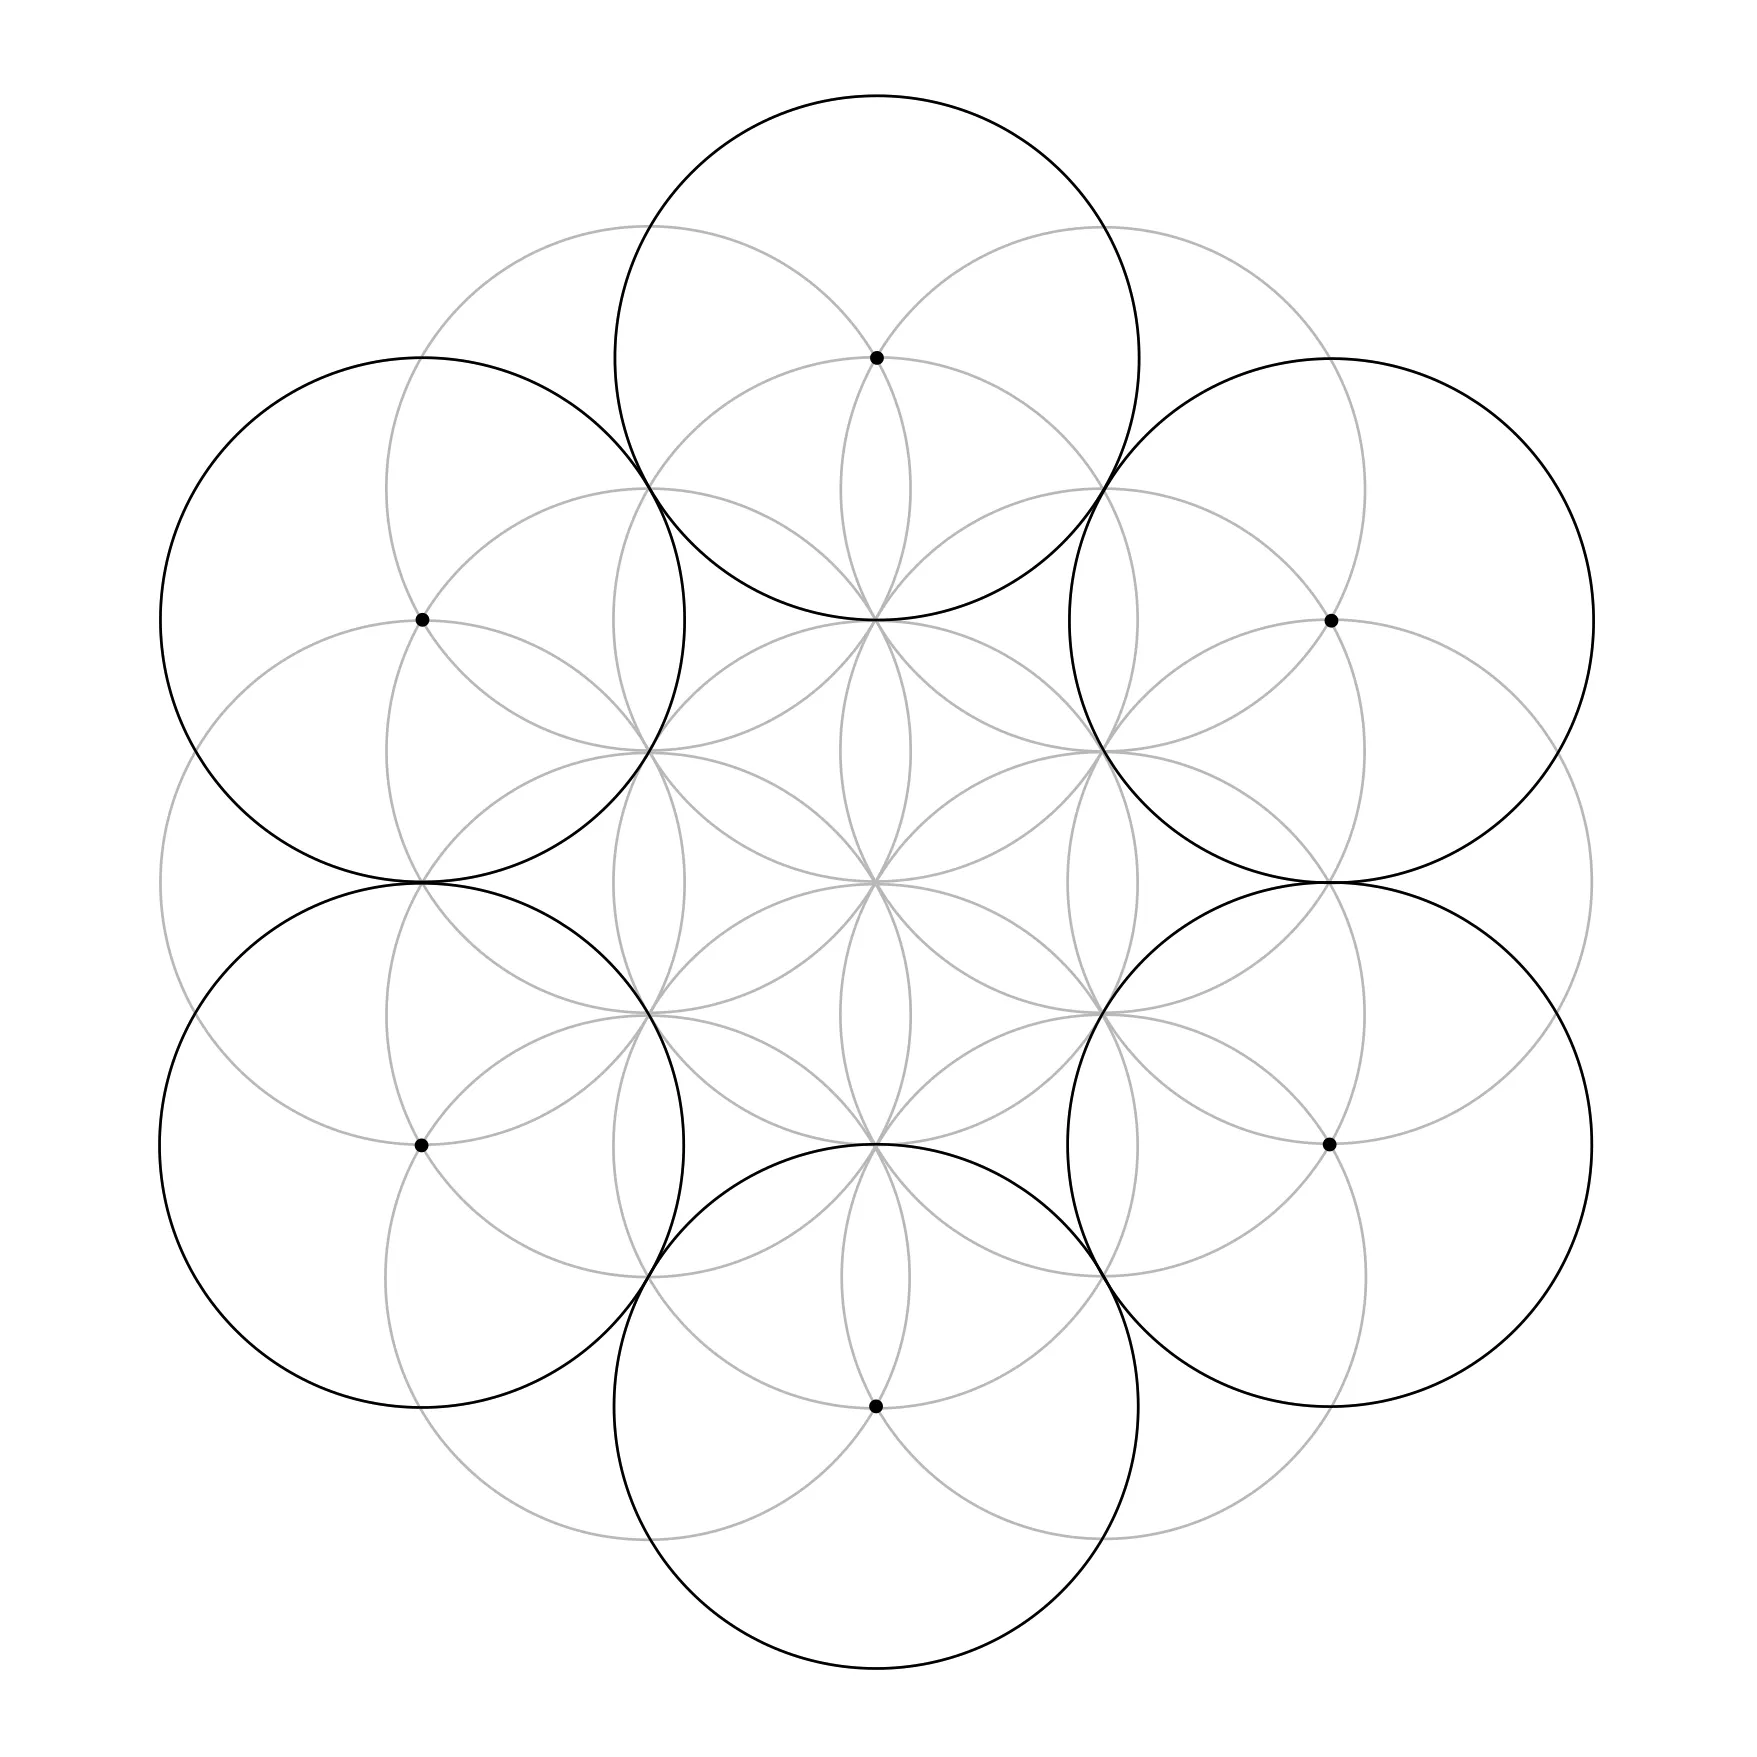
Go slowly here. The Flower of Life works best when each new circle lands exactly where the others meet.
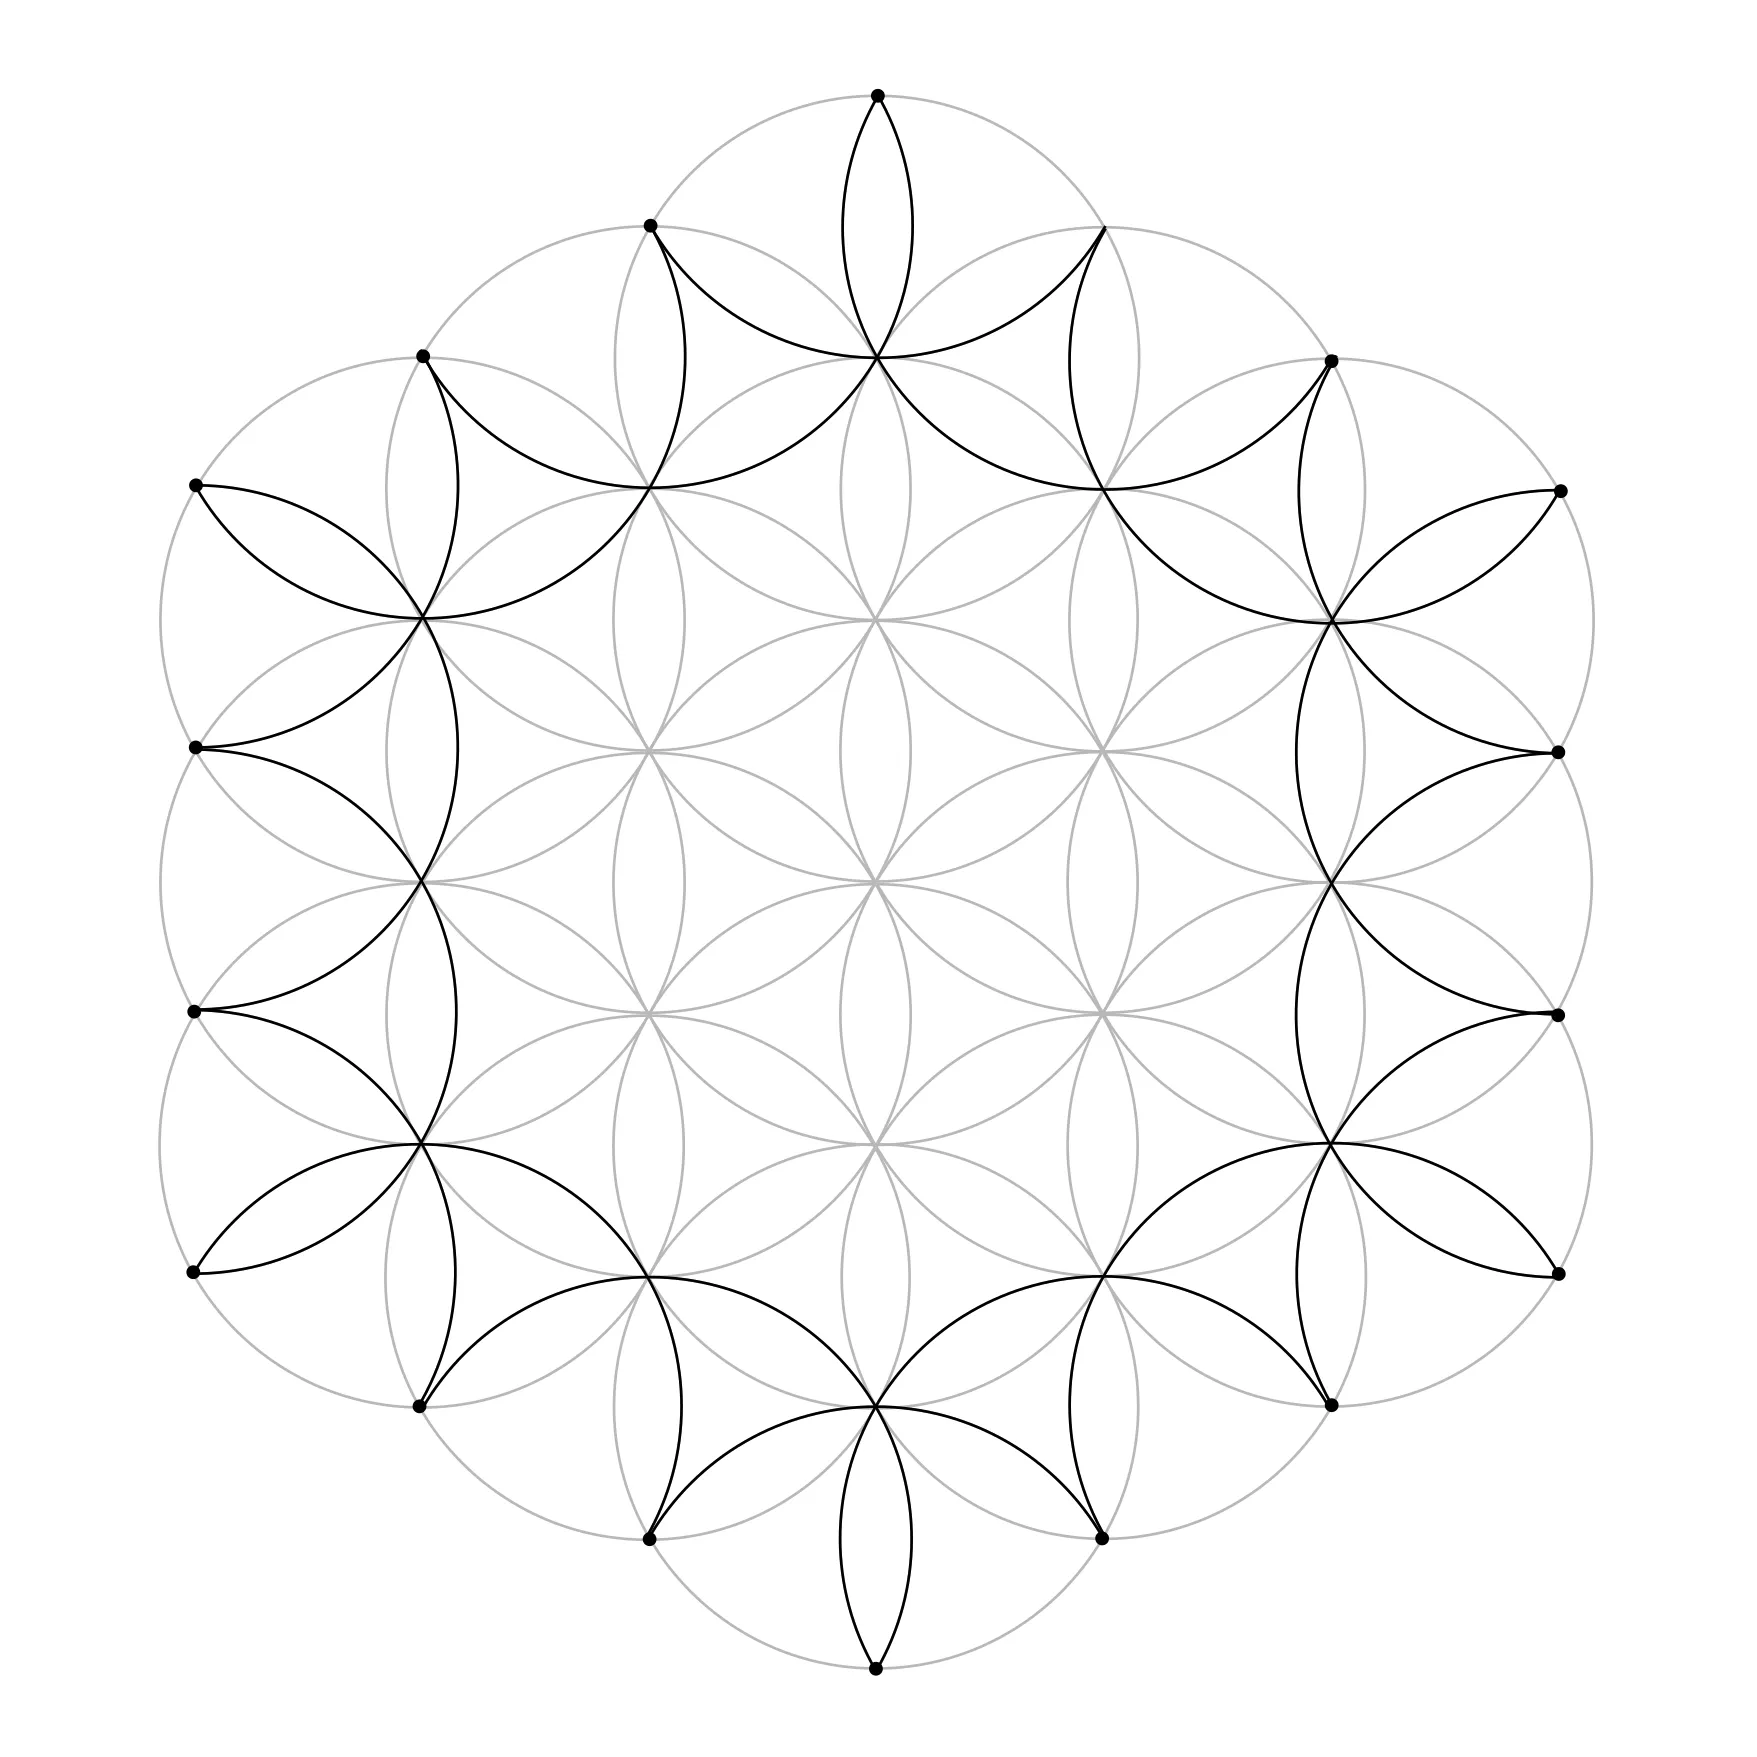
Complete the Outer Petals
Use the remaining outside points to complete the edge of the pattern.
Look closely. You need arcs here only, not full circles.
Draw the Boundary Circle
Place your compass point in the very centre, then open it up so the pencil reaches the very top of the flower.
Draw one large circle around the whole pattern.
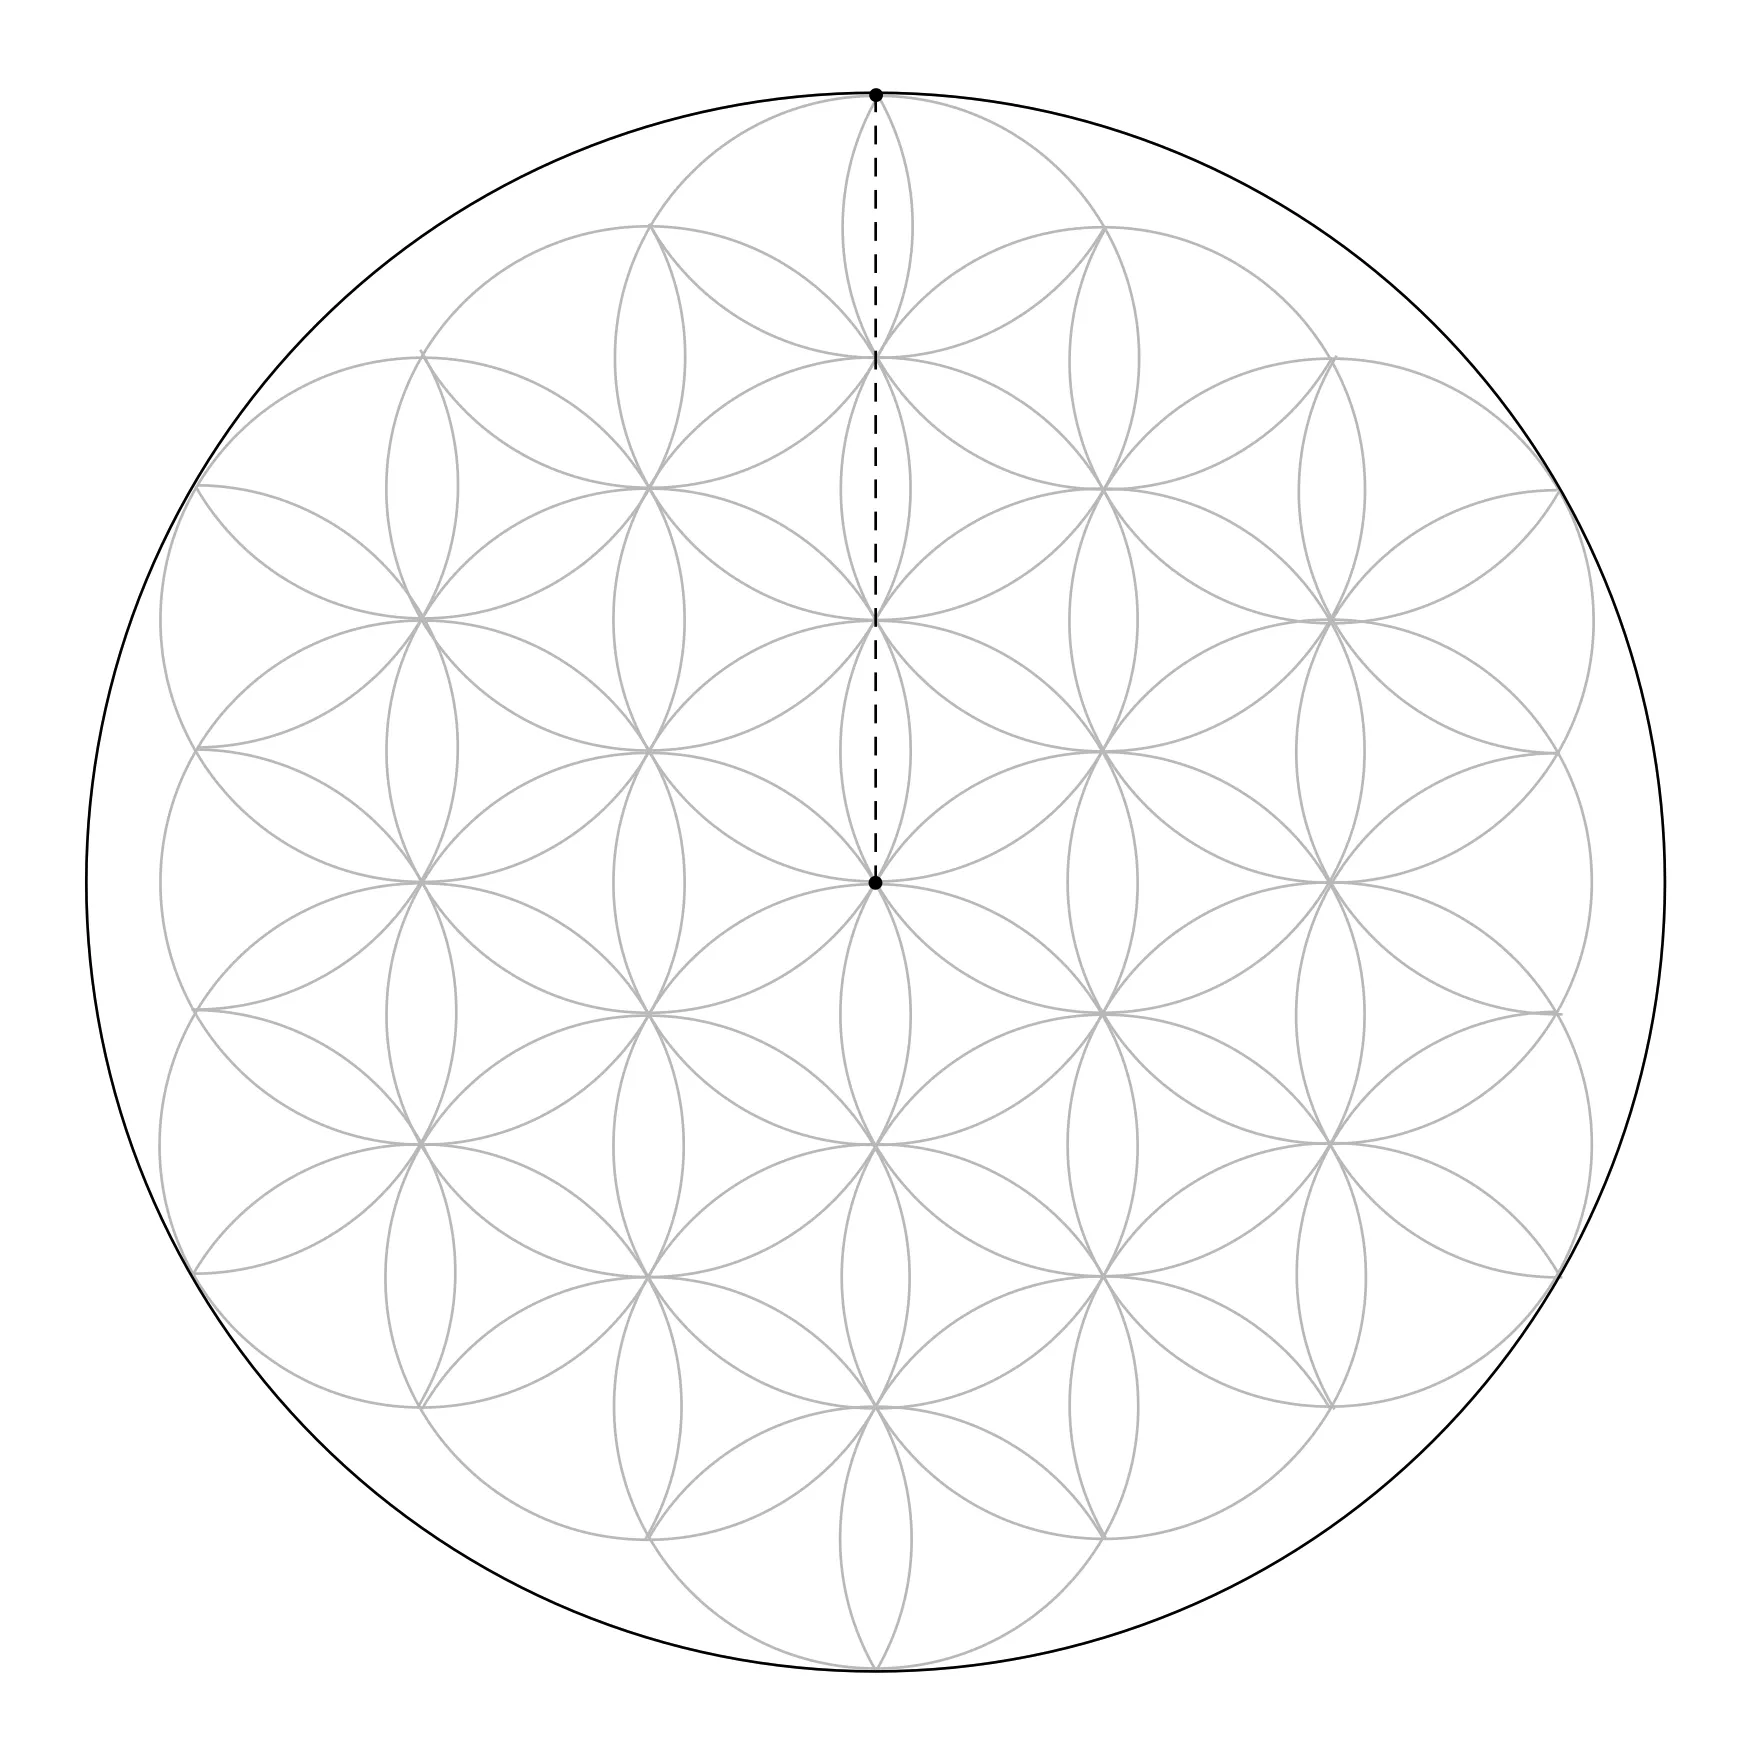
This gives the Flower of Life a clear edge.
Take It In
Lighten or erase any guide marks you no longer need.
Pause for a moment and look at the finished construction.
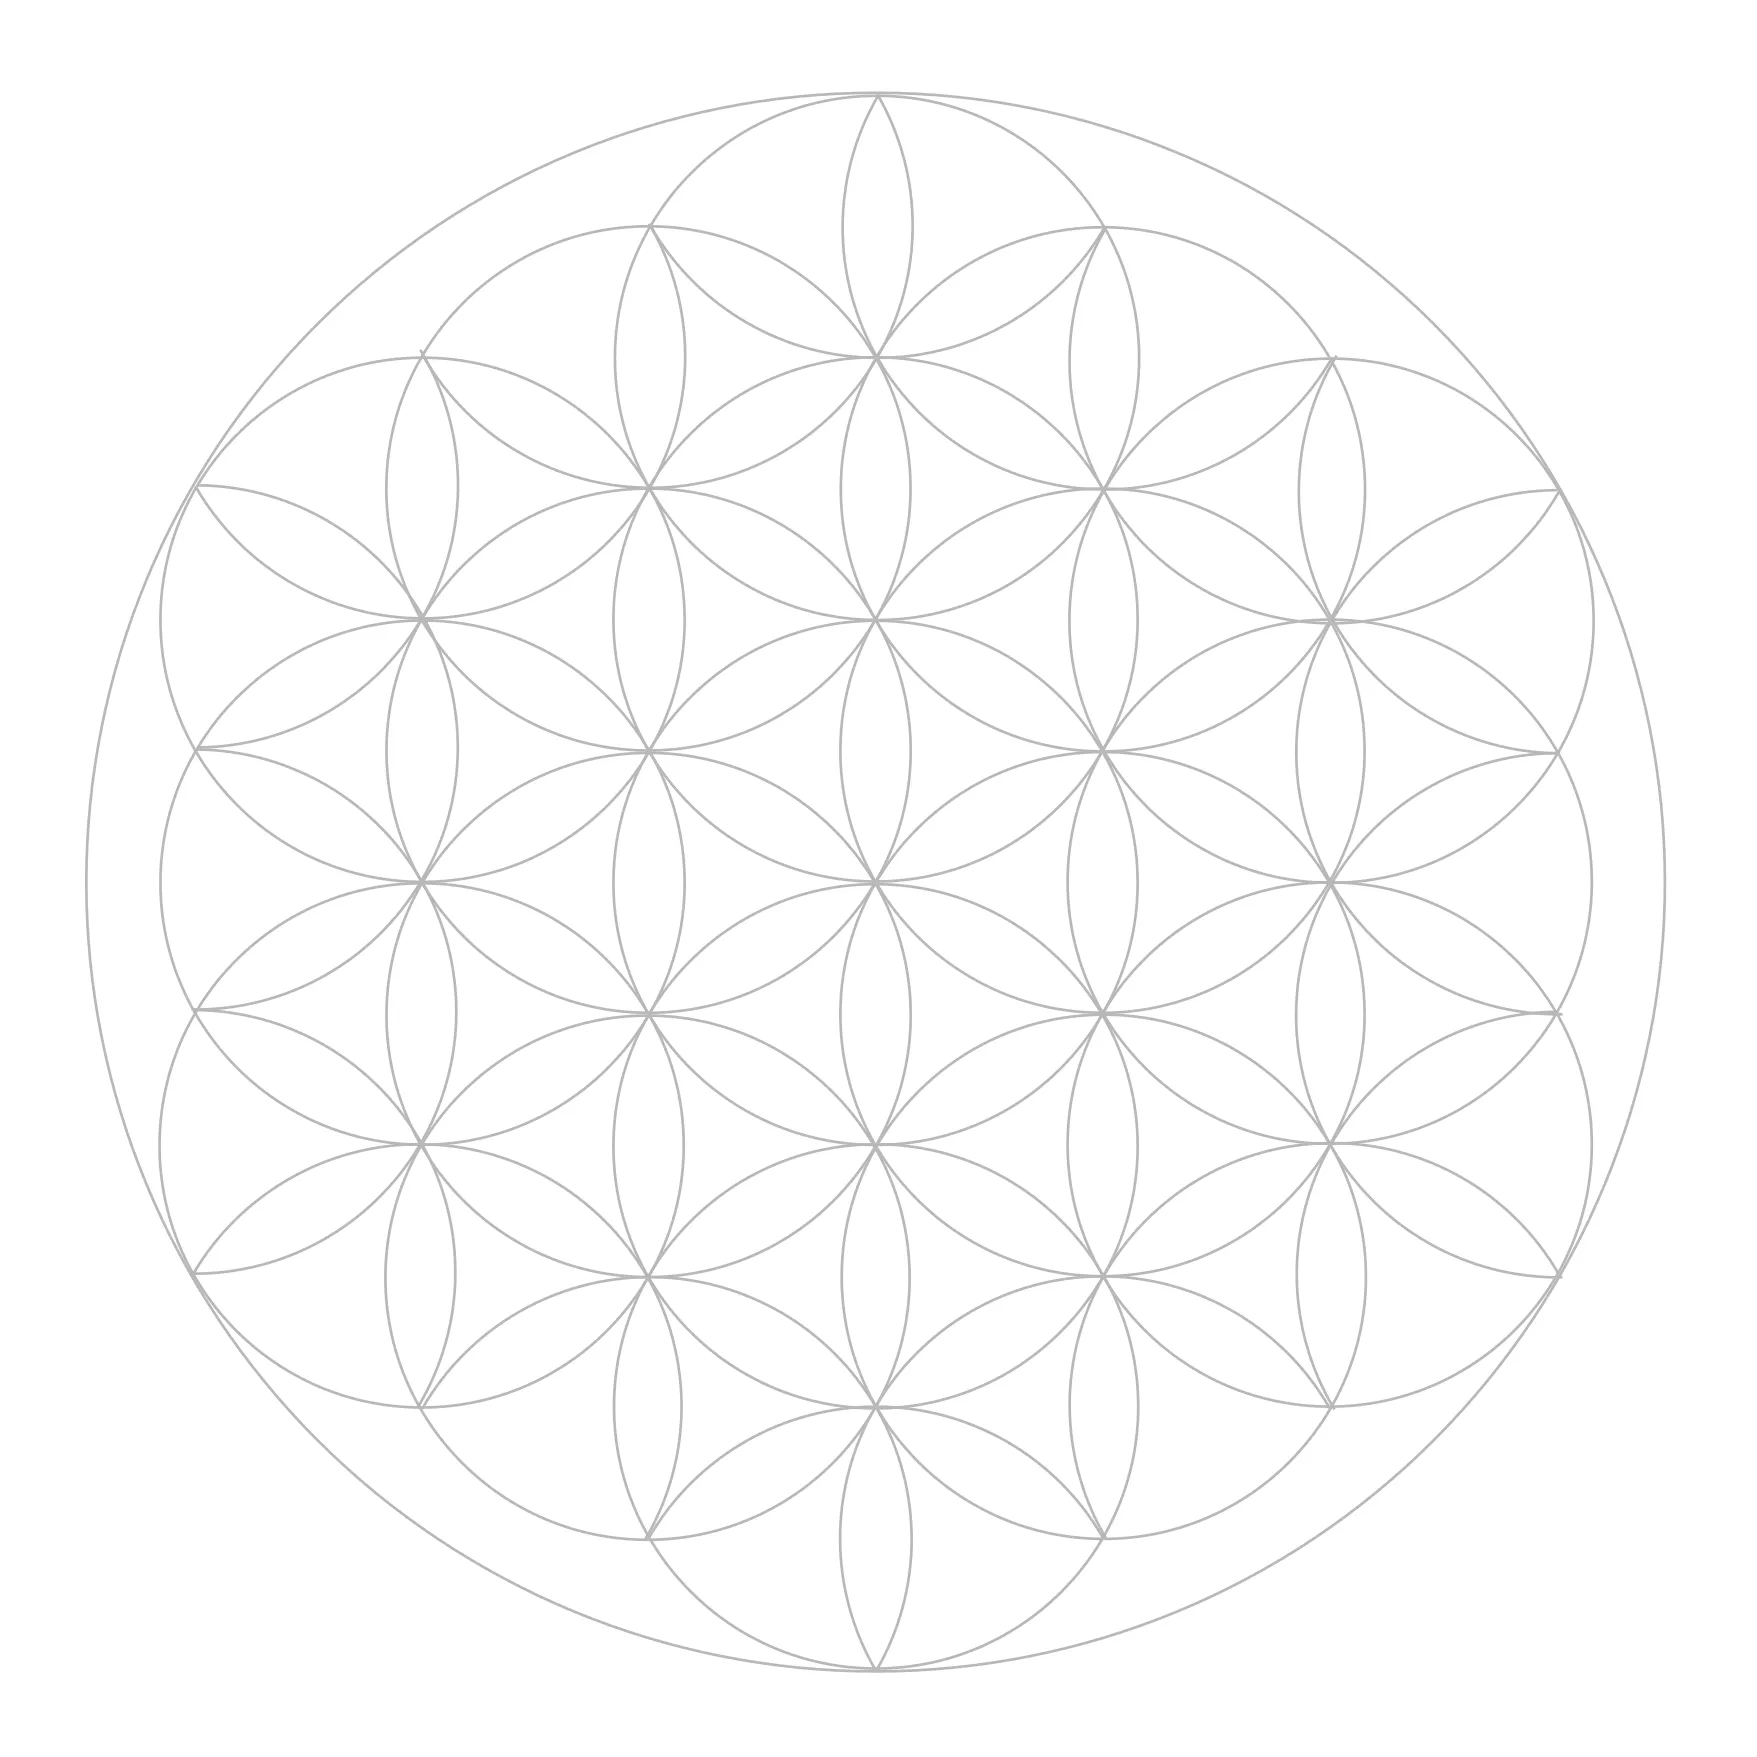
Need Another Go?
If your Flower of Life looks uneven, check three things.
Did your compass width stay the same? Did the compass point sit exactly on the crossing points? Did the paper move while you were drawing?
Small slips can spread through the whole pattern, which is annoying but also useful. It shows you exactly where to improve.
Make It Yours
Once the construction is complete, you can leave it as a calm line drawing or turn it into artwork.
You can make it bright, quiet, leafy, starry, golden, watery, or completely strange. It's up to you!
Where Next?
Mini Mandala
At a Glance
Get it. Print it. Make it.
Mini Mandala
A mandala can look complicated when it is finished. Lots of petals. Lots of balance. Possibly a suspicious amount of neatness.
But this one begins simply: with two guide lines and a circle.
In this task, you will use the same compass width again and again. Each new circle creates crossings. Those crossings help the next circle appear. Before long, a small mandala begins to grow.
Smudge says this is how circles become flowers. Biscuit is checking whether flowers are edible.
Need Help?
Steps
Start with the Template
Begin with the vertical and horizontal guide lines.

Draw Your First Circle
Find the centre point where the two lines cross.
Place your compass point on the centre and draw your first circle.
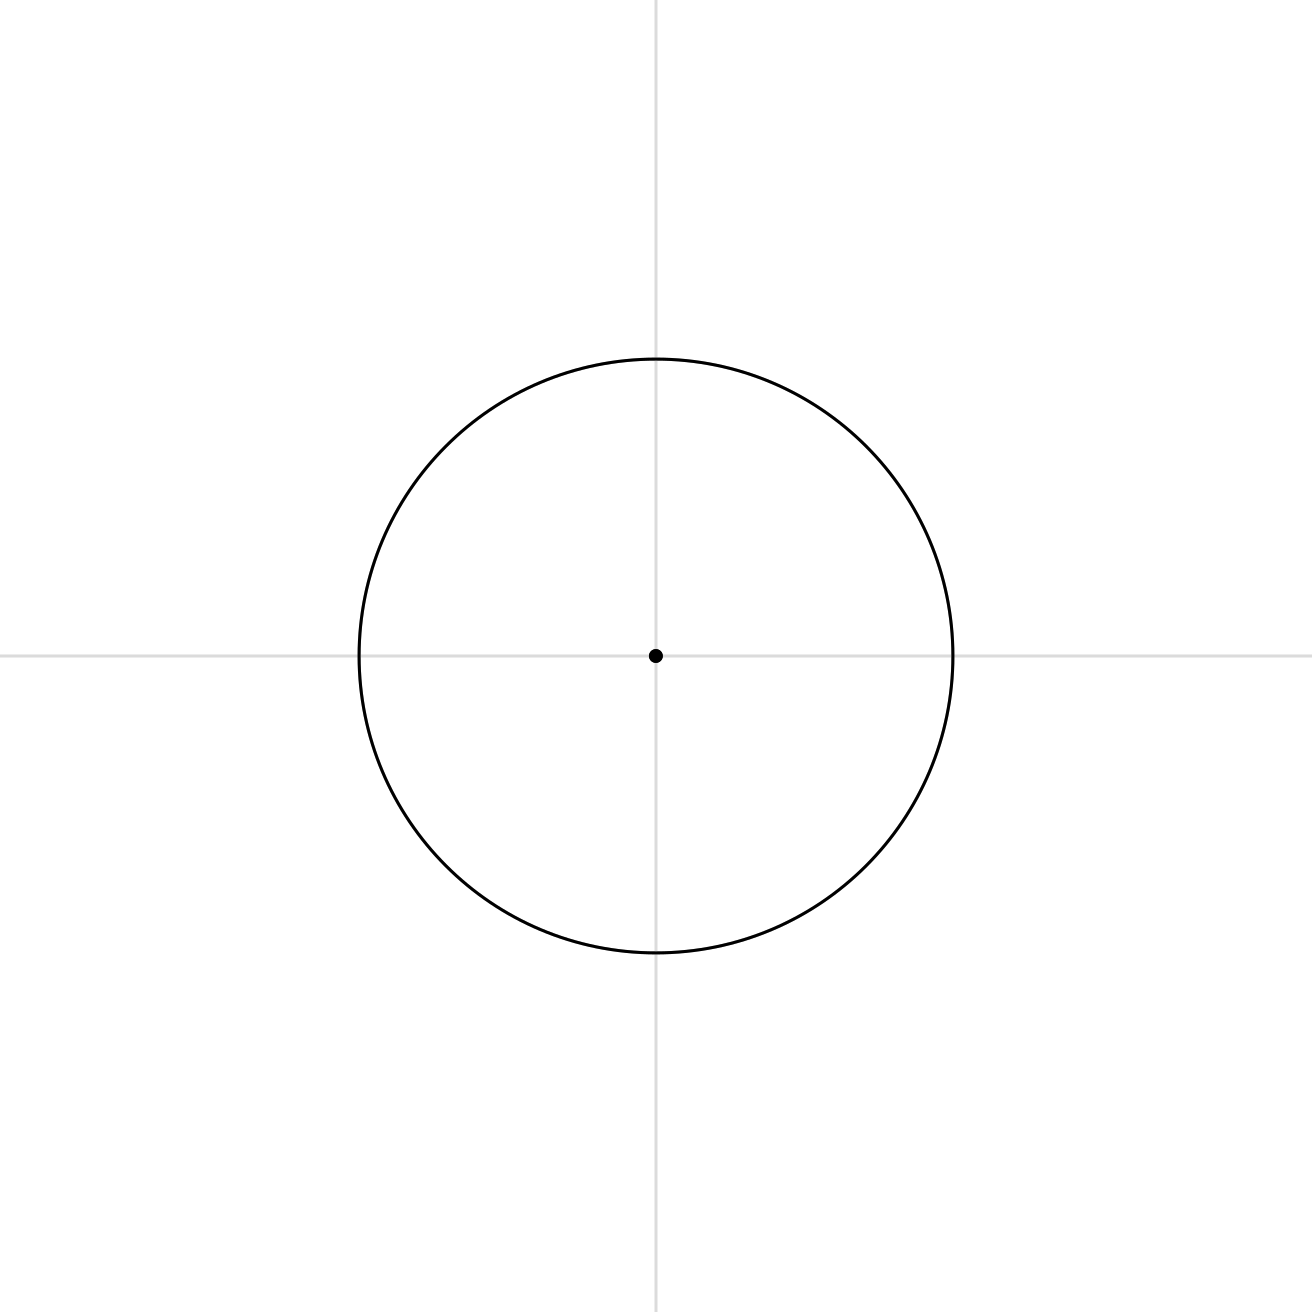
Add the First Petal Circle
Keep the same compass width. Place the compass point on the top, where the vertical line and circles cross.
Draw a neat arc within the first circle.
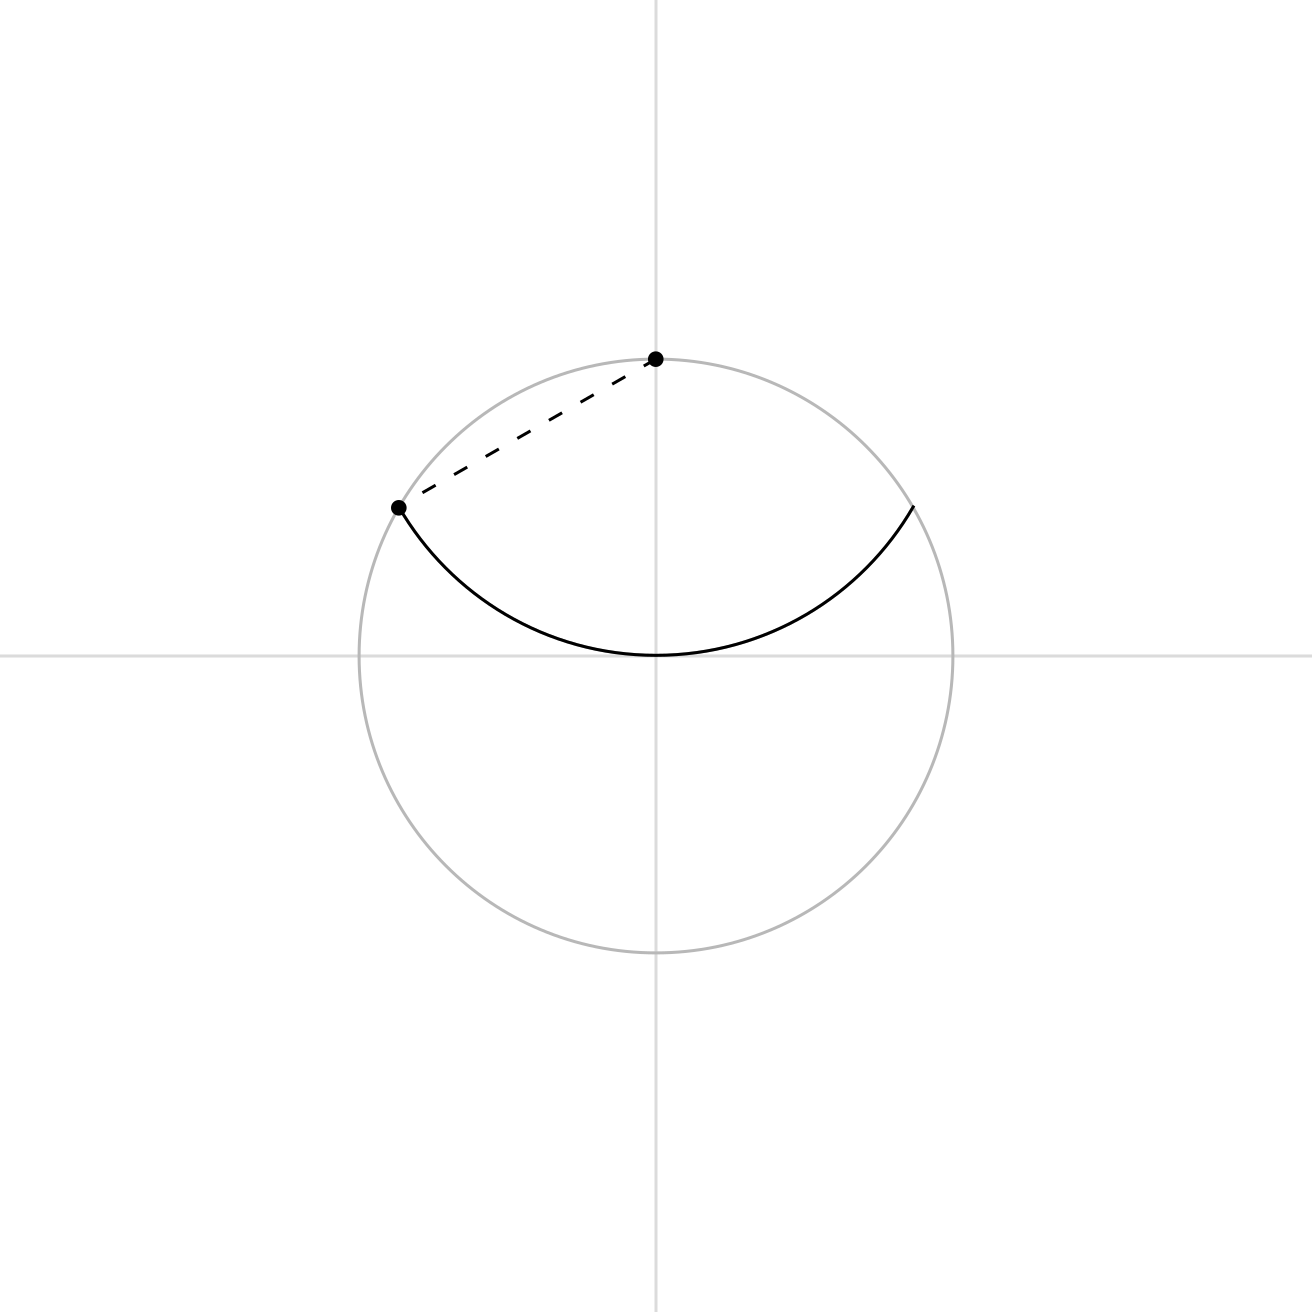
Move Around the Circle
Use where the arc touches the circle edge as your next compass point. Draw another arc using the same compass width.
The mandala is starting to grow around the centre.
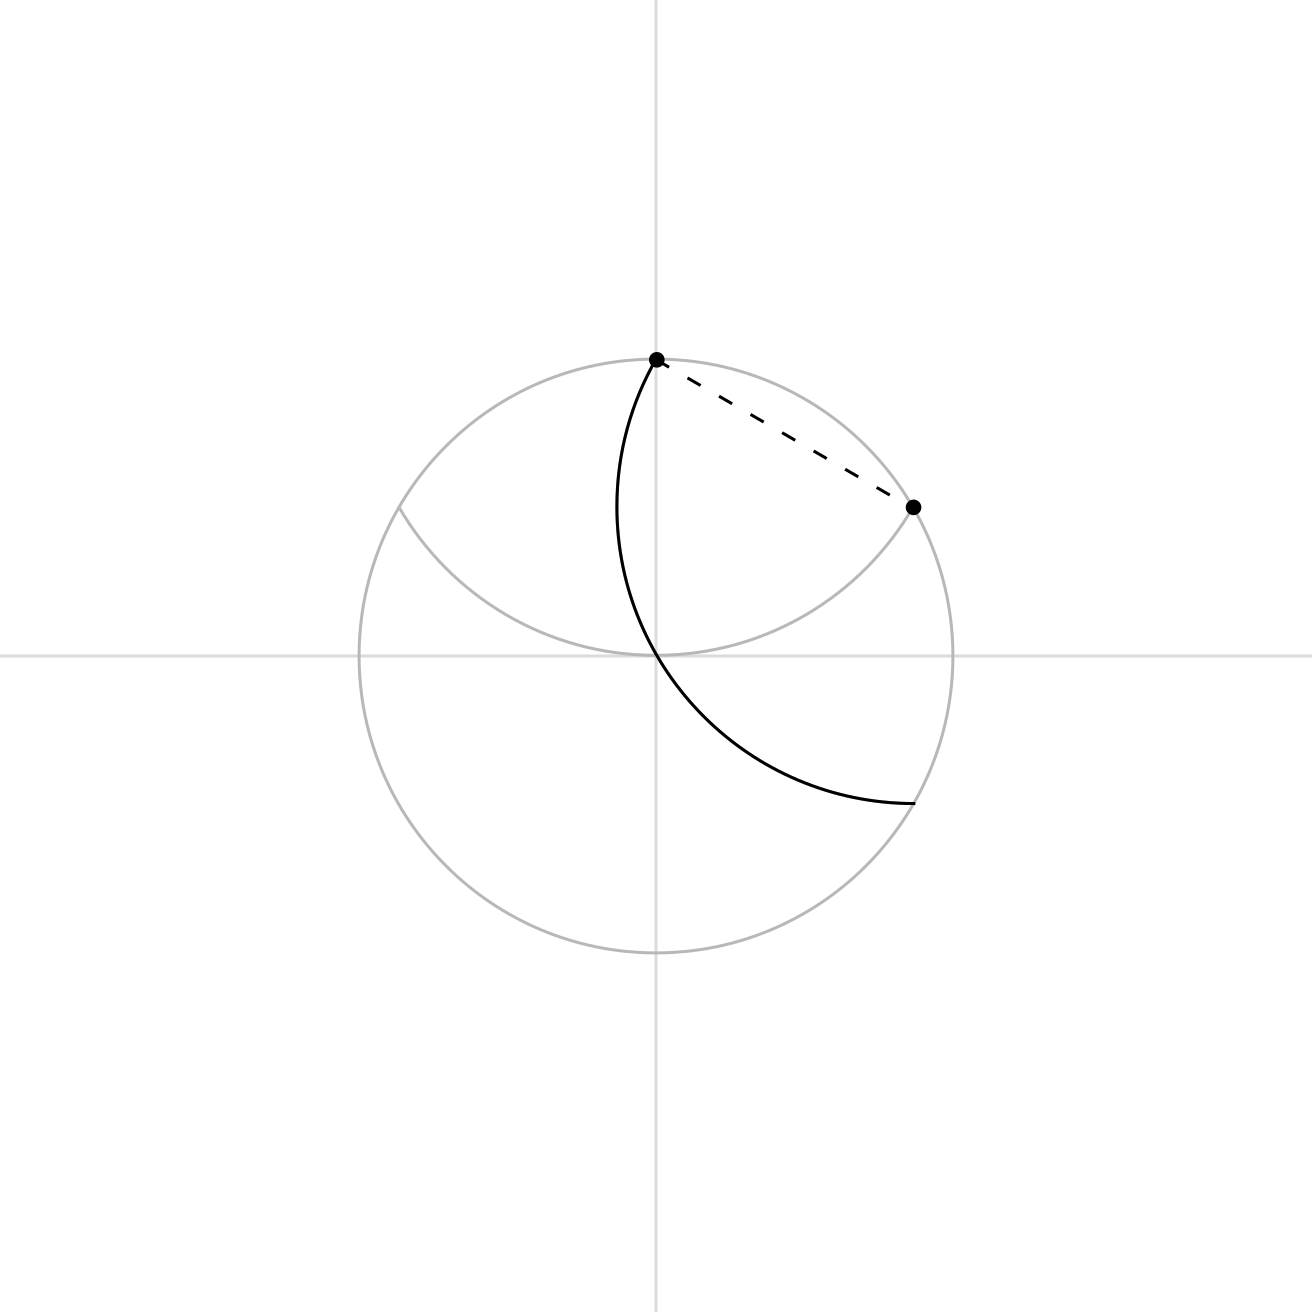
Keep Repeating
Keep moving. Each time, keep the compass width the same and draw the next arc.
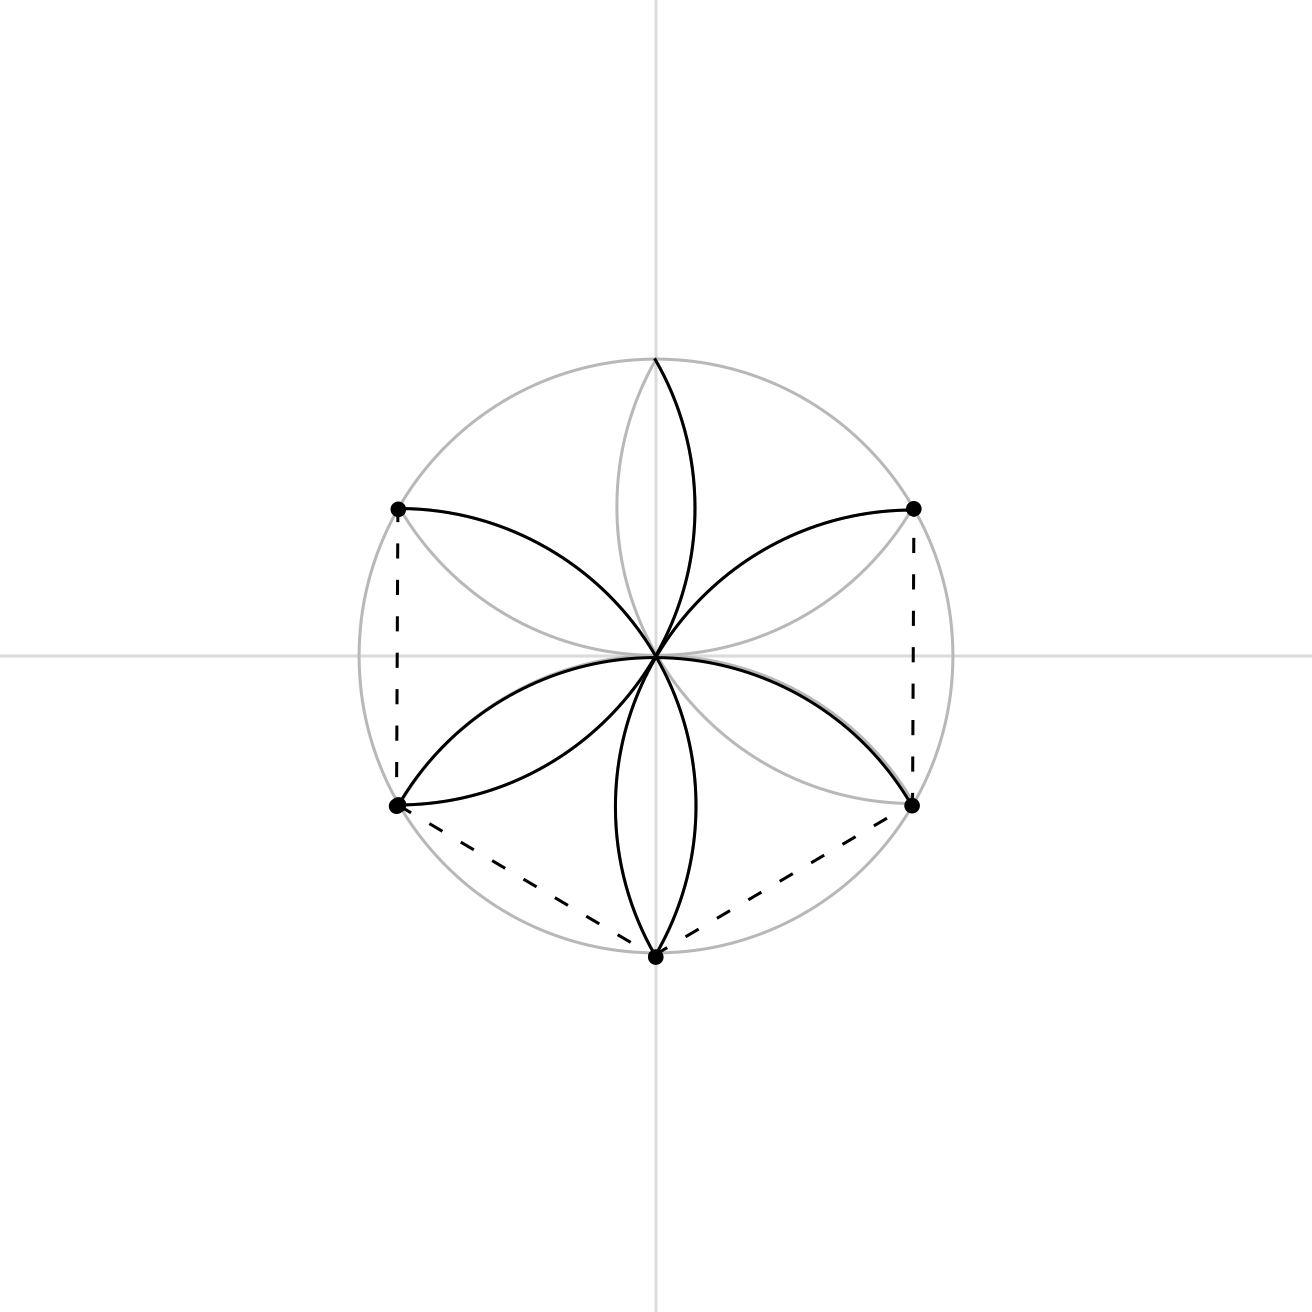
Complete the Petal Ring
Eventually, the petals meet evenly around the centre.
You should now see a six-petal flower shape inside the circle.
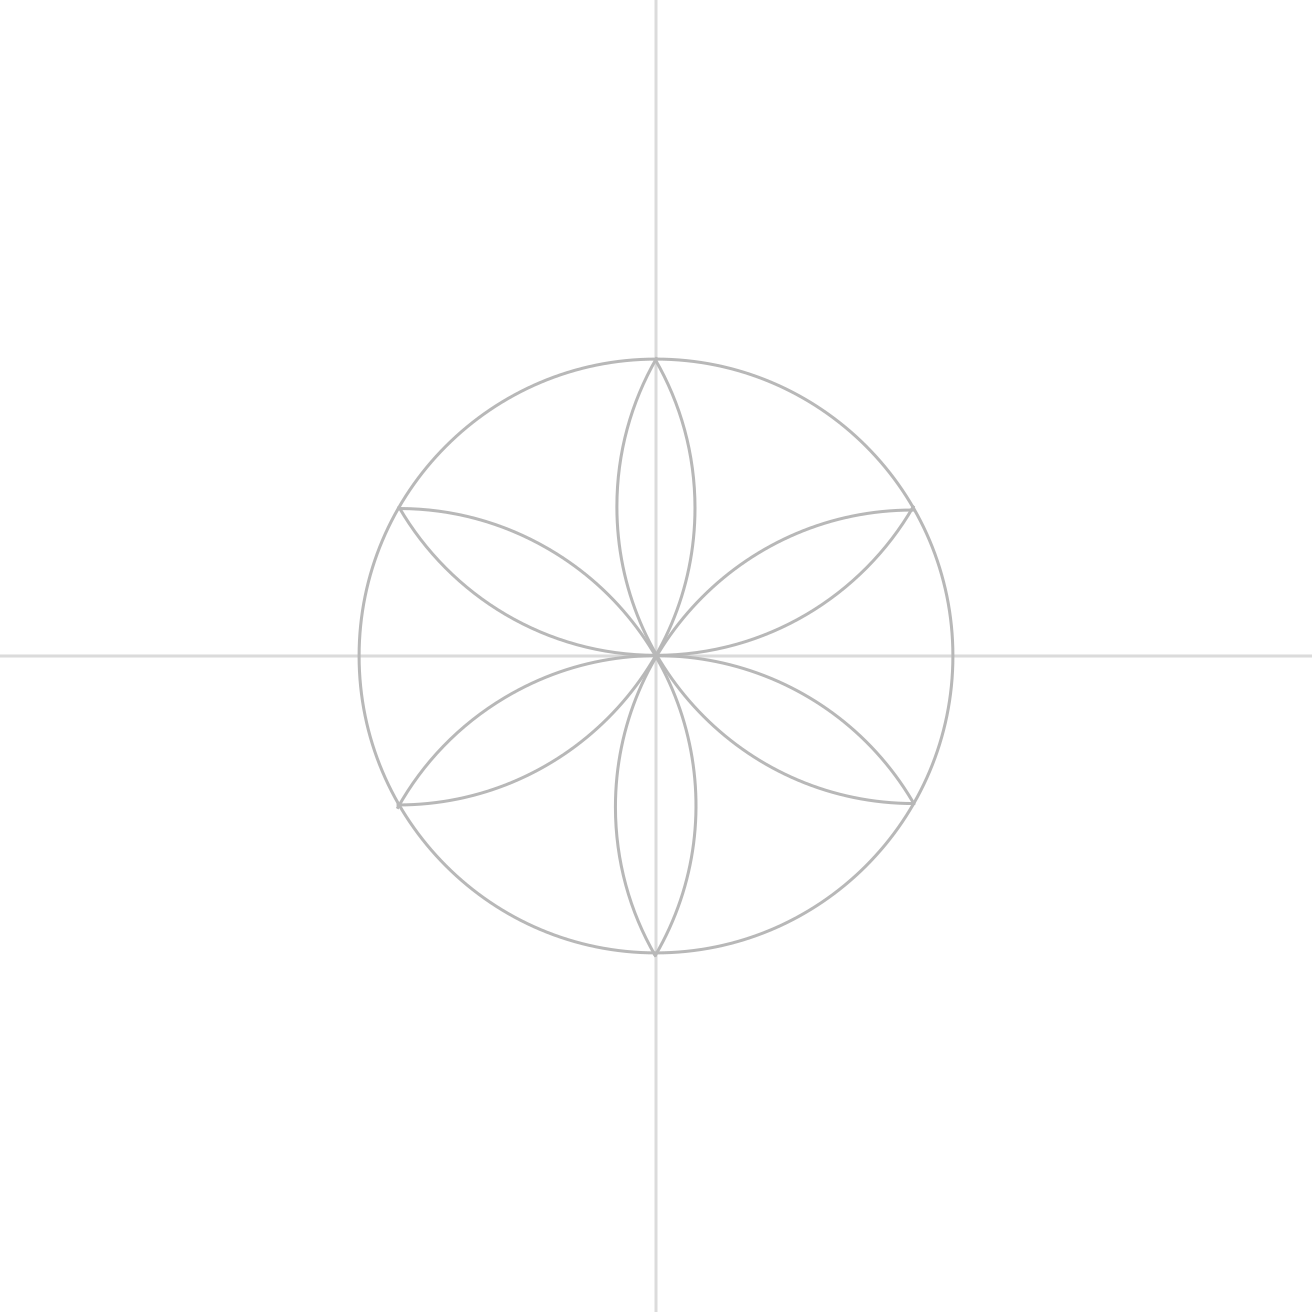
Congratulations. You’ve made a mini mandala from one repeated compass setting.
Need Another Go?
If your mandala looks a little wonky, good news: that’s exactly what practice is for. Check out the tool tips and try again.
Make it your own
Colour the petals, add dots, draw a small centre, or use the mandala as the beginning of a larger pattern.
You can keep it simple, or save your decorating energy for Part 2. Biscuit recommends saving some energy for snacks as well.
Where Next?
More Mini Mandala
At a Glance
Get it. Print it. Make it.
More Mini Mandala
In Mini Mandala, you built a small six-petal mandala from repeated circles. Now you’re going to give it a second layer.
This task adds more sweeping arcs around the first flower. The same simple pattern starts to feel fuller, richer, and more mandala-like.
Smudge says this is where the mandala starts showing off. Biscuit thinks showing off is acceptable if the result is pretty.
The printable version gives you the second mandala layer to work through on paper at your own pace.
Steps
Begin with Mini Mandala
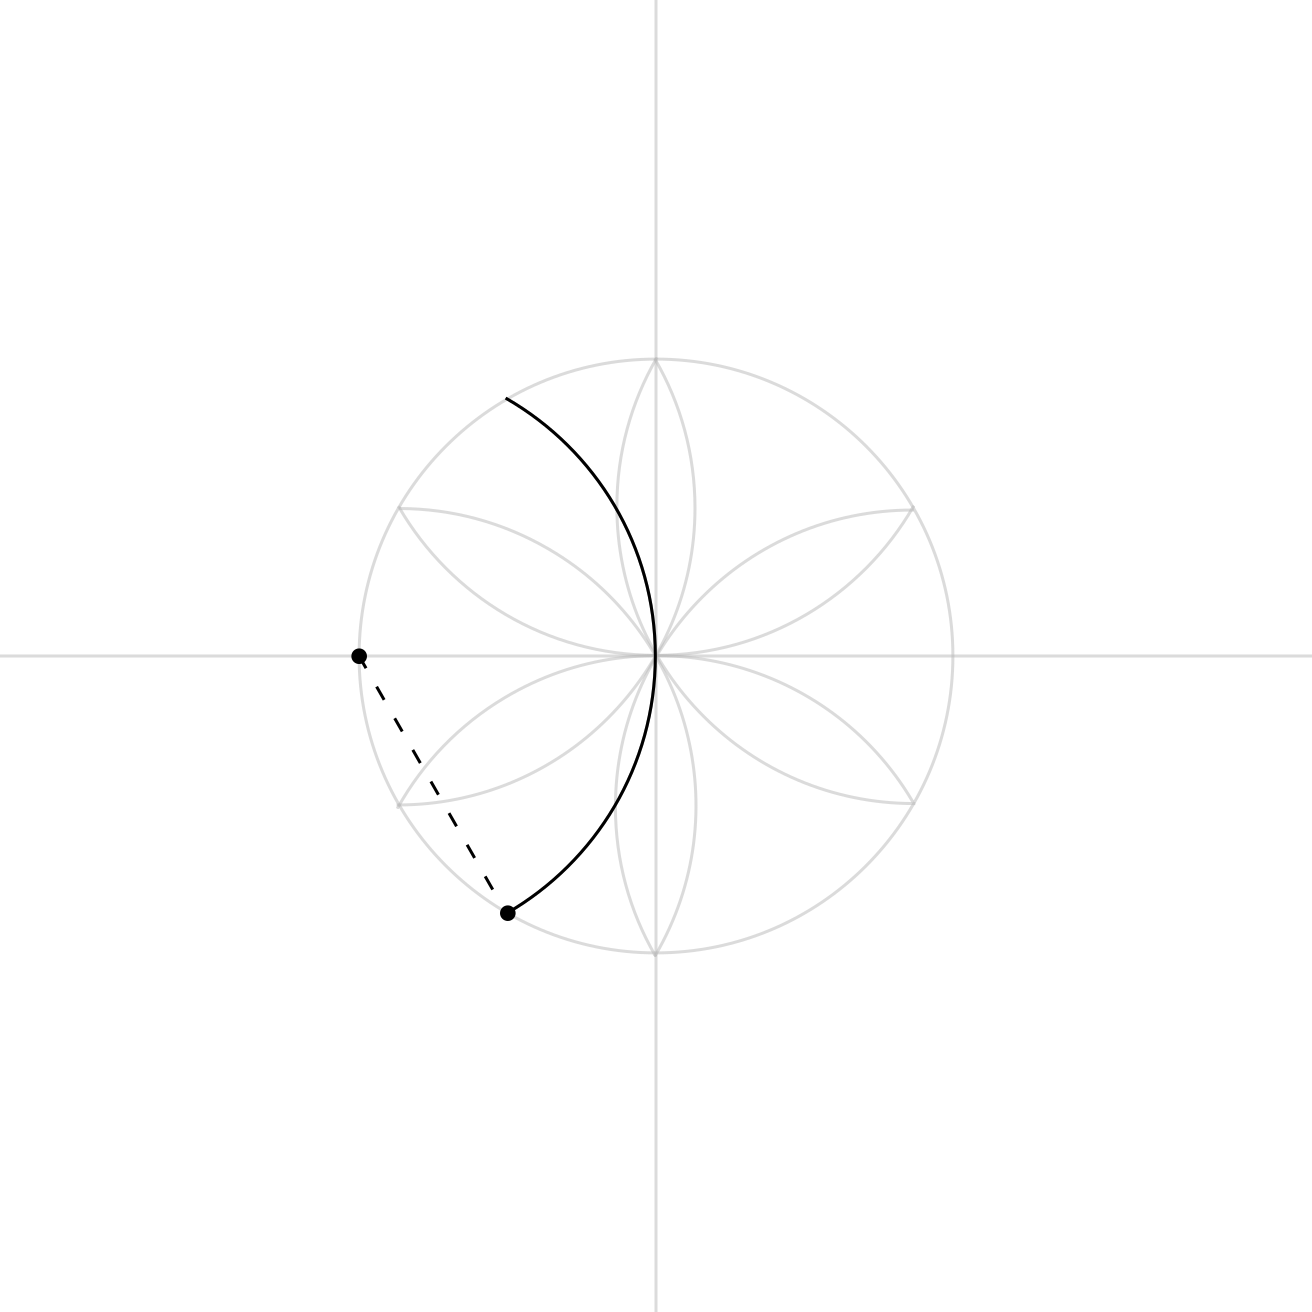
Start with your completed Mini Mandala. You should already have the six-petal flower sitting inside the circle, with the vertical and horizontal guides still visible.
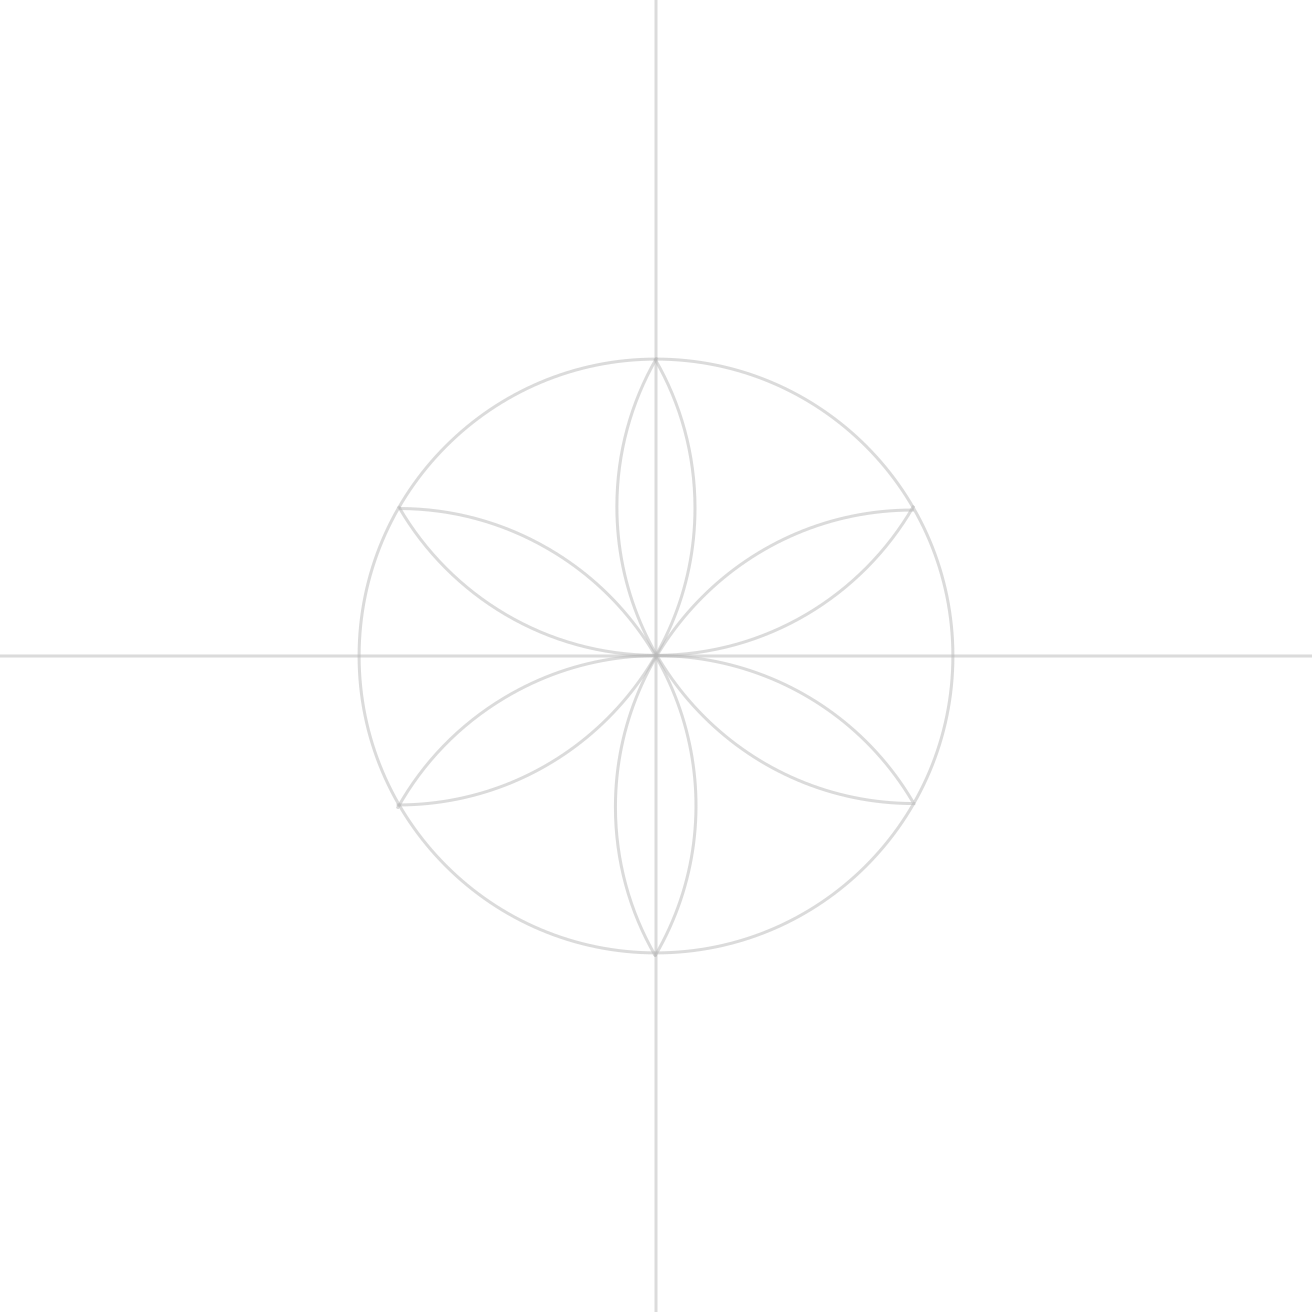
We will do everything again, but this time start on the side (intersection), where the horizontal line meets the circle.
Add the First Arc
Using the correct centre point, draw the first arc.
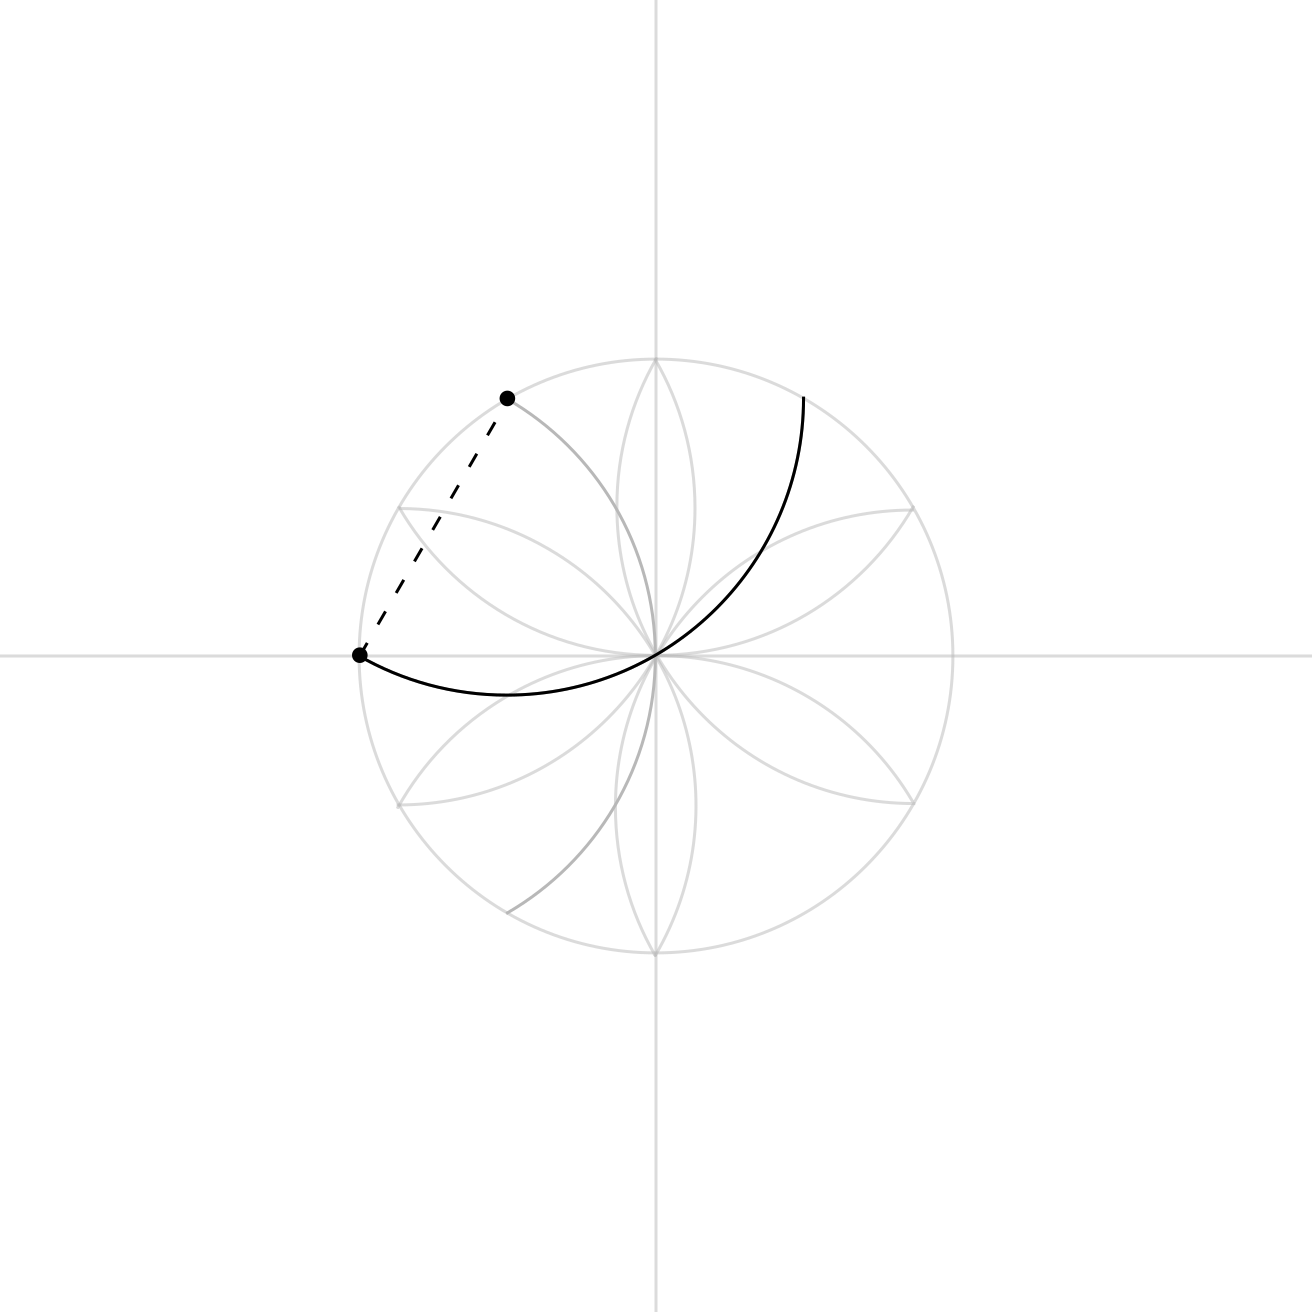
Add the Next Arc
Move to the next point and draw another arc using the same idea.
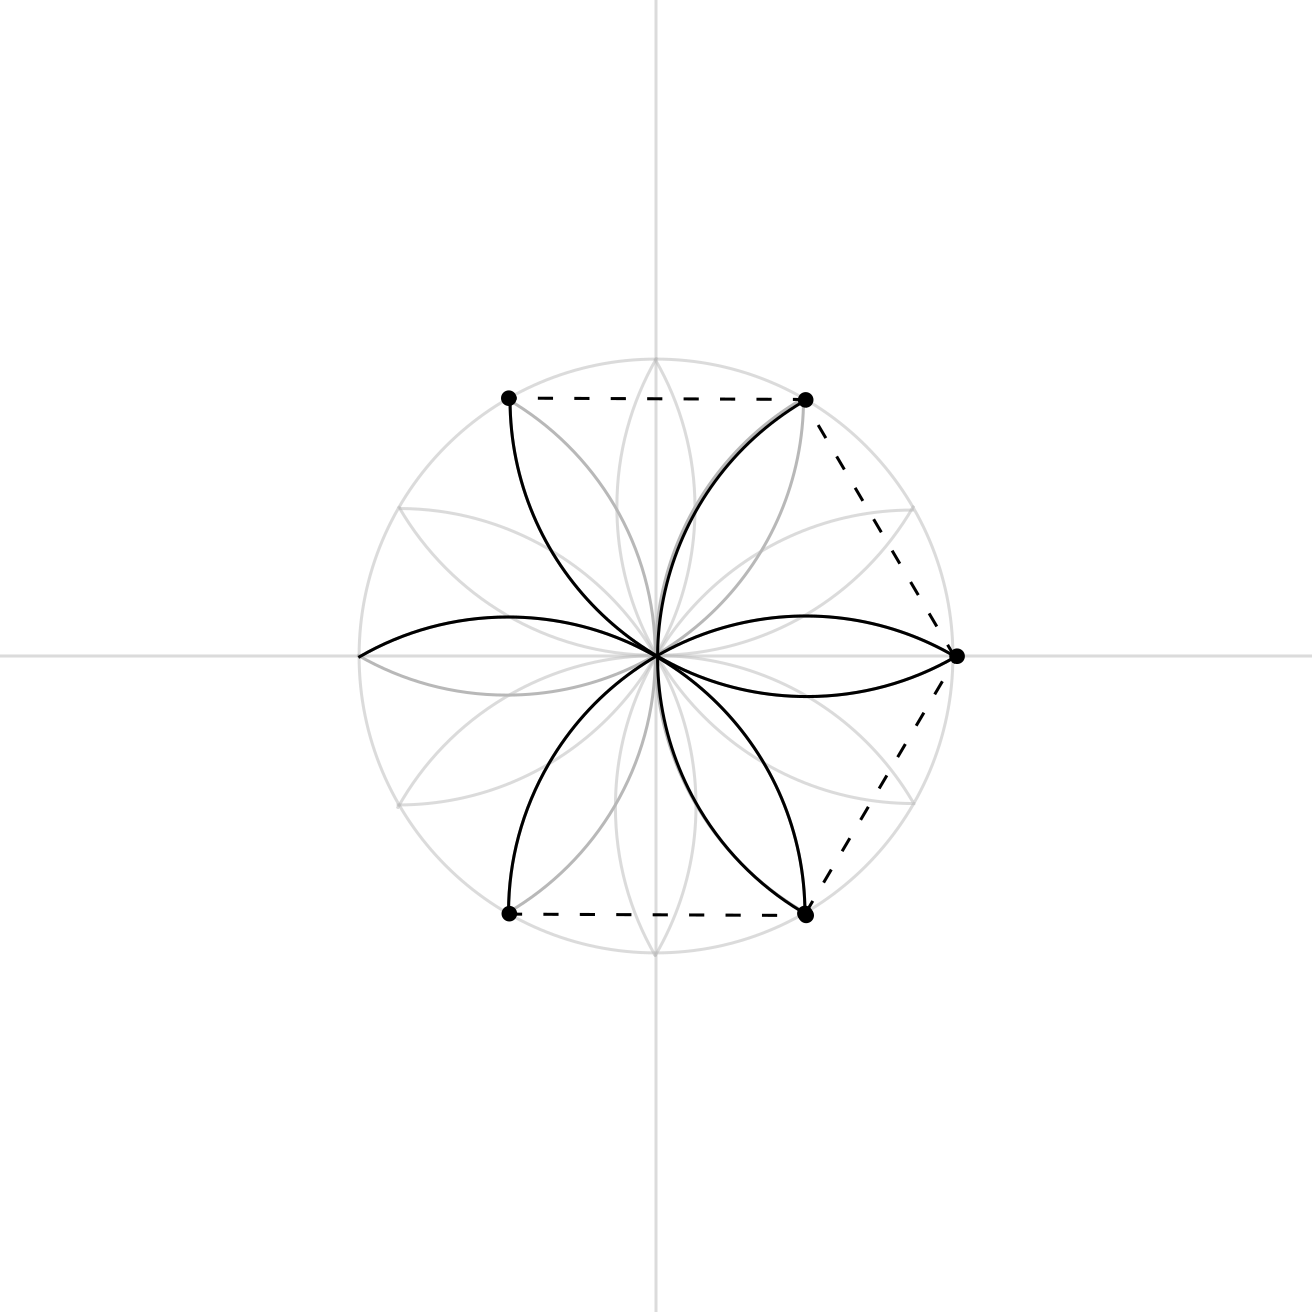
Continue Around the Mandala
Keep moving around the circle, using the touching points to place each new arc. Each new curve adds another part of the second petal layer.
Strengthen the Final Mandala
Congratulations. You've turned a simple six-petal mandala into a fuller layered design.
Pause for a moment and look at how much changed without much more effort. Beautiful!
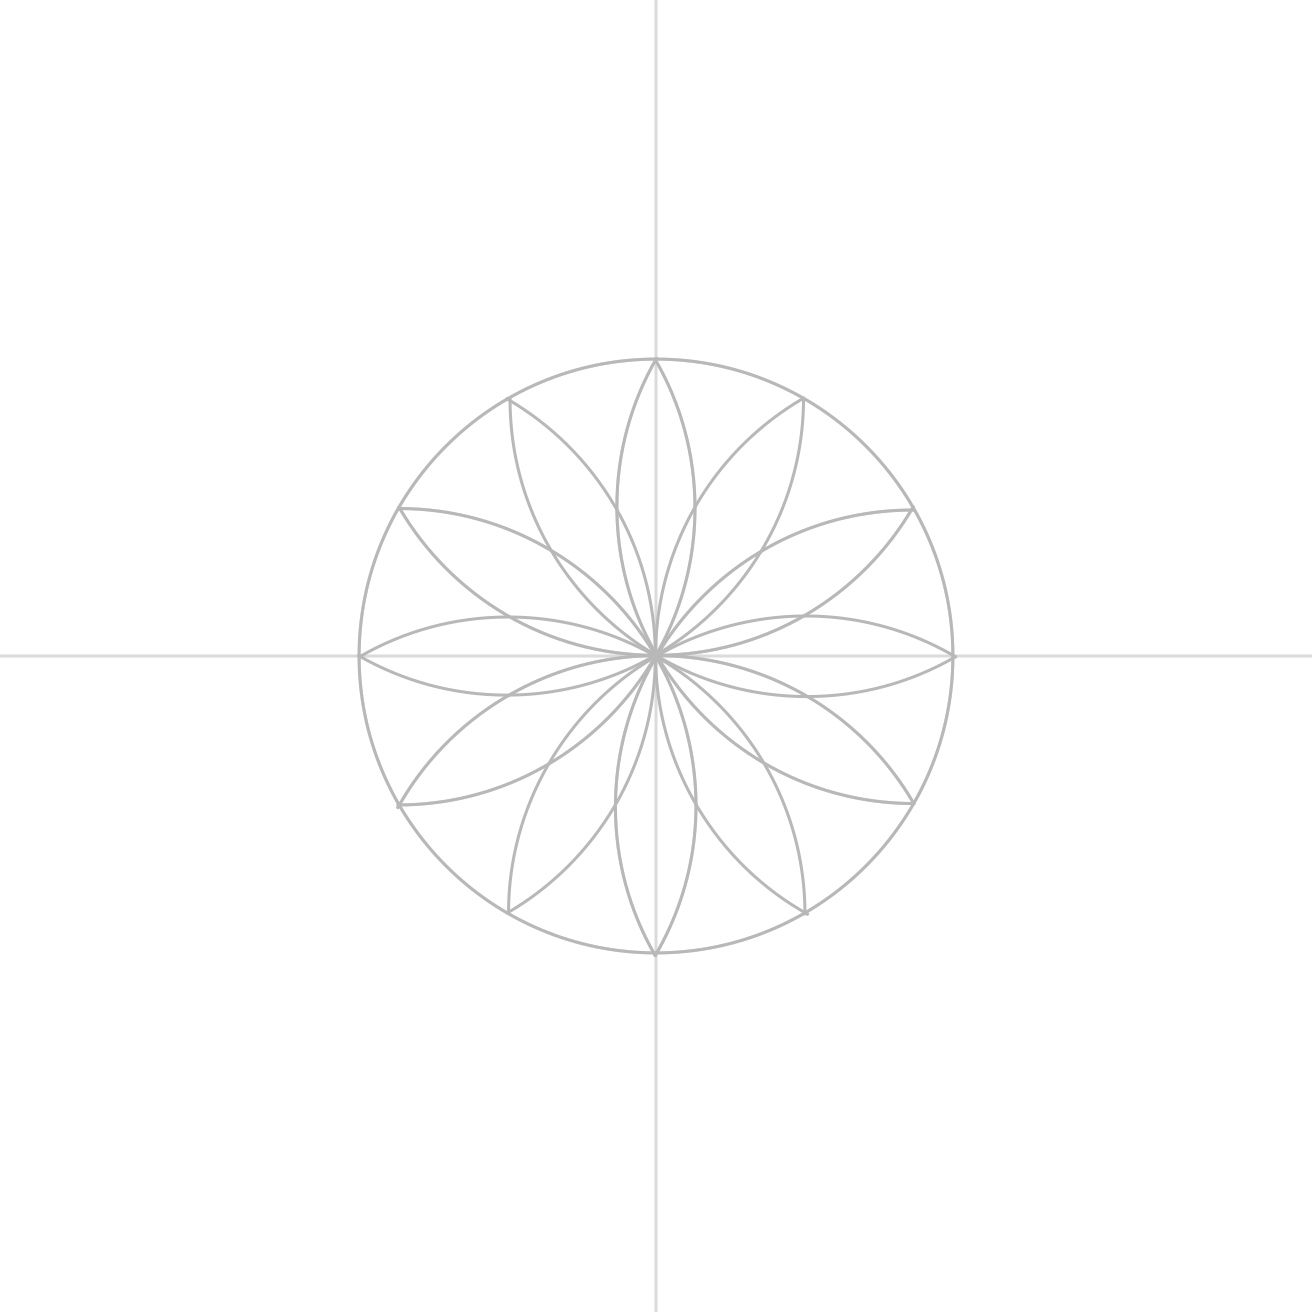
Choose the lines you want to keep and make them clearer. You can leave some construction lines faint, or clean the design up so the finished mandala stands on its own.
Need Another Go?
If the arcs don't sit neatly around the centre, check that you used the correct points and kept your compass steady while drawing each curve.
If one arc feels wrong, draw it again lightly before strengthening it. Mandalas improve when you slow down and look carefully.
Make It Yours
Colour alternating petals one way then another. Add dots, borders, tiny shapes, or soft shading to show the two layers.
You can keep the mandala calm, make it bright, or let the colours gently argue with each other until they become friends.
Where Next?
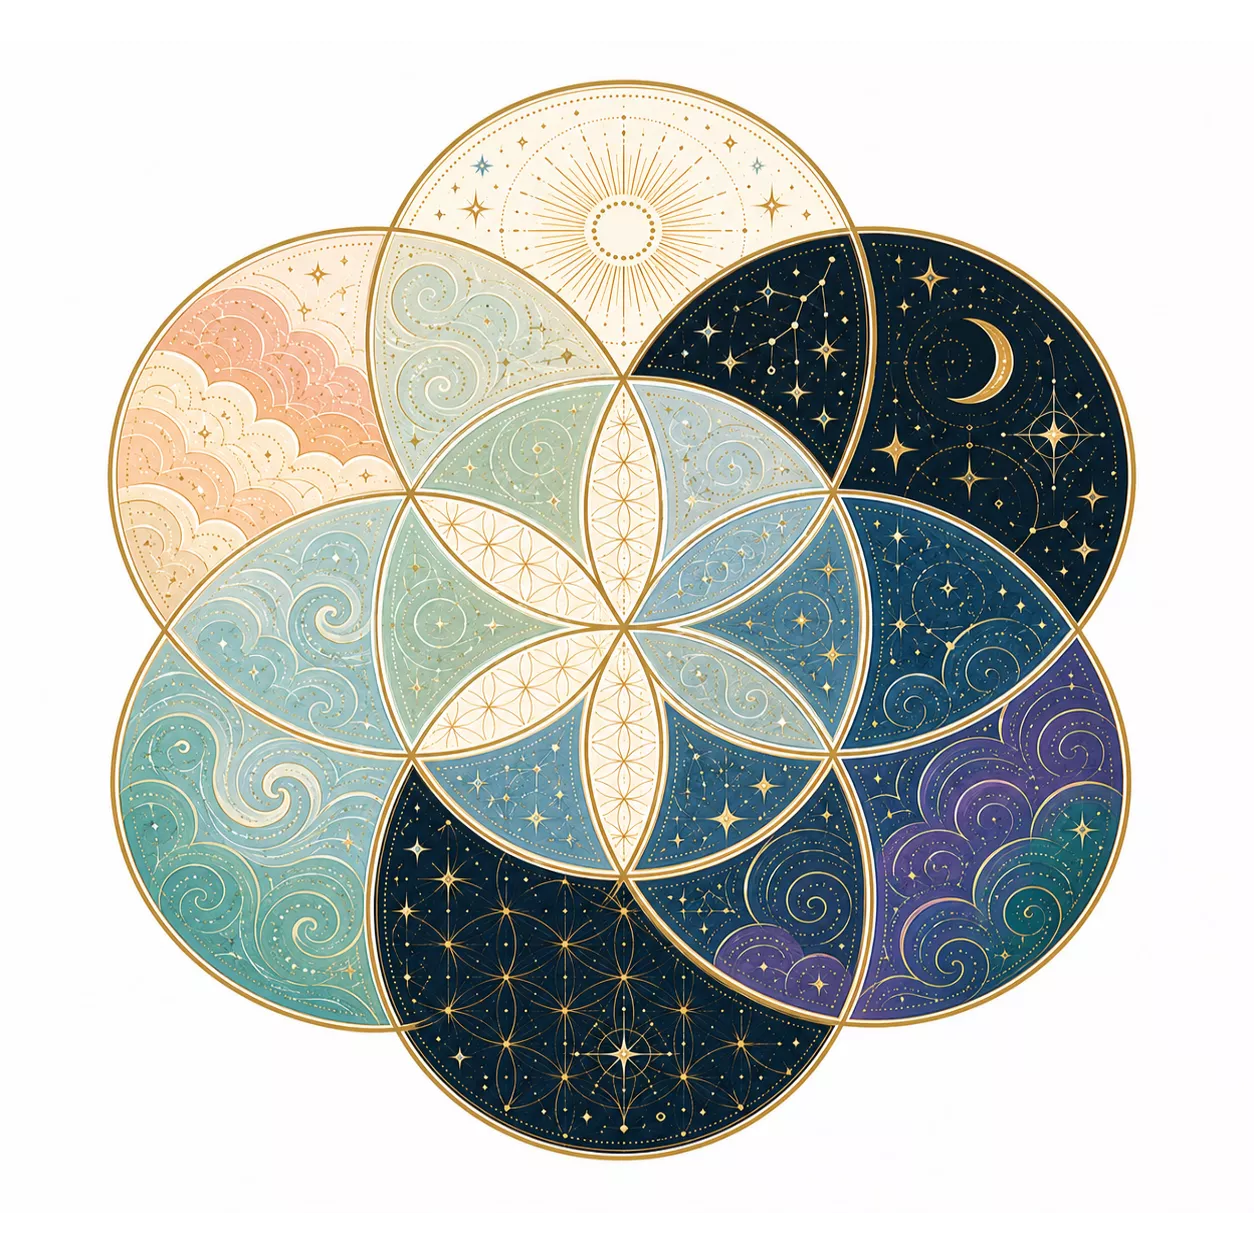
The Seed of Life
At a Glance
Get it. Print it. Make it.
The Seed of Life
In this task, you’re going to build a pattern from circles.
Just circles.
One circle leads to another. Then another. Then another.
Before long, a pattern begins to appear.
How?
Each new circle shows you where the next one belongs.
Smudge suspects the circles know what they’re doing.
Start with one circle, follow the clues, and see what appears.
The printable version gives you the construction to work through on paper at your own pace.
Need a hand with your compass or ruler? Check the Tool Tips before you begin.
Steps
Take a blank sheet of paper.
You’re about to build a Seed of Life from a single circle.
Ready?
Let’s begin.
Draw Your Guide Line
Use your ruler to draw a light vertical line down the page.
This is your guide line. It gives the first circle somewhere sensible to sit.

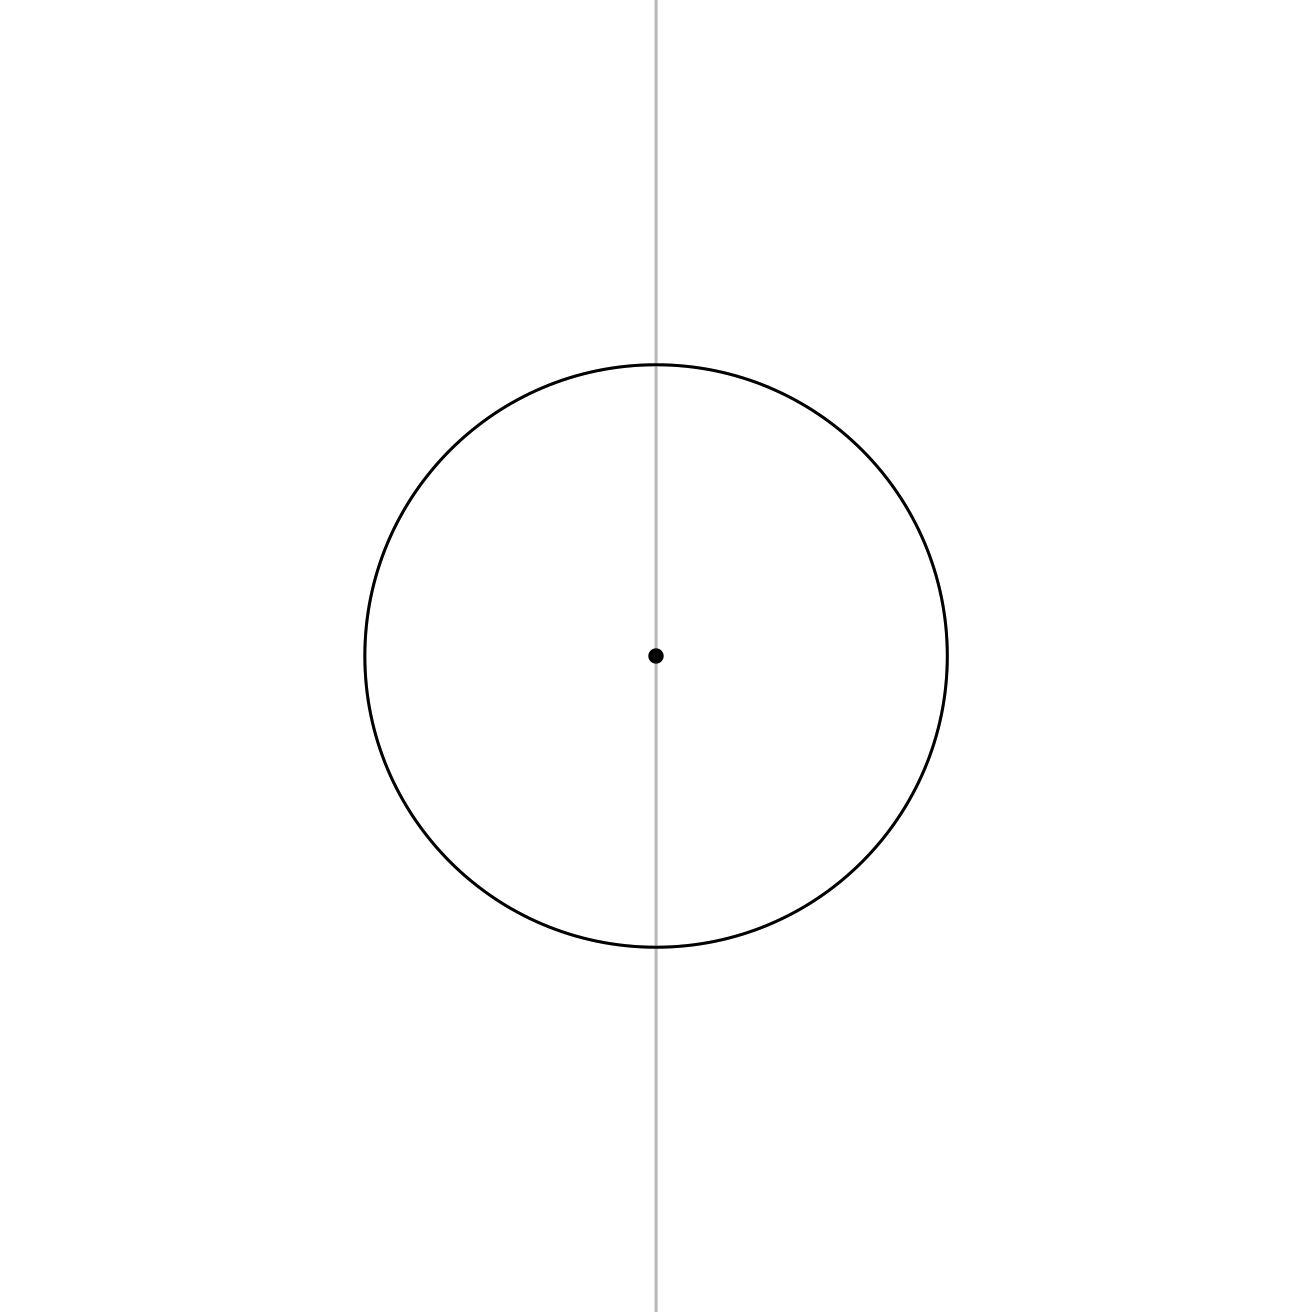
Draw the First Circle
Place the compass point roughly in the centre of the guide line.
Draw a circle.
This is the first circle. Every other circle in the Seed of Life will grow from this one.
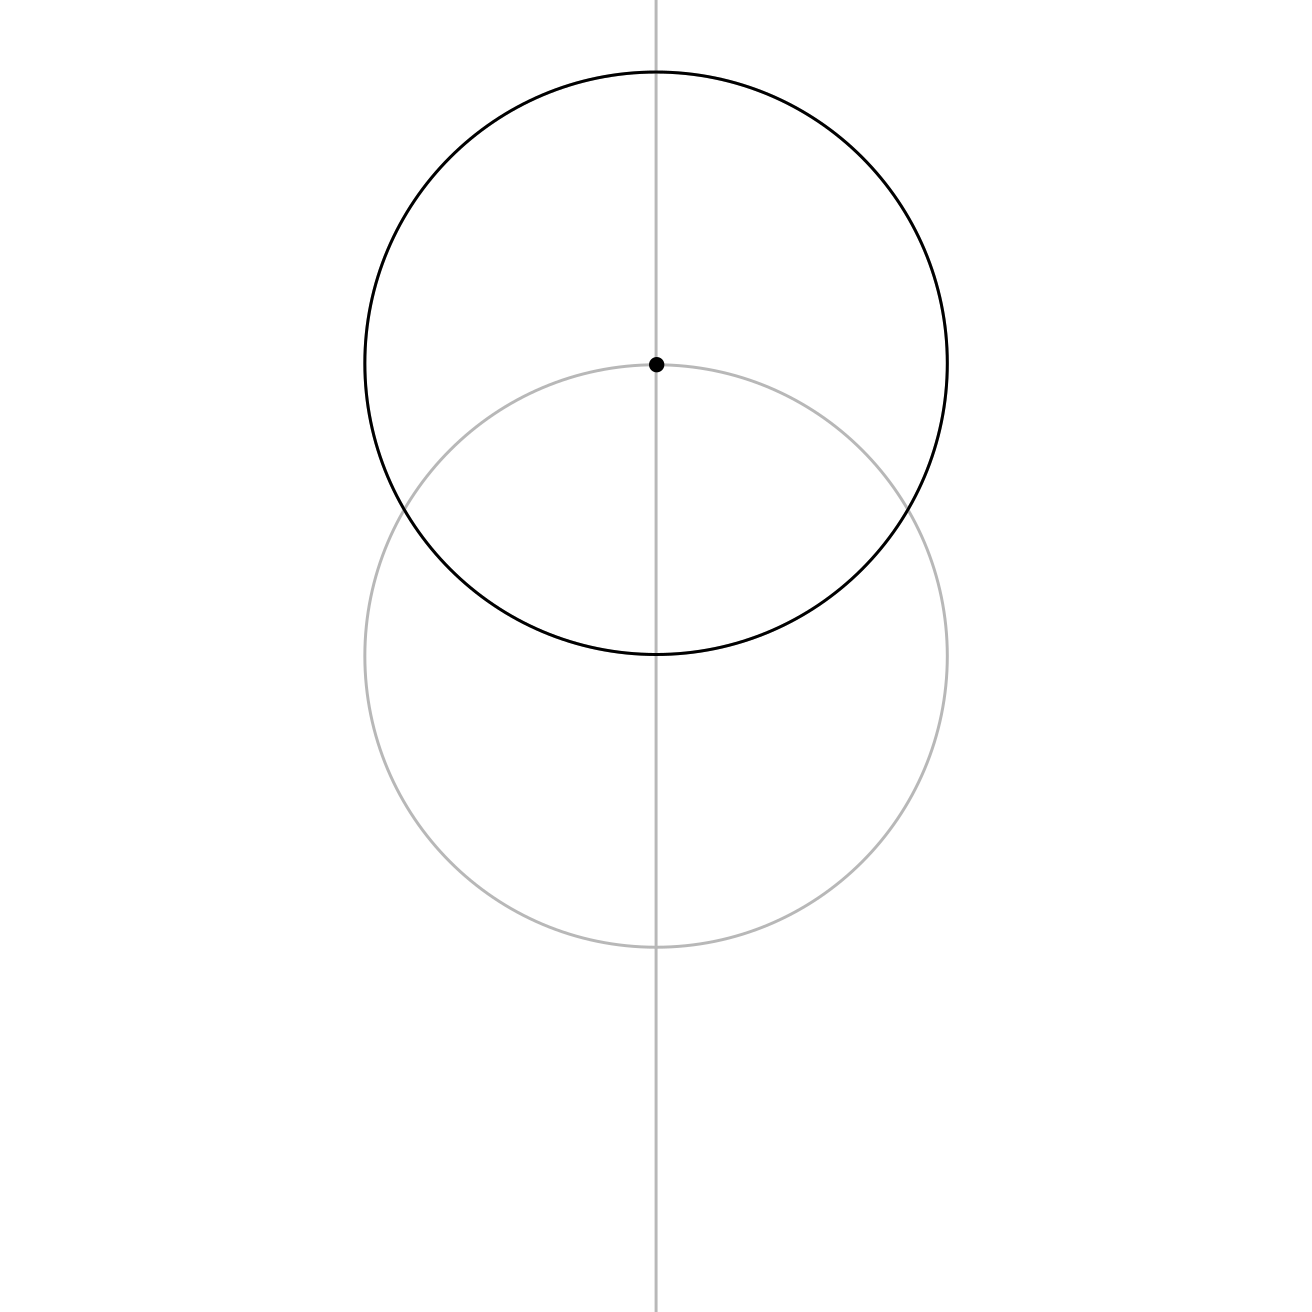
Draw the Top Circle
Place the compass point where the first circle crosses the guide line at the top.
Draw another circle using the same compass width.
Now the circles have started to show you where to go next.
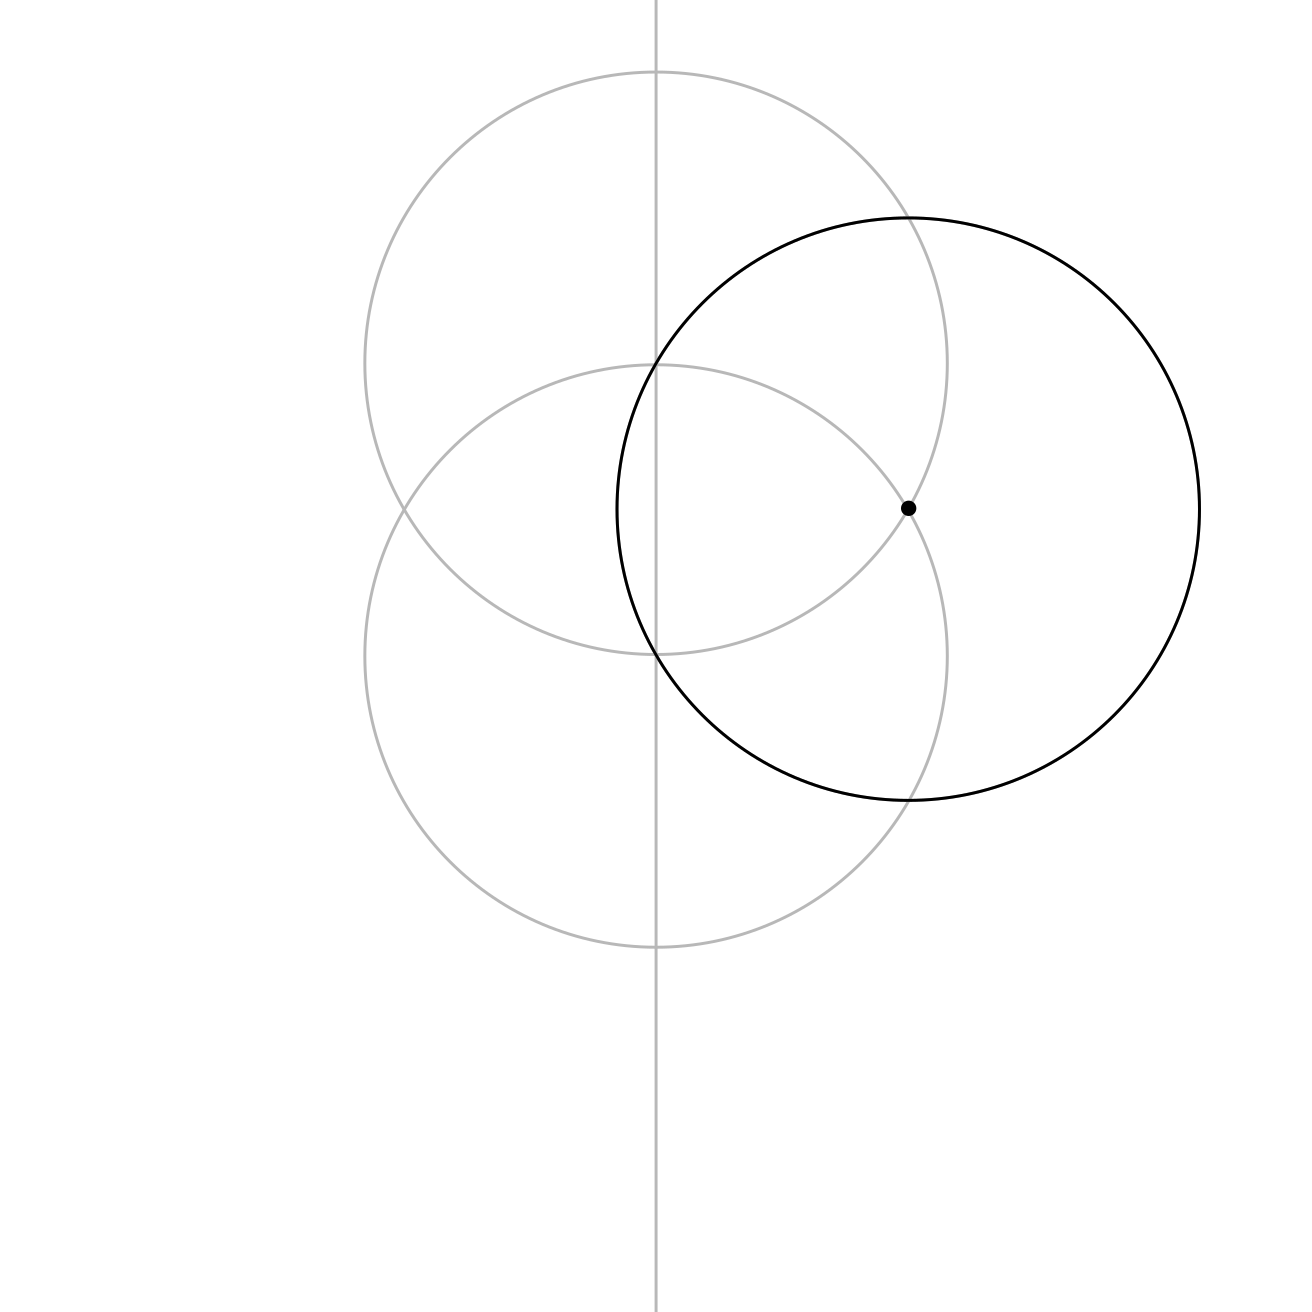
Draw the Upper-Right Circle
Look for the place where the two circles cross on the upper-right side.
Place the compass point there and draw another circle using the same compass width.
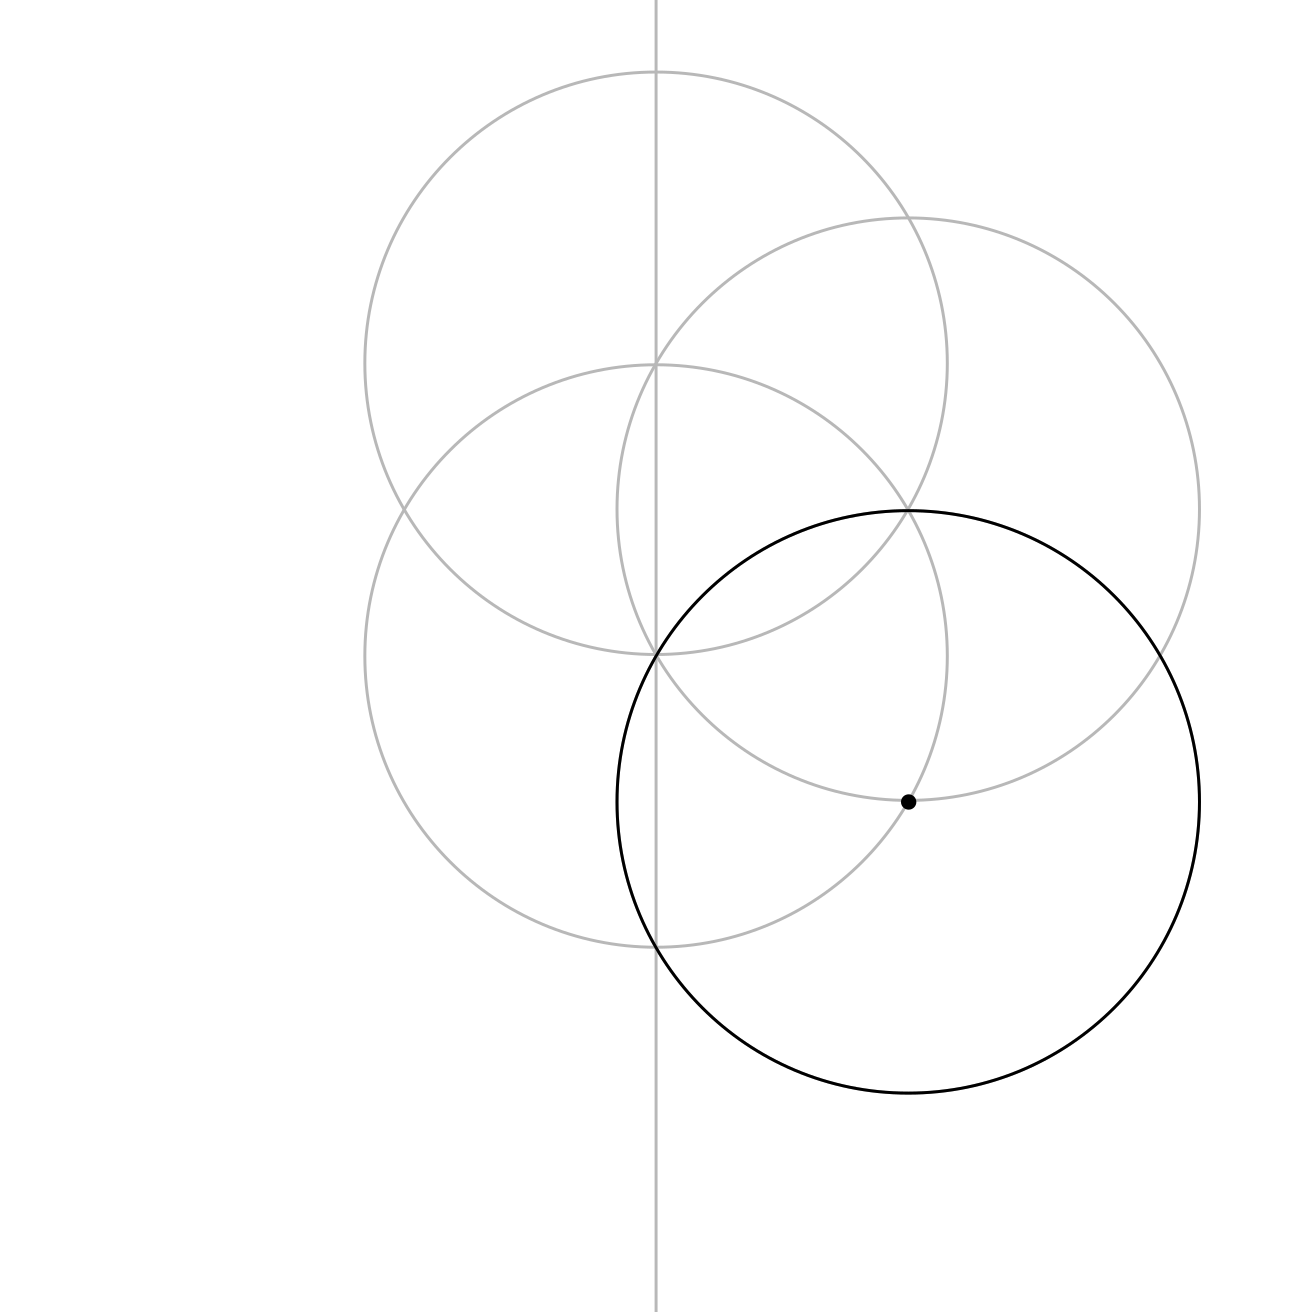
Draw the Next Circle
Move to the next crossing around the first circle.
Place the compass point there and draw another circle using the same compass width.
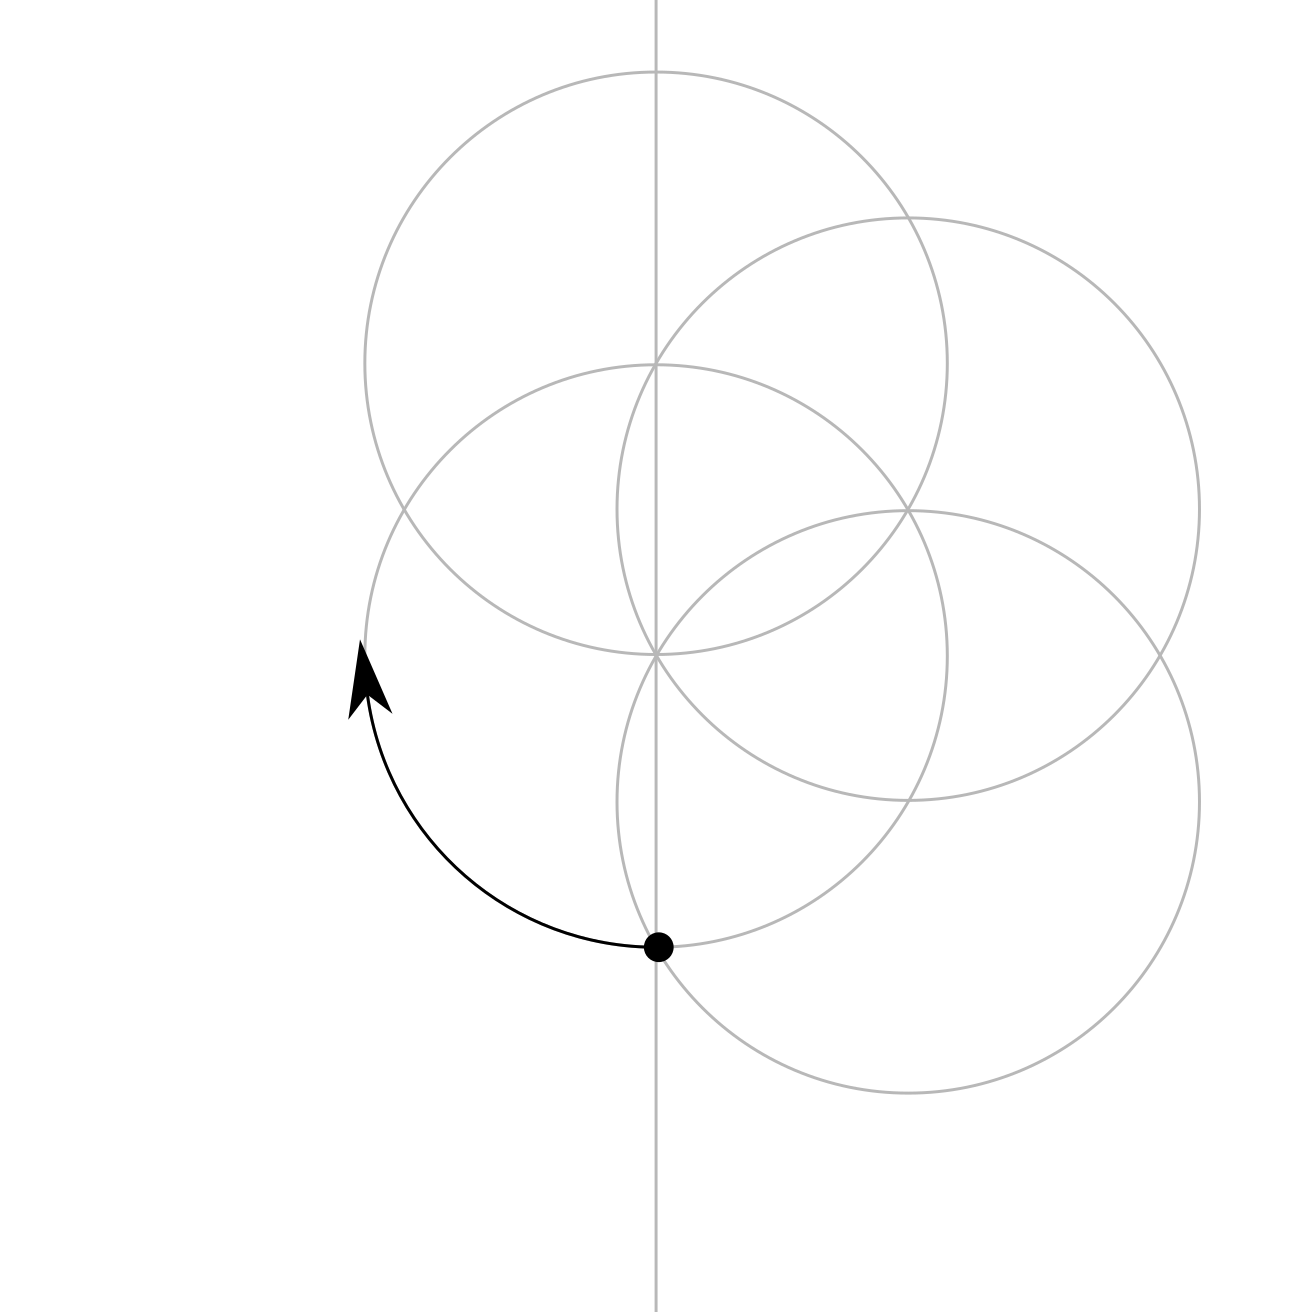
Keep Going Around the Circle
Once you’ve noticed the pattern, you can keep going.
Keep moving around the first circle, using each new crossing to place the next circle.
Remember to keep the compass width the same.
Continue around like a roundabout until the Seed of Life is complete.
Take It In
Pause for a moment and look at what you’ve built.
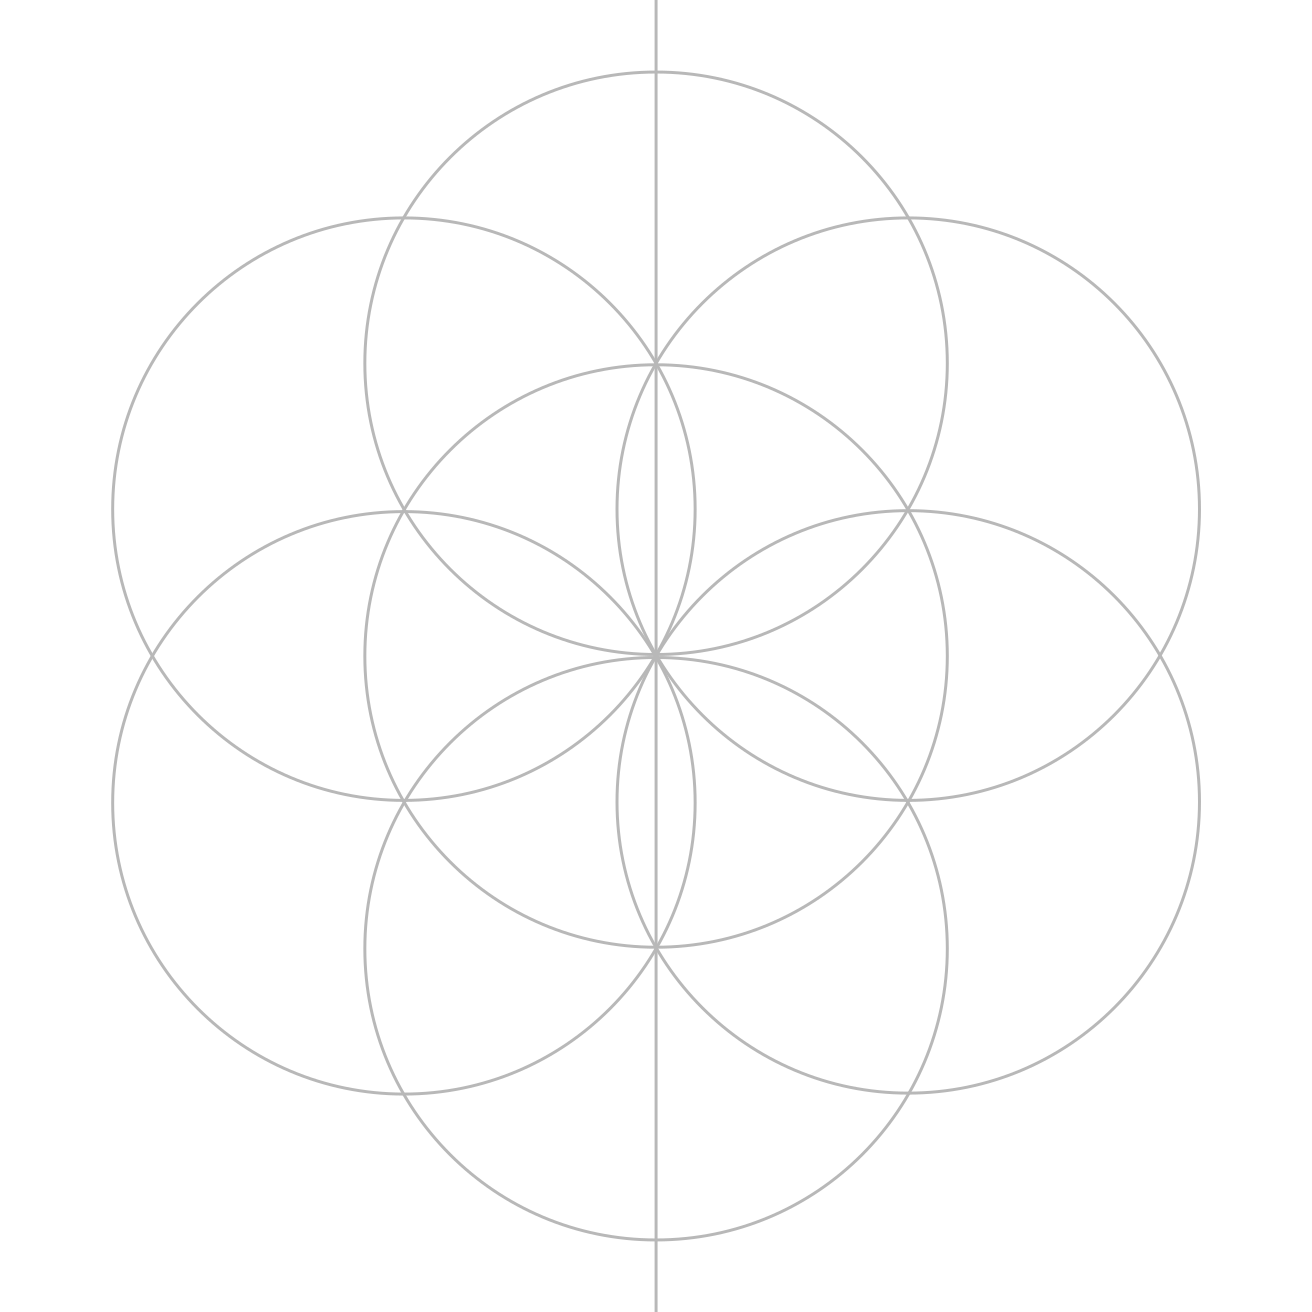
You started with one circle. Now the Seed of Life has appeared.
Biscuit trusted the circles all along.
Tidy the Seed of Life
You can leave the construction as it is or strengthen the final circles.
You can keep the guide line or erase it.
It’s up to you, but it can be useful if you want to keep building.
Need Another Go?
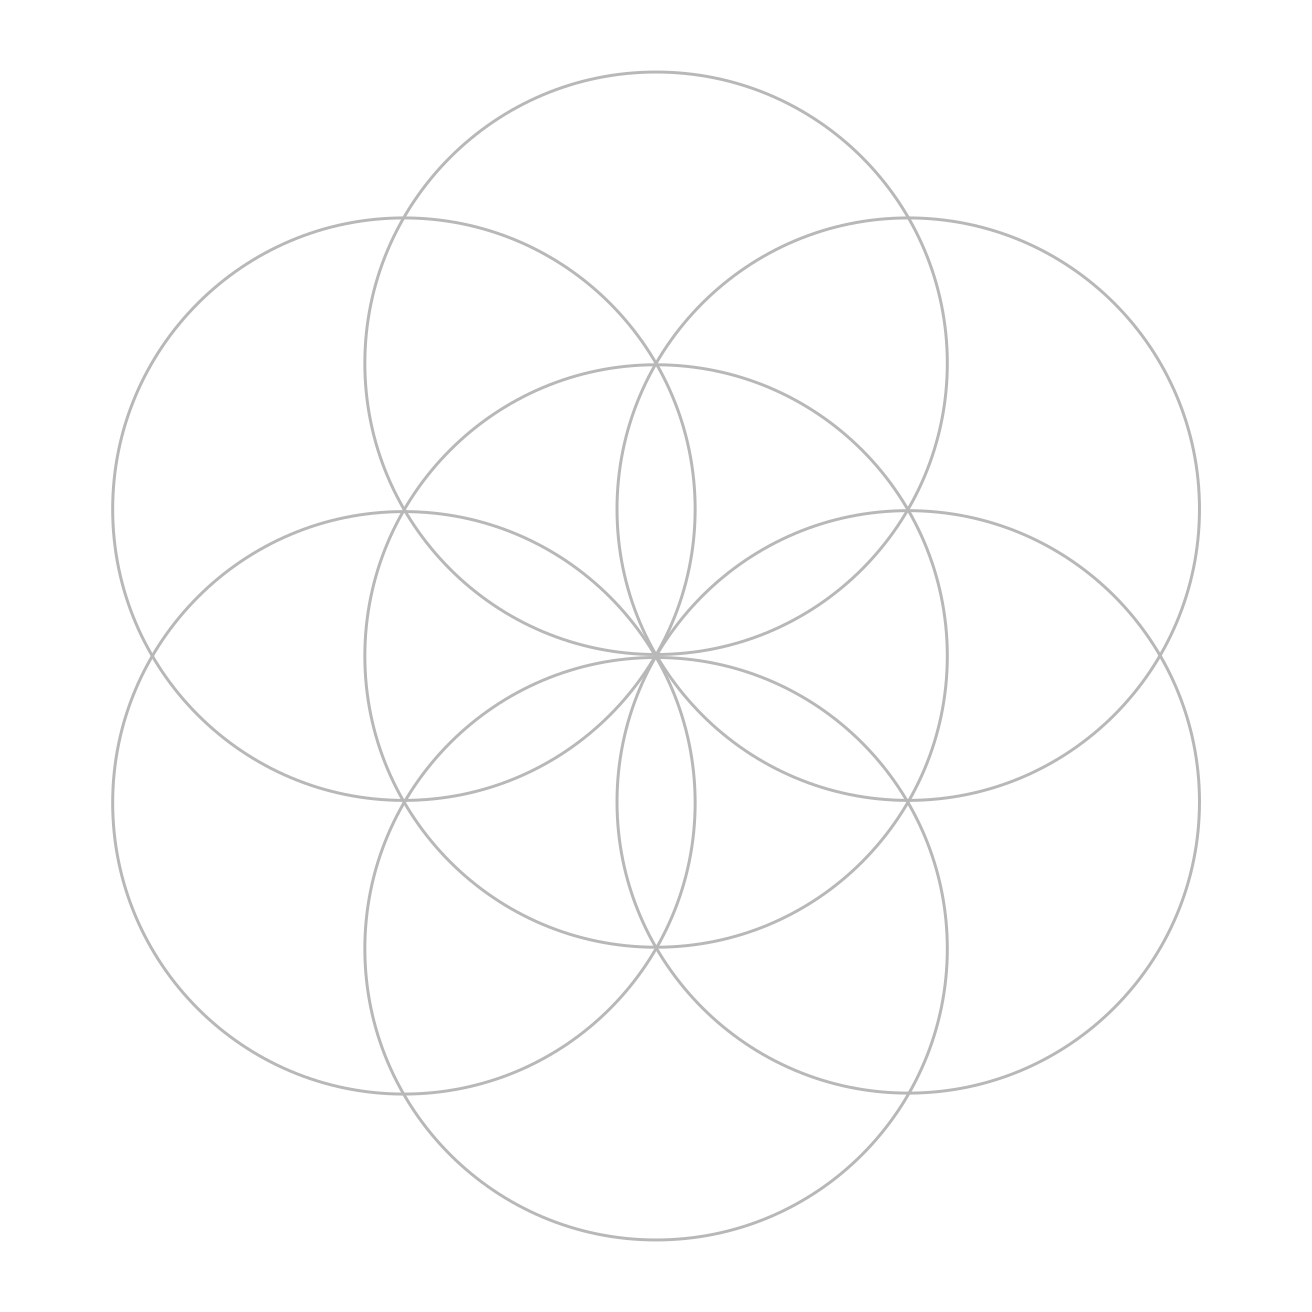
If your circles don’t line up neatly, good news: that’s exactly what practice is for. Check out the tool tips and try again.
Smudge calls this “getting closer.”
Make It Yours
Now make it yours.
Colour it, pattern it, turn it into a flower, or use it as the starting point for something completely different.
You can keep it simple or make it as detailed as you like.
Follow a pattern, invent a pattern, or see what happens when you make one up as you go.
Where Next?
The Hidden Grid
At a Glance
Get it. Print it. Make it.
The Hidden Grid
In this task, you’re going to make a square grid out of… circles.
Circles?!
Yes. Circles.
How is that possible?
Orin thinks it’s magic. Smudge agrees. Biscuit is not ready to rule anything out.
Let’s see for ourselves.
The printable version gives you the construction to work through on paper while you reveal the hidden grid.
Steps
Begin with the Seed of Life
Begin with your completed Seed of Life.
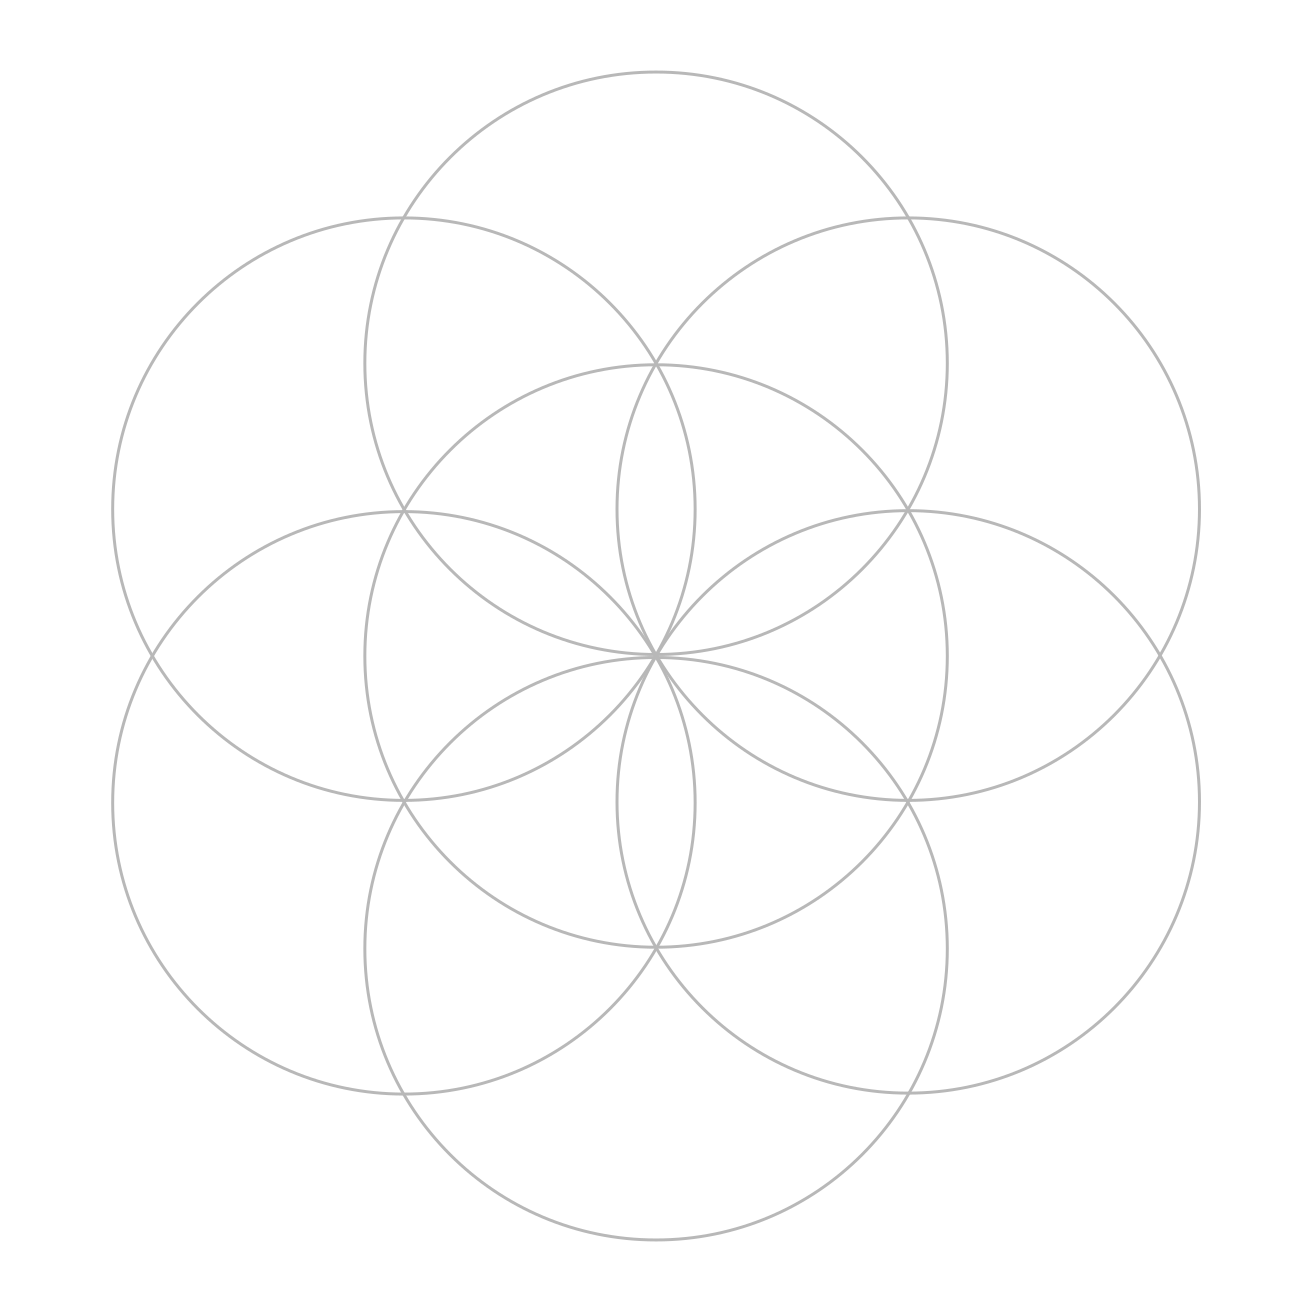
Got it? Excellent. Place it in front of you and take a moment to look at the circles, petals, crossings, and centre point.
Something is hiding in there. You’re going to find it.
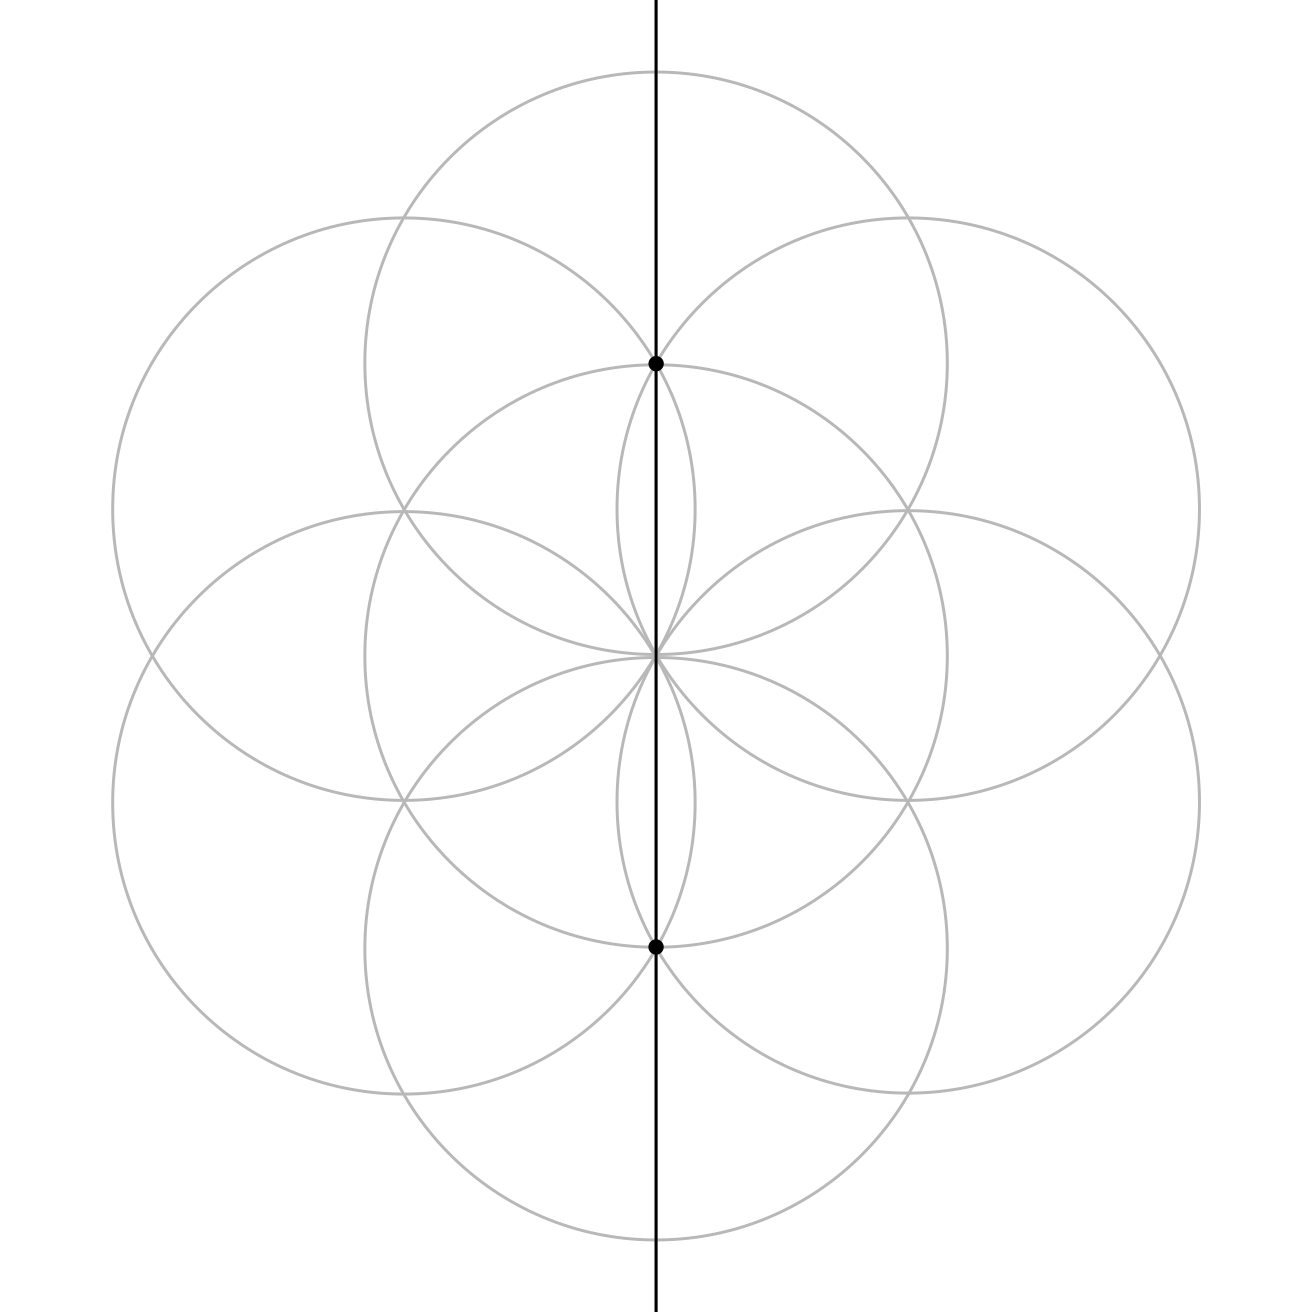
Draw the Vertical Centre Line
First up: find the vertical centre of the pattern.
Draw a straight line through the centre of the Seed of Life.
How? Look closely and you’ll find two nice intersections to help you. Find the right ones and… pop! Vertical line perfection.
Draw the Horizontal Centre Line
Now draw a straight horizontal line through the centre of the pattern.
Same story. Different intersections.
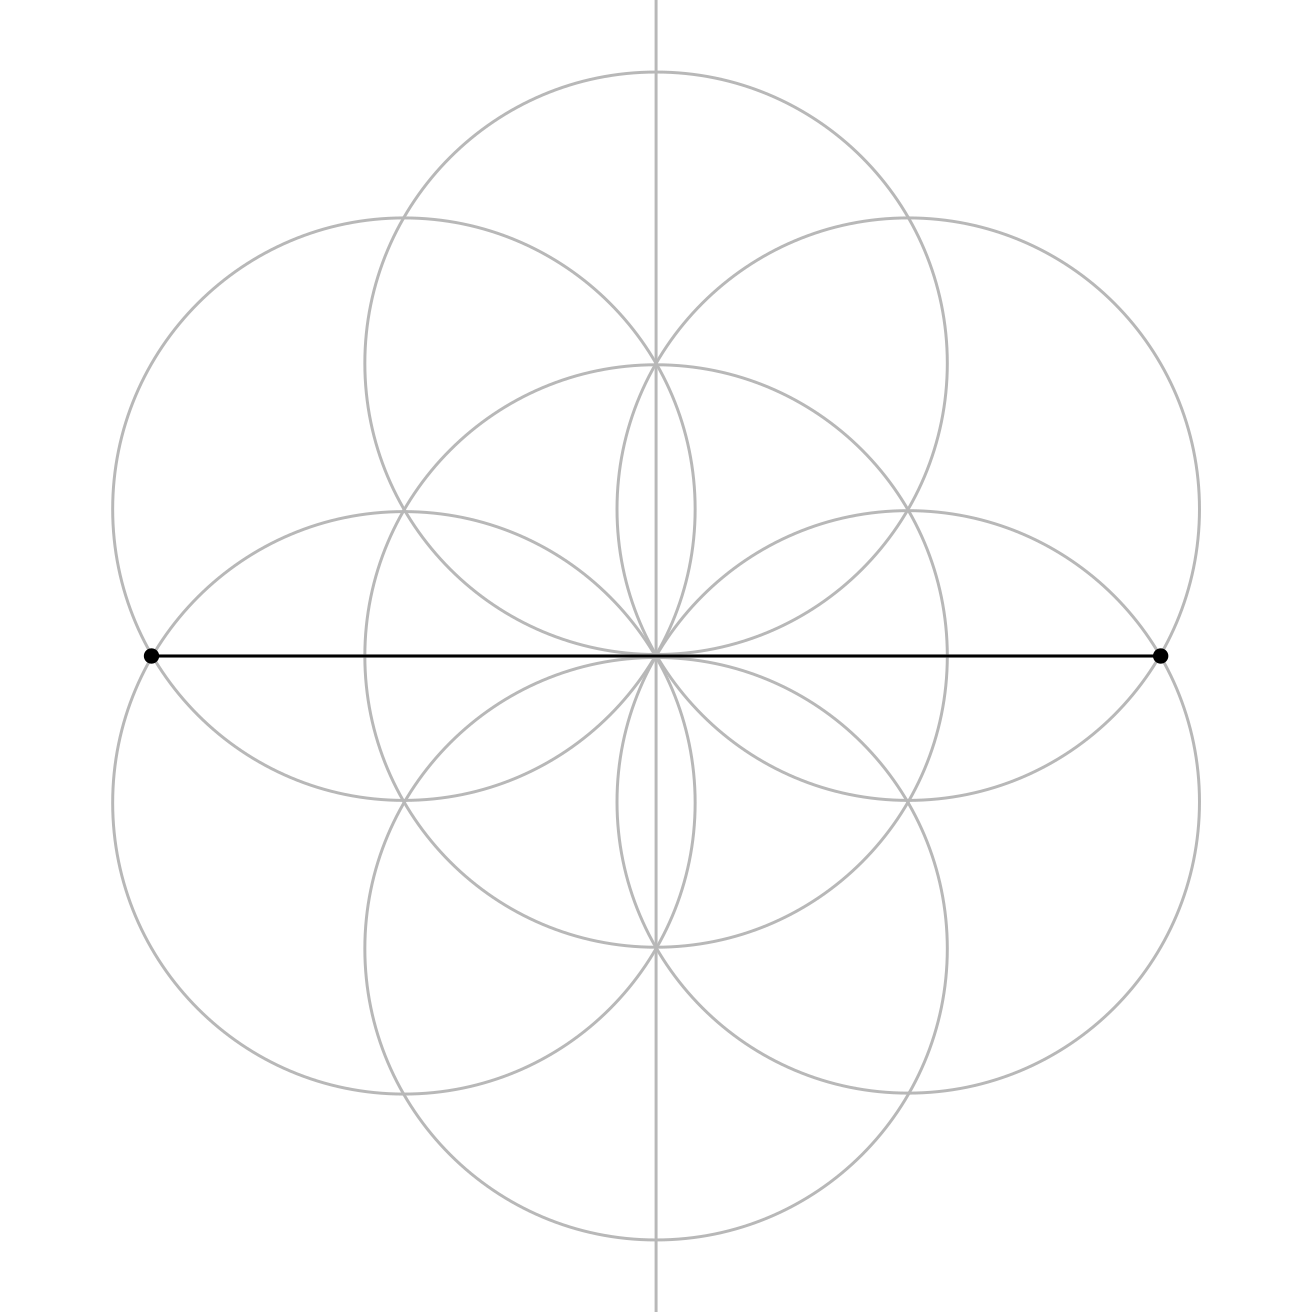
You now have two main directions: vertical and horizontal. Hurrah!
Add Left and Right Circles
Make sure your compass is set to the same width as the Seed of Life circles.
Use the left crossing of the horizontal line and centre circle to draw a circle. Then do the same on the right side.
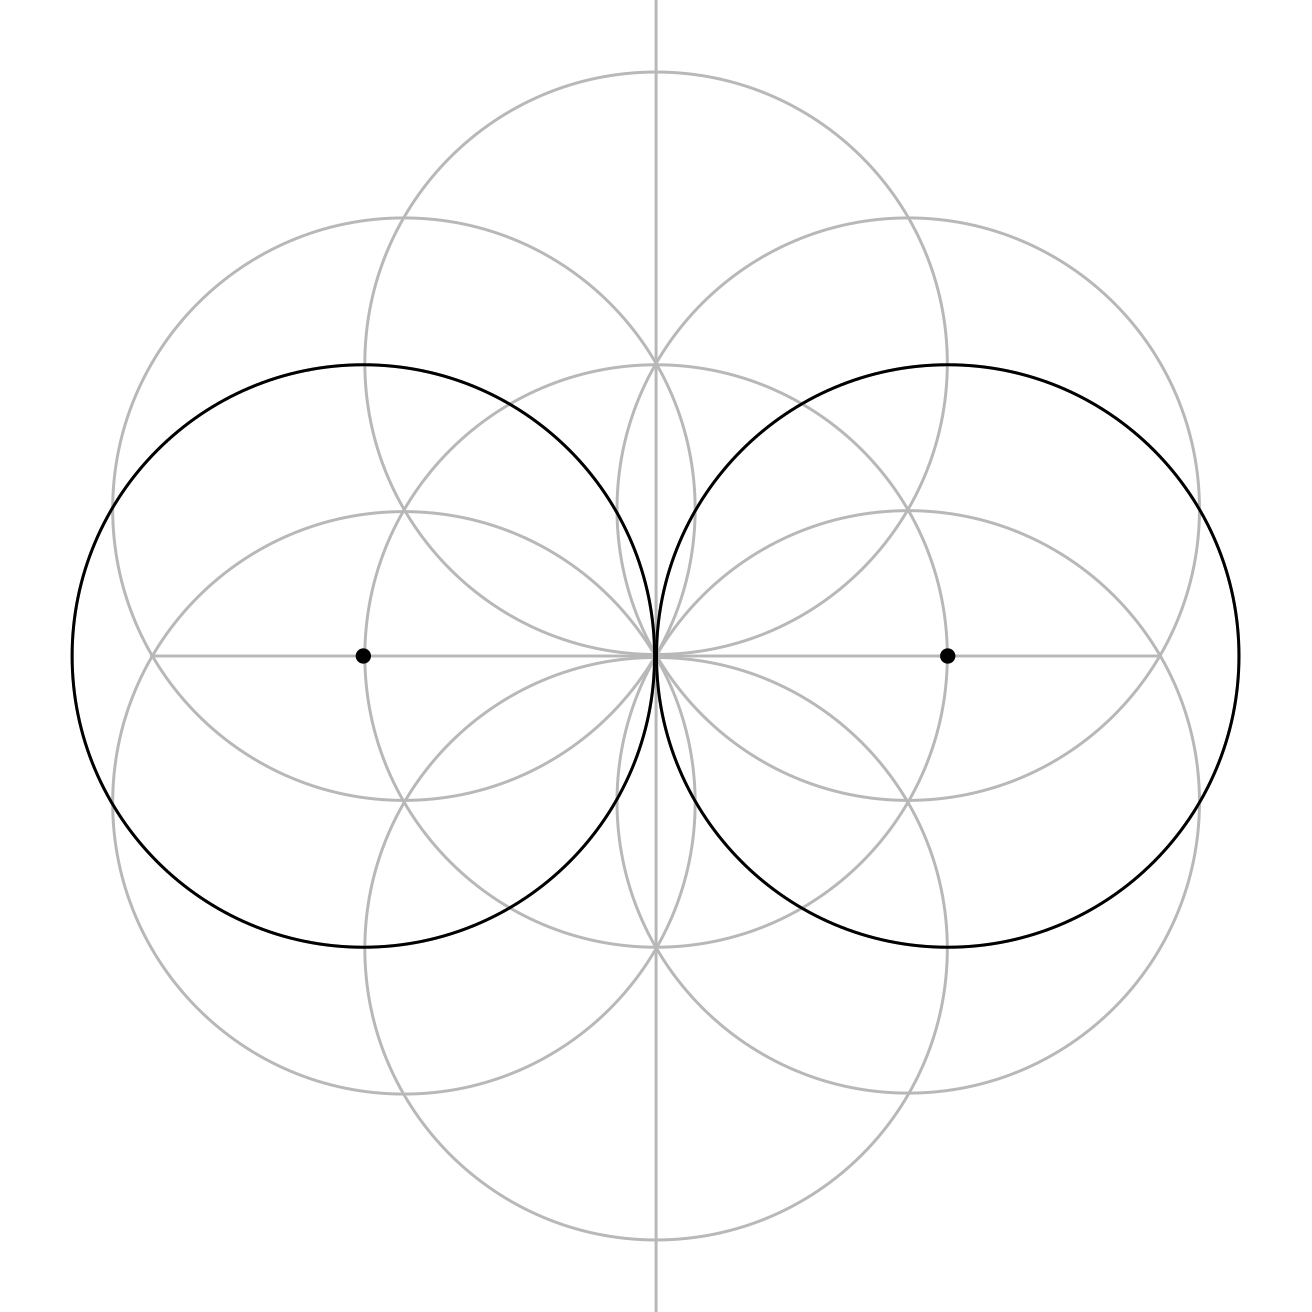
What are these for?
Keep going. You’re about to find out.
Create the Second Seed of Life
Now use the two new circles to complete a second Seed of Life nestled within the first.
Add four more circles using the same compass width.
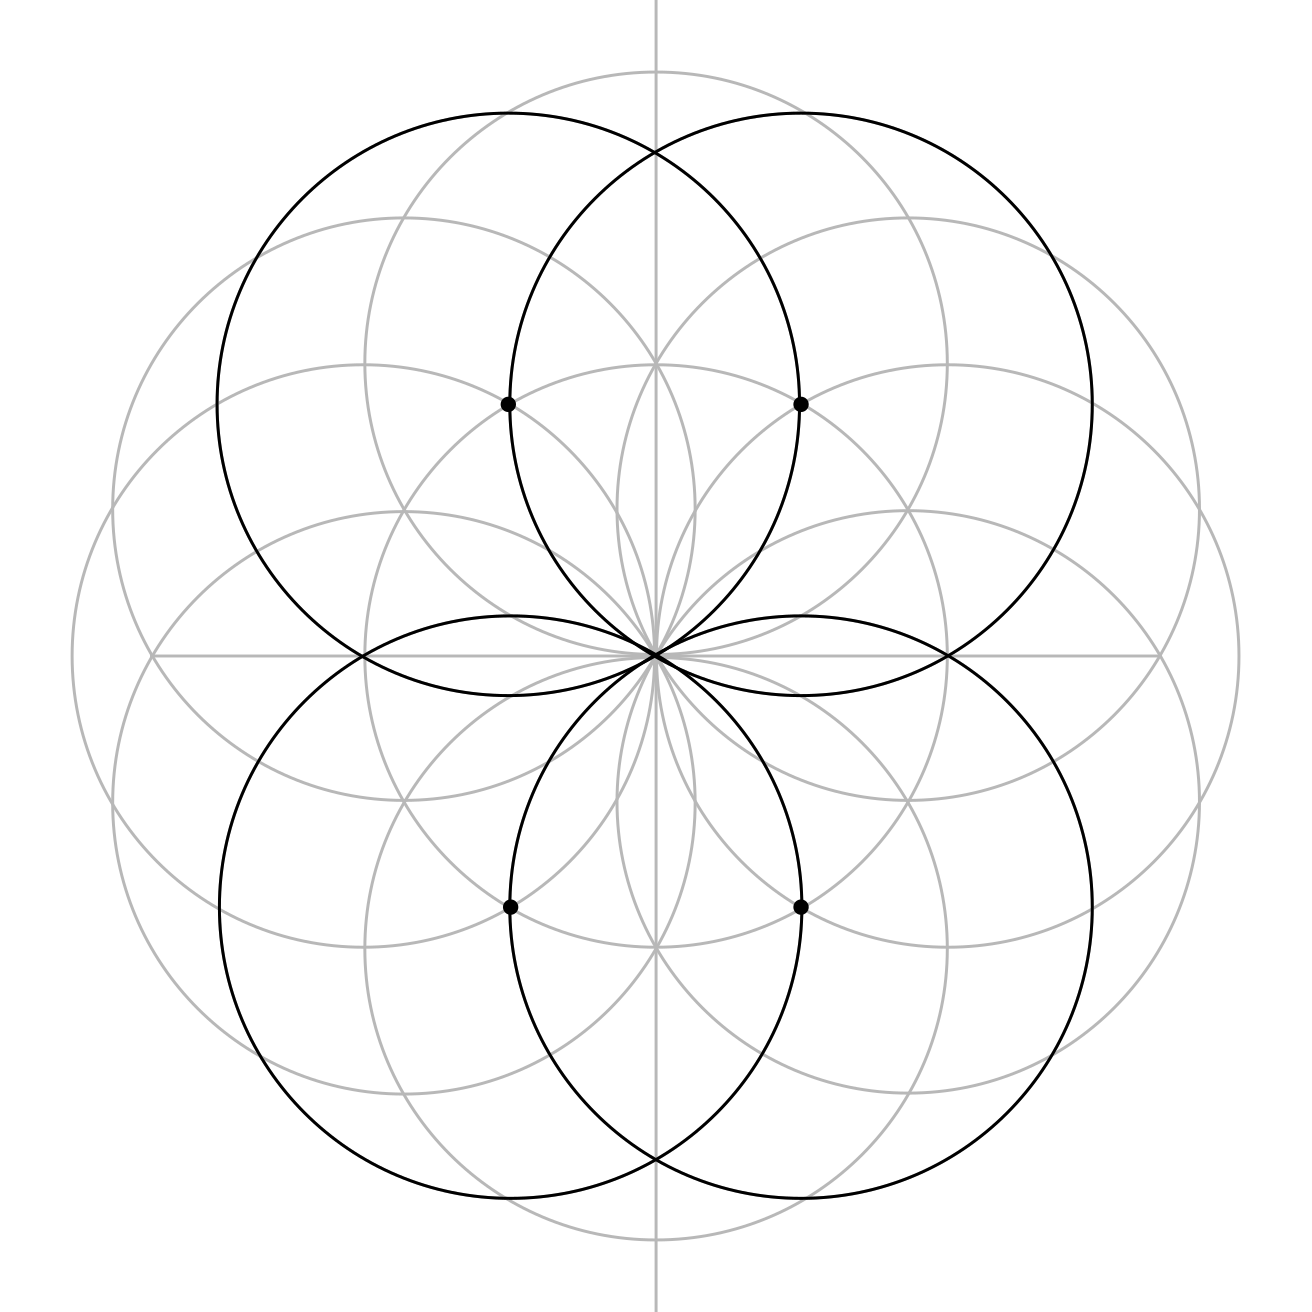
Take It In
Pause for a moment and look at what you’ve built.
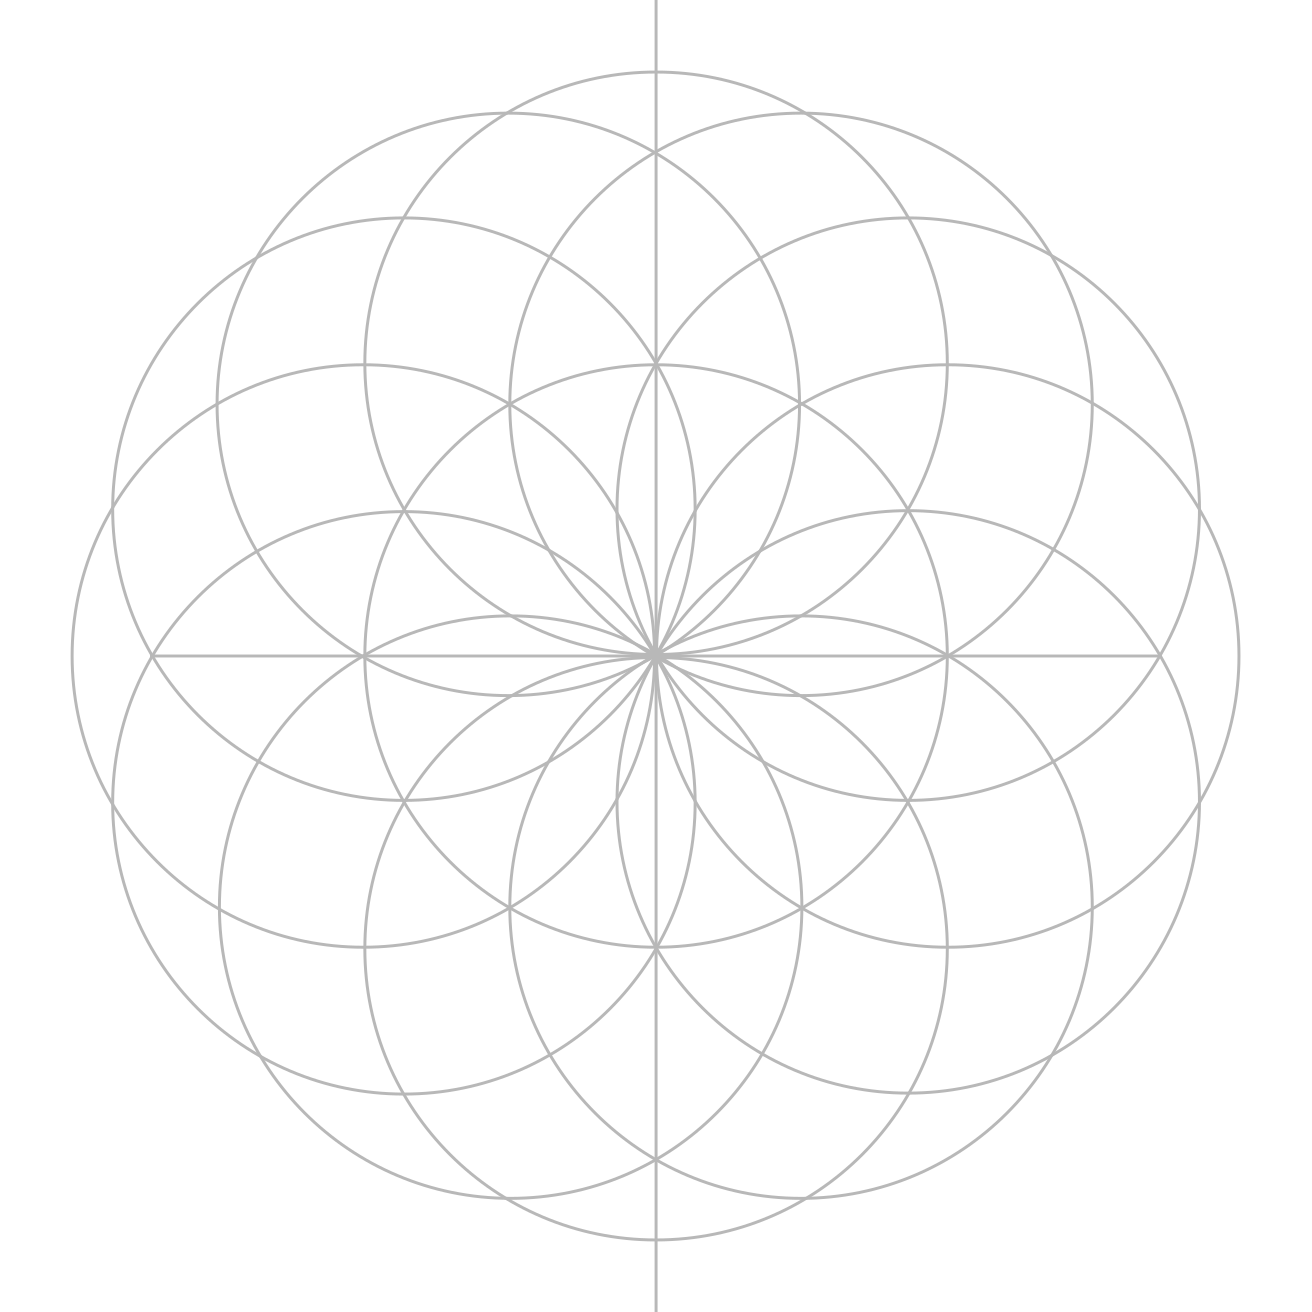
The original Seed of Life is still there. But now there’s another one snugly inside it.
Lovely!
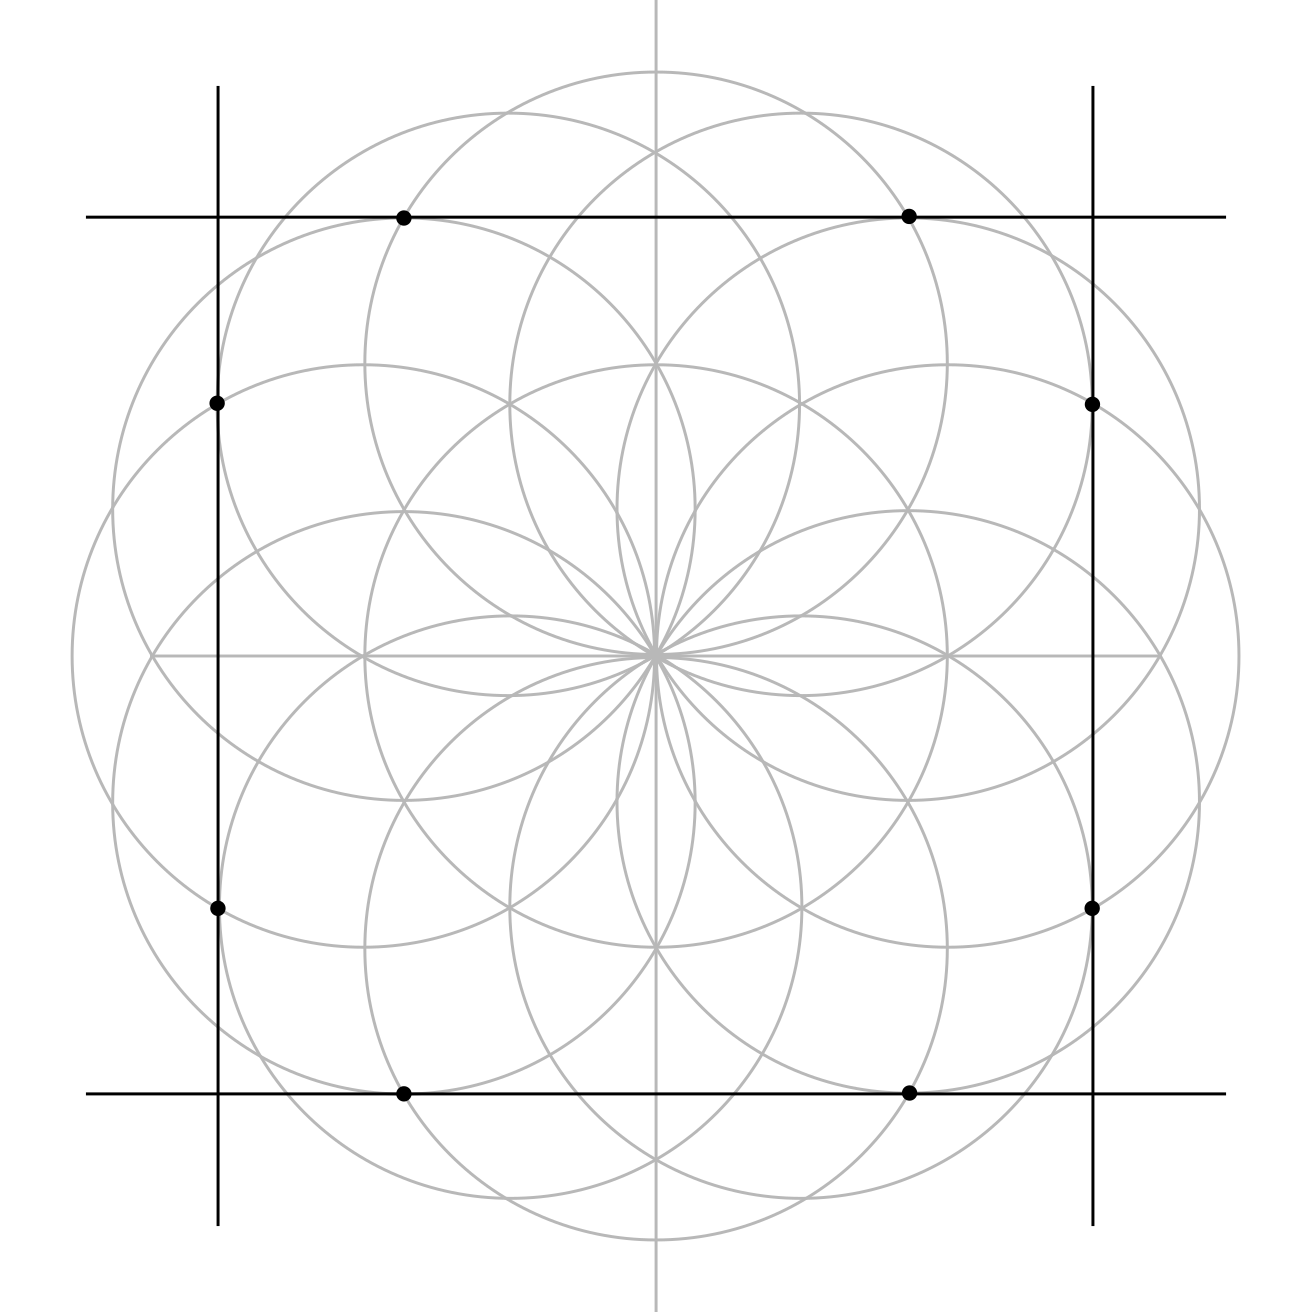
Draw the Outer Square
Look carefully for the marked crossings (dots).
Use these points to draw the four straight lines that reveal the outer square.
Draw the Inner Grid
But wait! There are more useful points. These ones show where the inner grid lines belong.
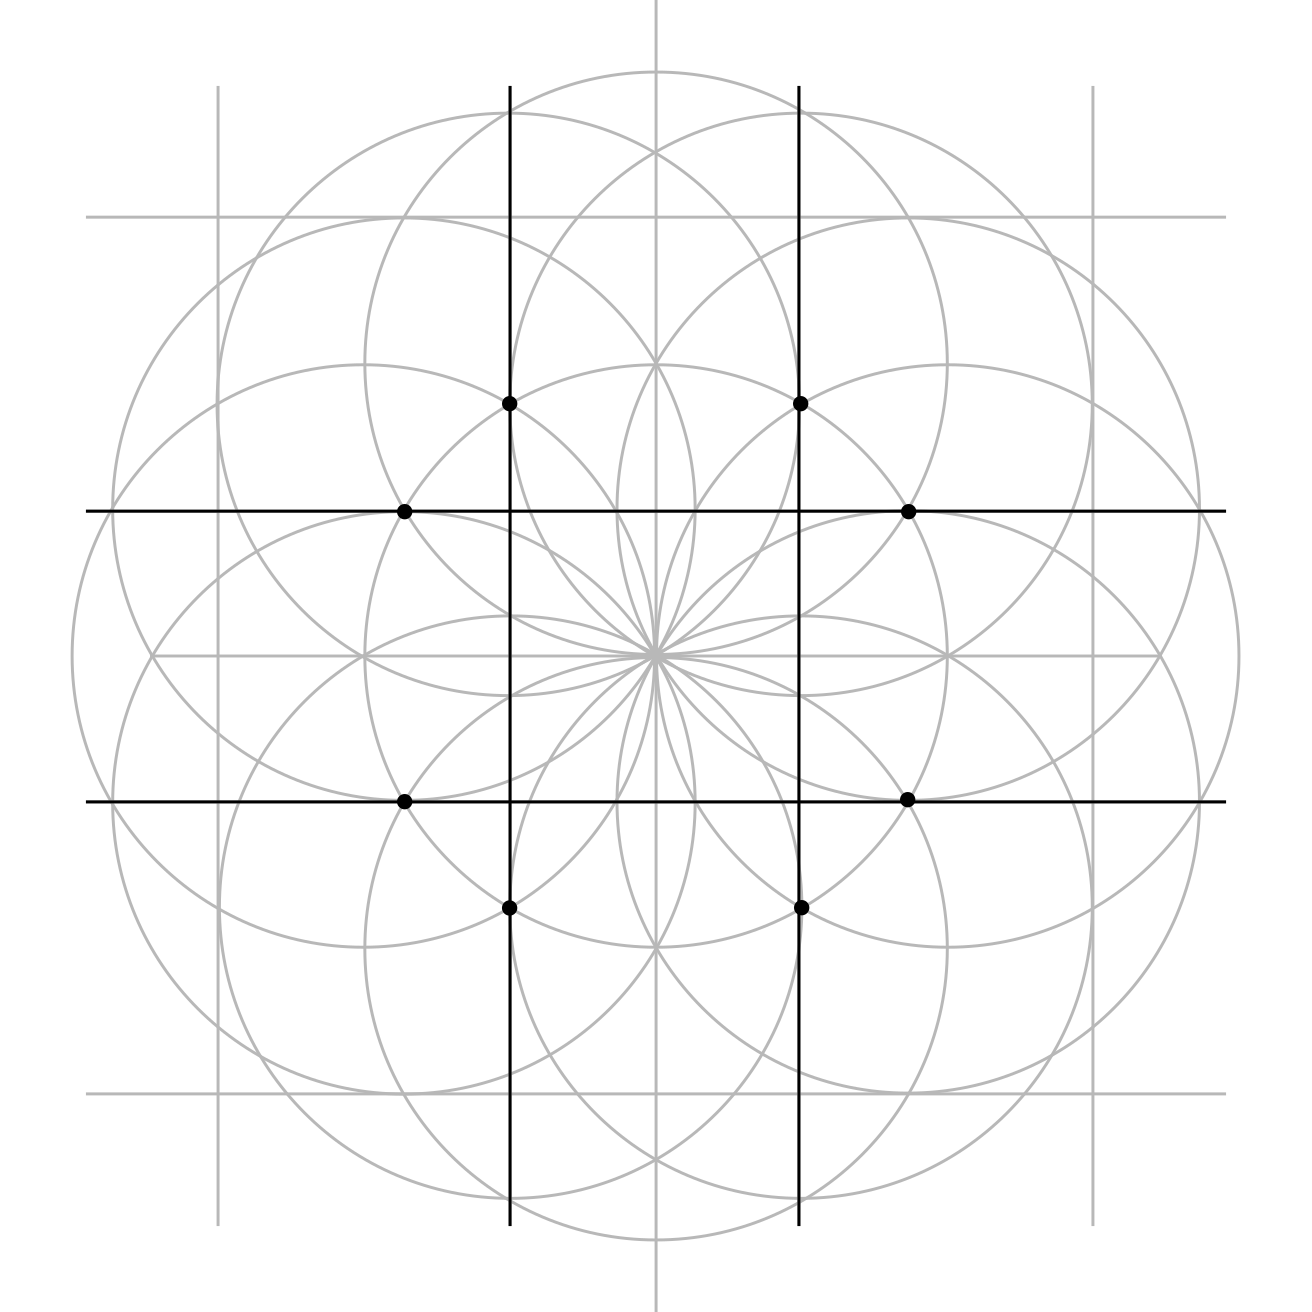
Together they divide the big square into nine equal spaces.
No hiding now. Everyone can see you, griddy.
Strengthen the Grid
Make it clearer for Biscuit by thickening the grid lines. Use a thicker pen, pencil, or colour, or even just press a little harder.
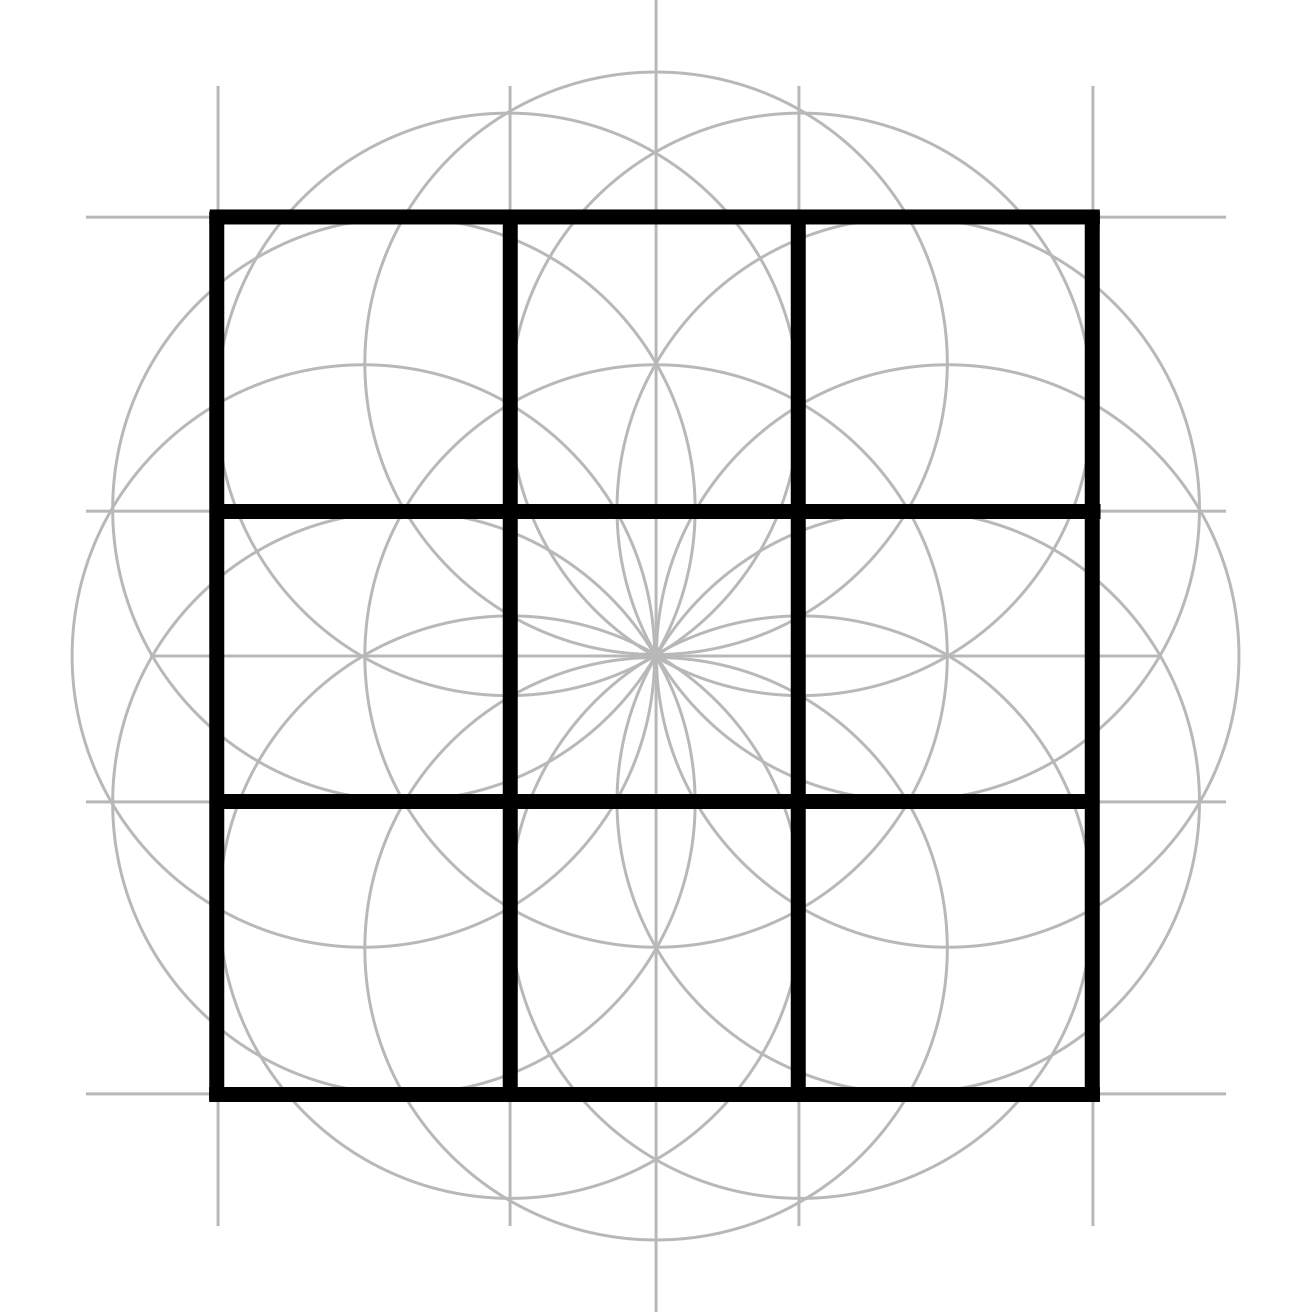
Congratulations! You’ve done the impossible: made a square grid out of circles.
Need Another Go?
If your grid doesn’t quite line up, good news: that’s exactly what practice is for. Check out the tool tips and try again.
Make It Yours
Colour it, pattern it, add a centre symbol, fill each square differently, or let one design wander across the whole grid. It's your grid and it's up to you!
Where Next?
Root Chakra Symbol
At a Glance
Get it. Print it. Make it.
Root Chakra Symbol
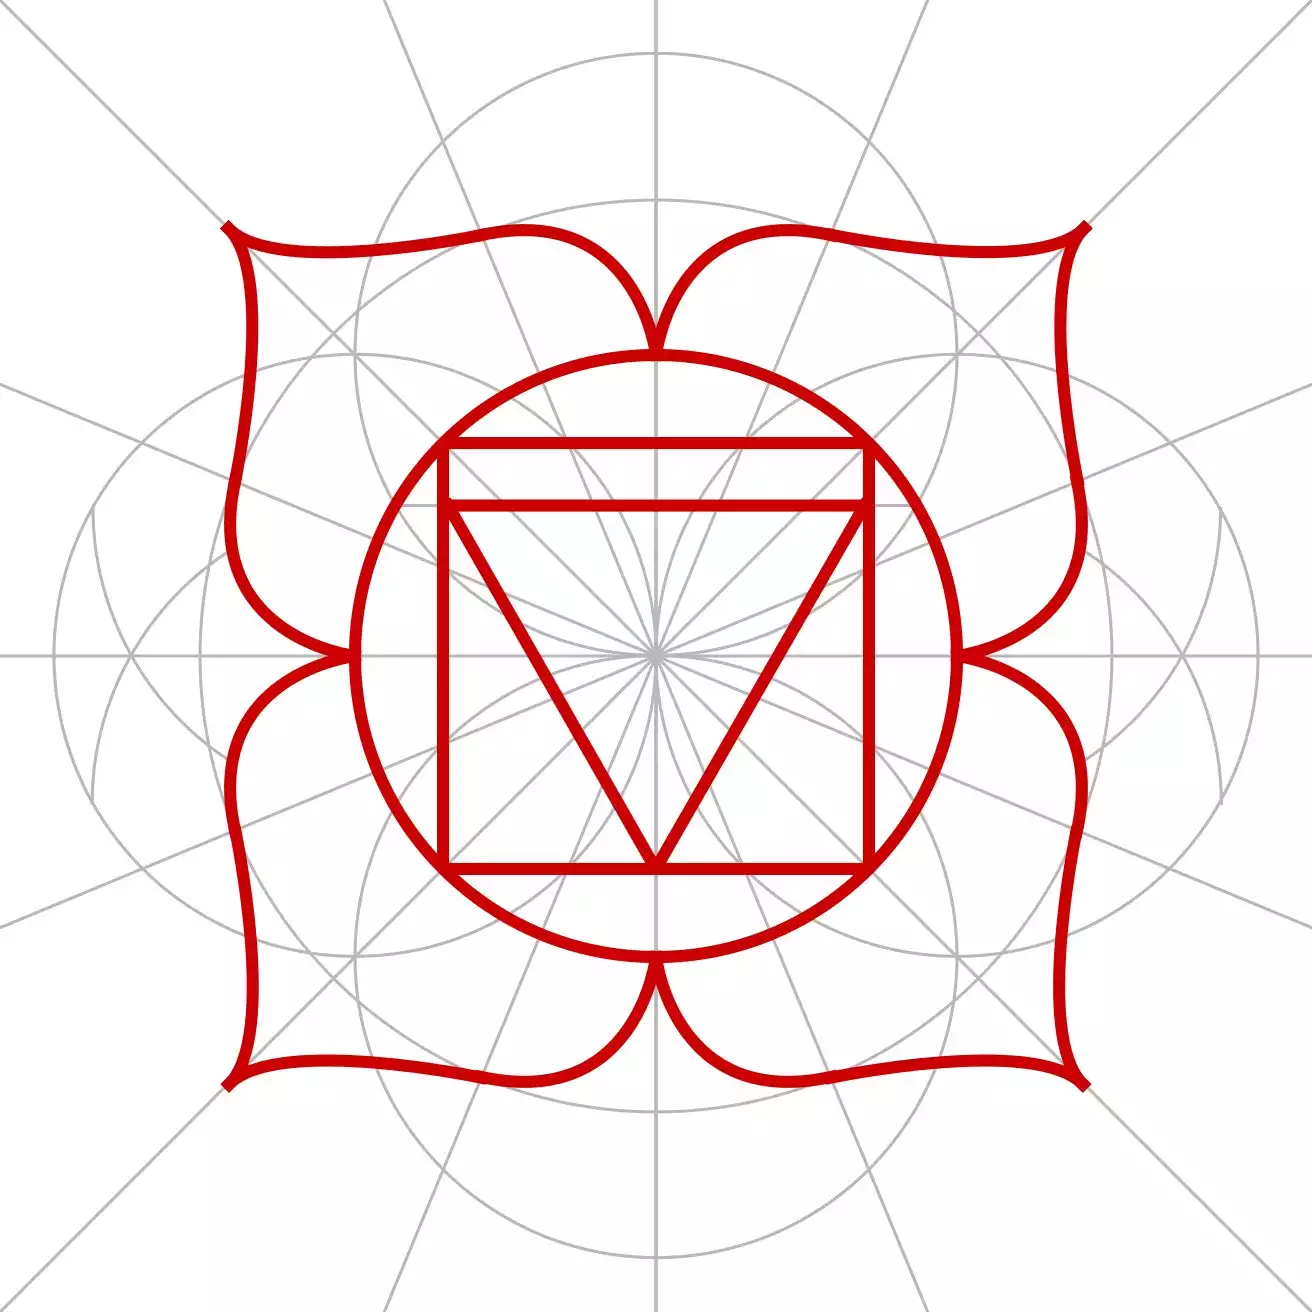
In this task, you're going to build a symbol from circles, revealing a square, a triangle and other hidden shapes along the way.
That's right! A symbol from a square from circles.
At first it may look complicated.
Don't worry. We'll take it slow!
Let's see what appears.
The printable version gives you the full construction to work through on paper at your own pace.
Steps
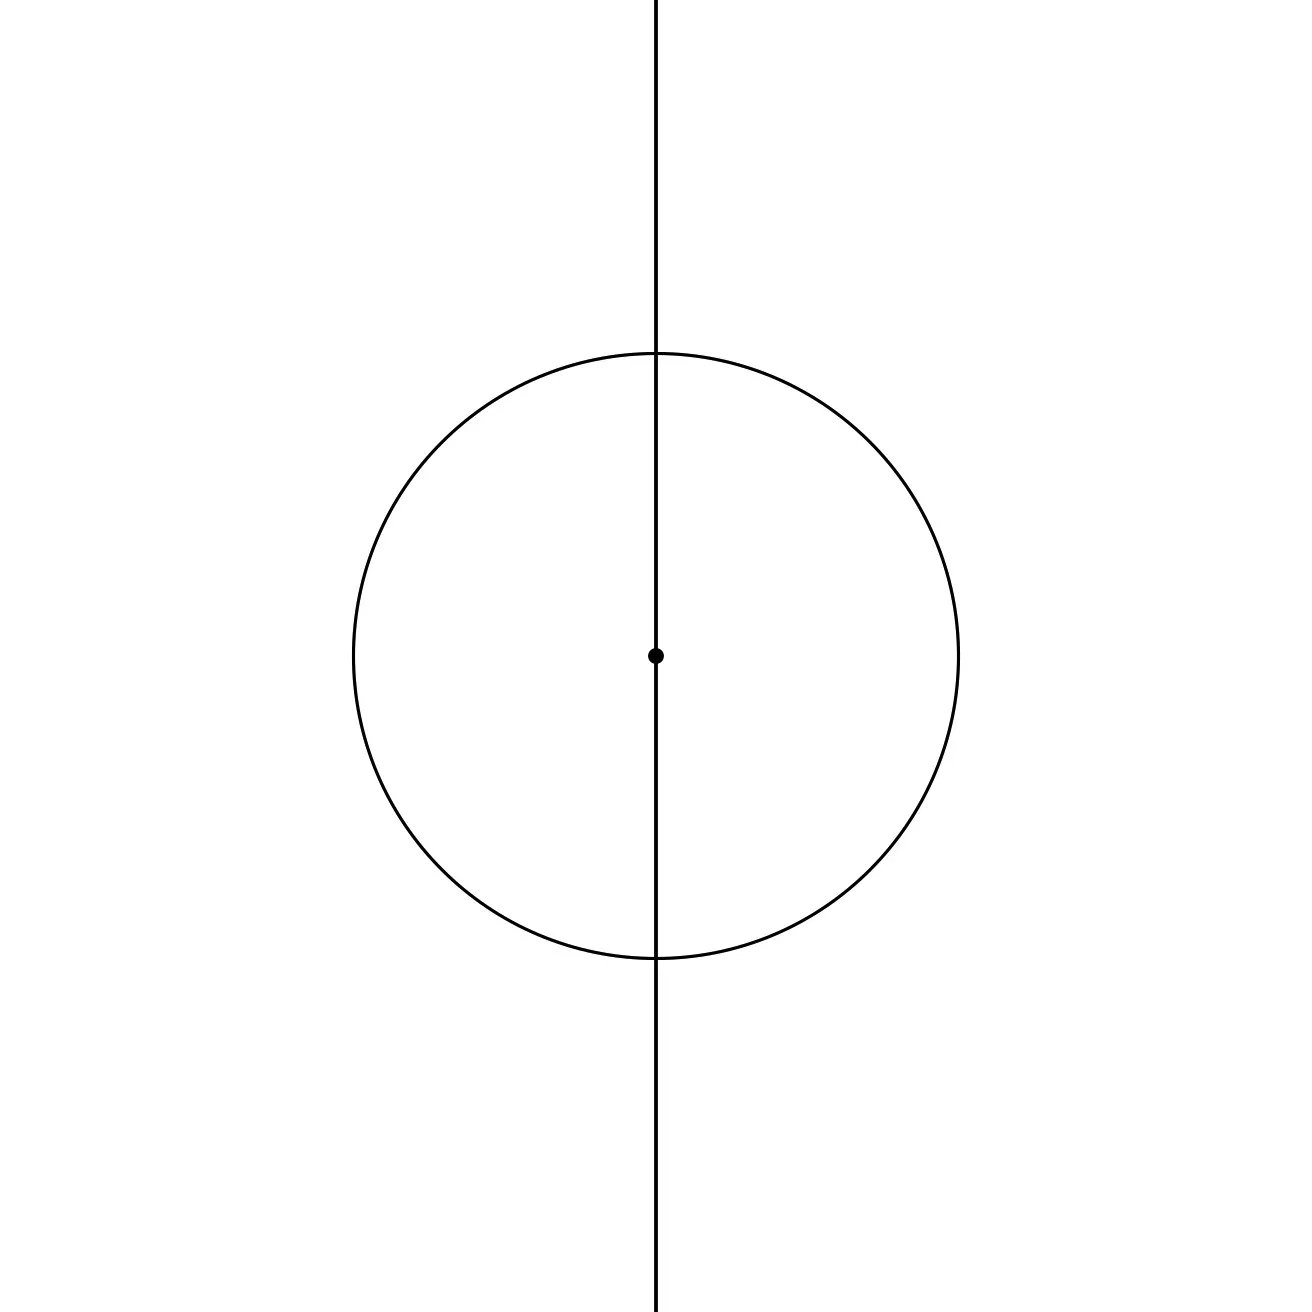
Draw the First Circle
Draw a vertical line down the middle of the page.
Then use a compass to draw a circle centred on the line.
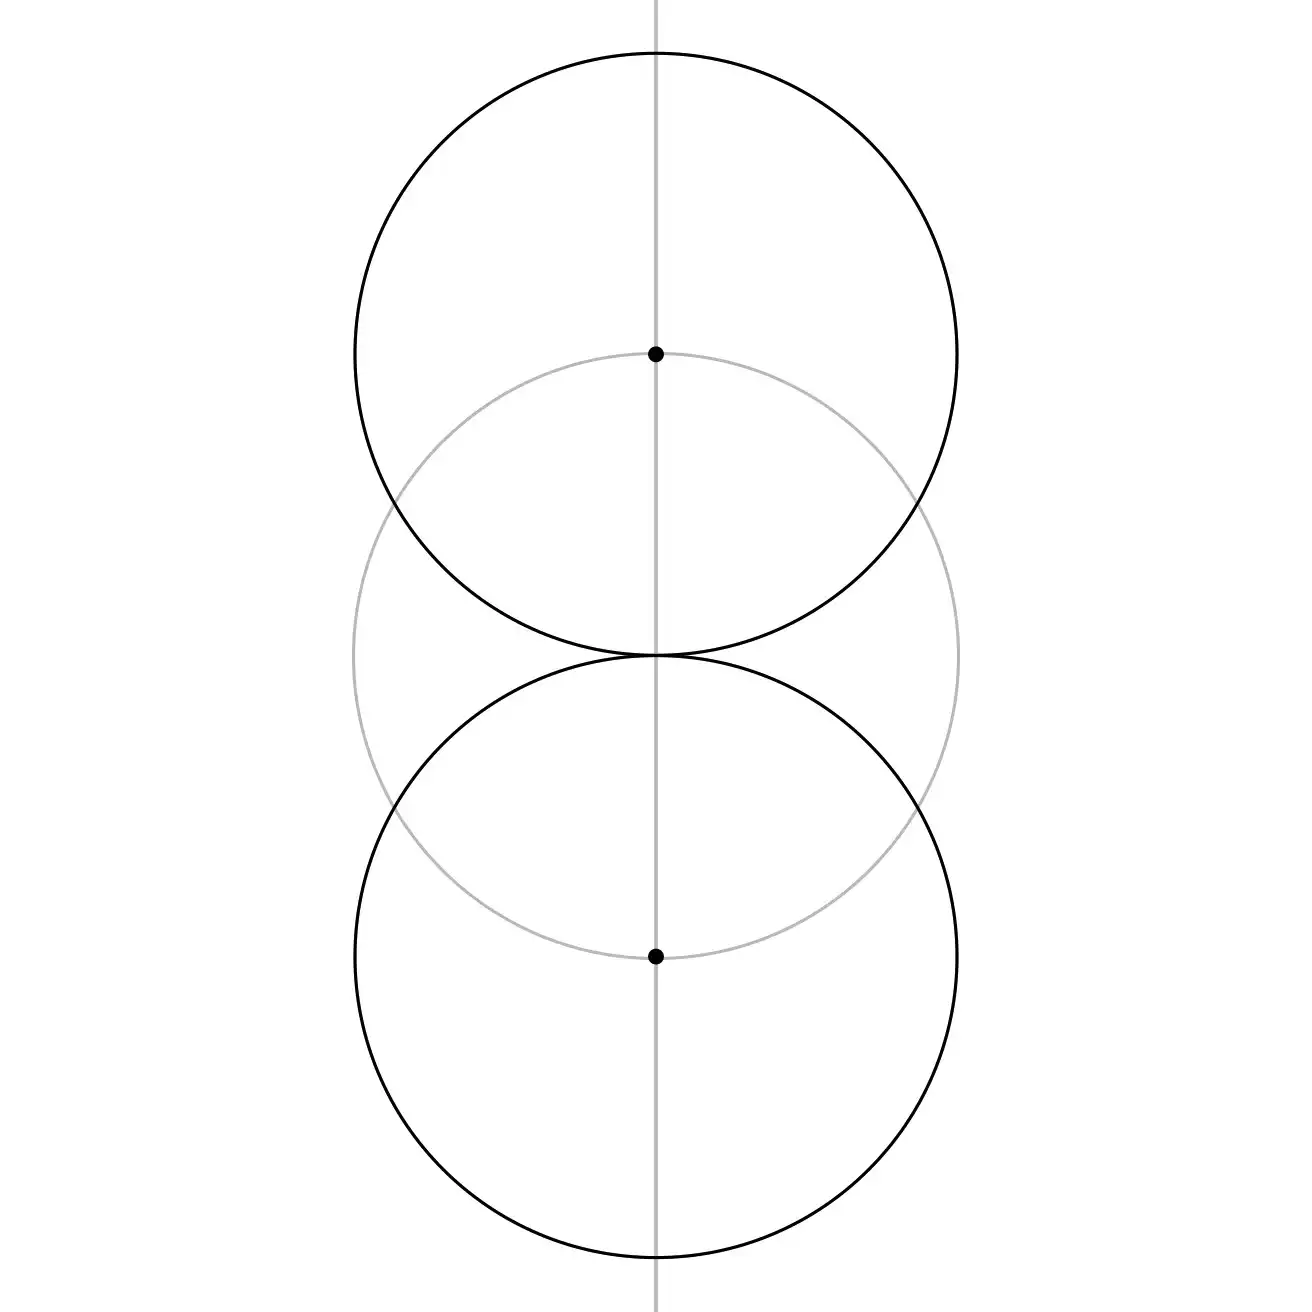
Add the Top and Bottom Circles
Now draw two more circles—one above, one below—using the intersections of the first circle and the line as their centres.
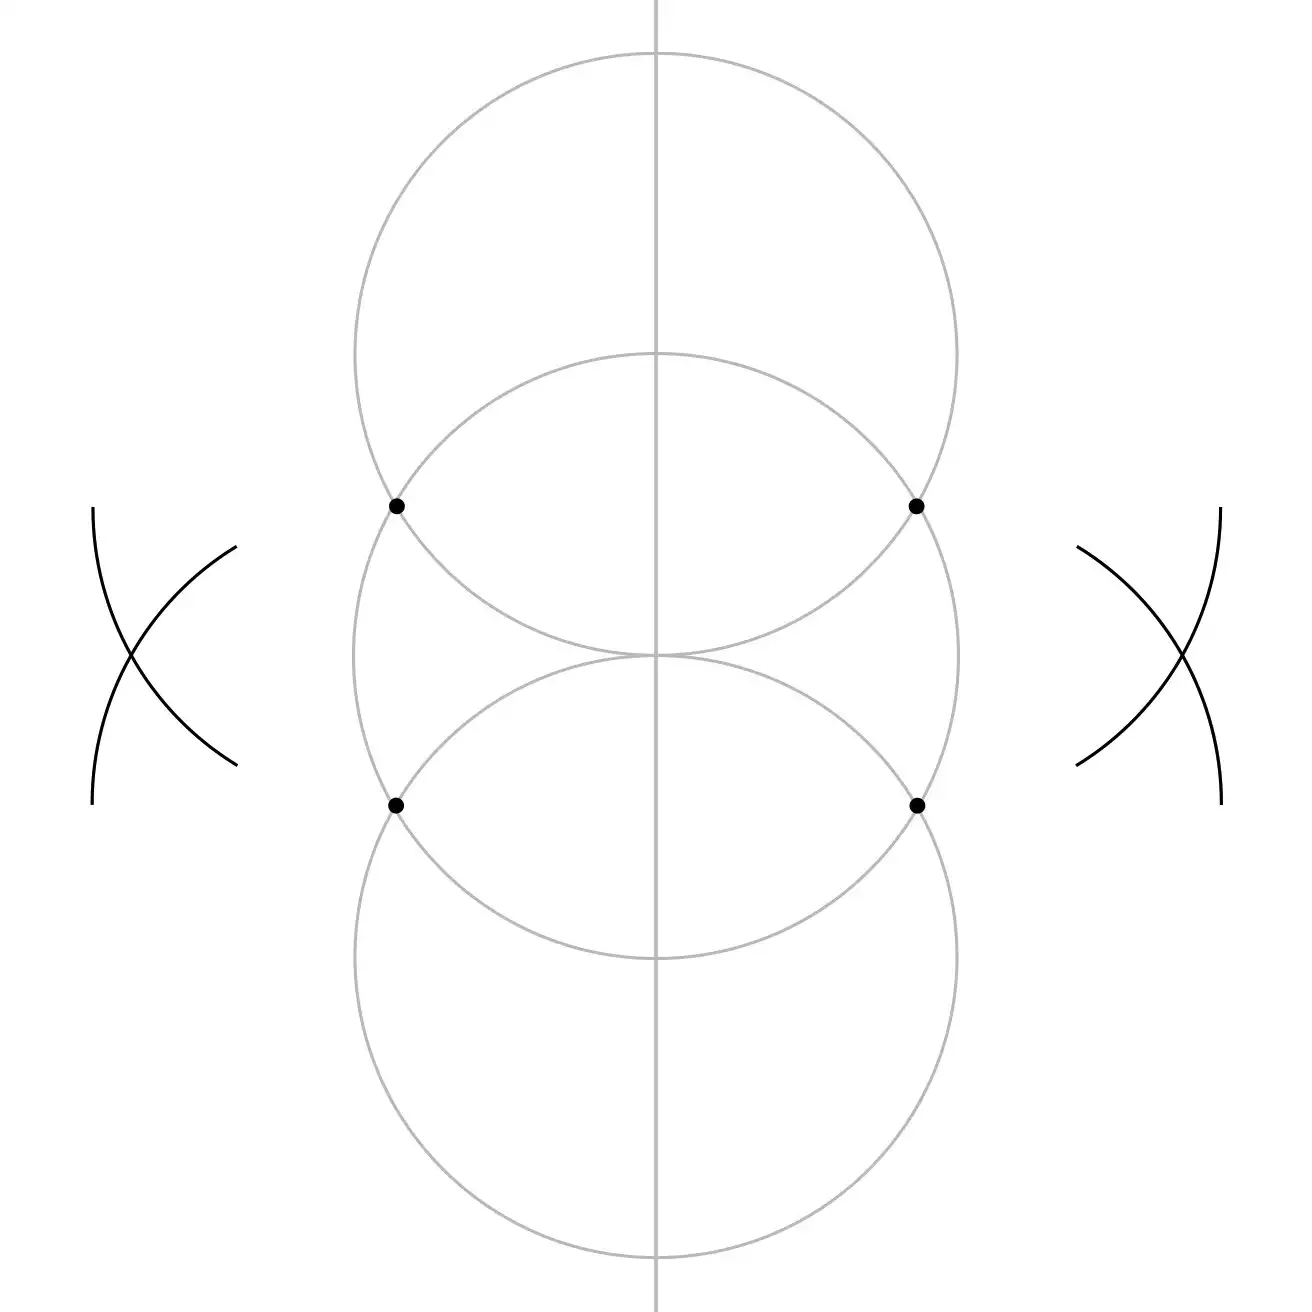
Make the Horizontal Guide
Next, you'll need to make a horizontal line.
Use the intersections of the circles as centres.
Draw intersecting arcs to the left—and to the right.
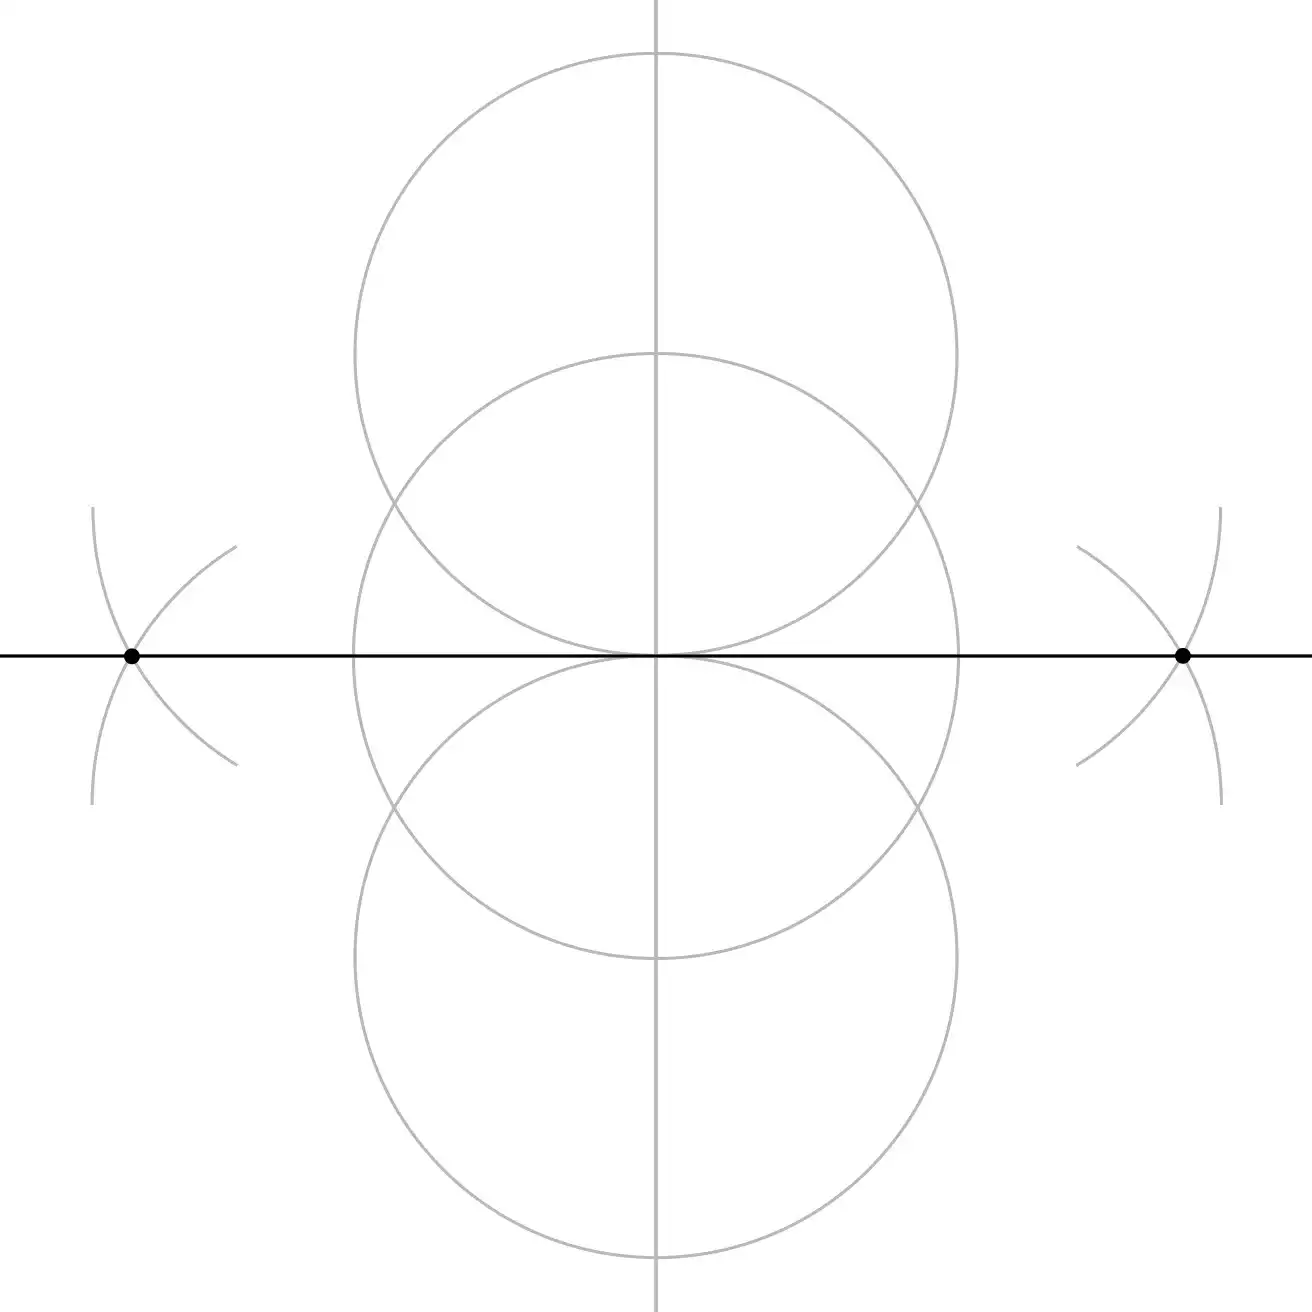
Draw the Horizontal Line
Use where these arcs cross to draw a straight line across the page—that's your horizontal.
It'll slice the first circle right in half.
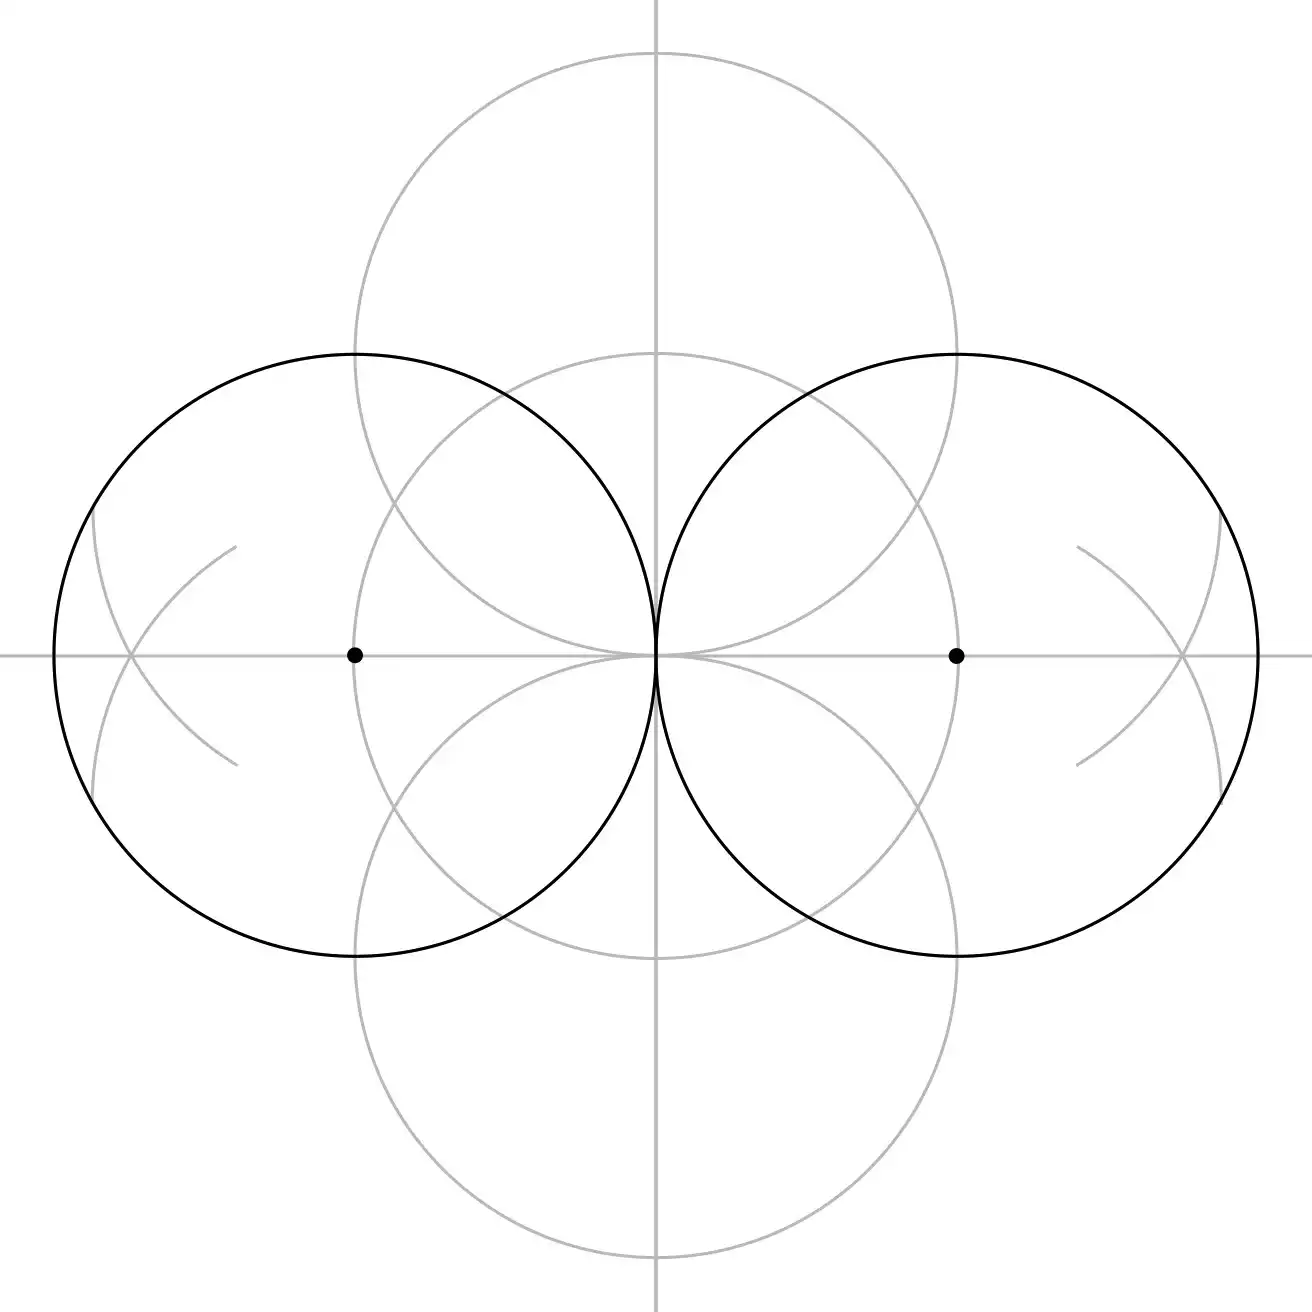
Add the Side Circles
Now draw two new circles centred on the points where the horizontal line intersects the edges of the first circle.
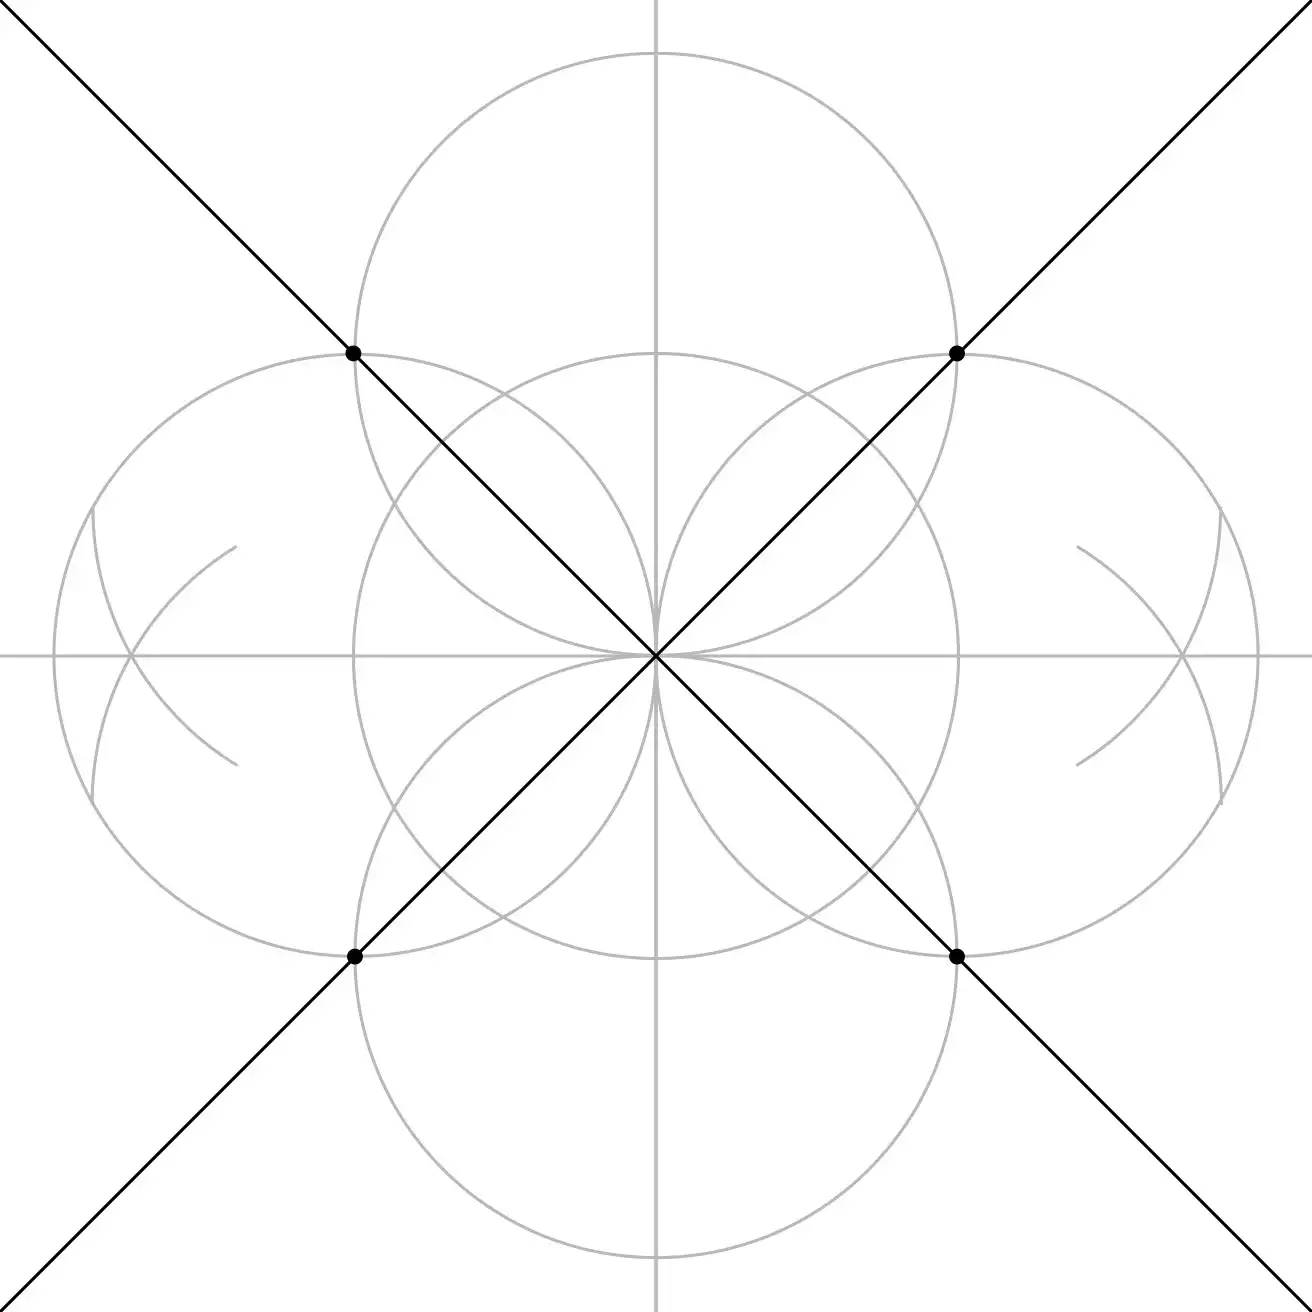
Draw the Diagonals
Let's slice things into eighths.
Draw lines at 45-degree angles using the intersections of the outer circles.
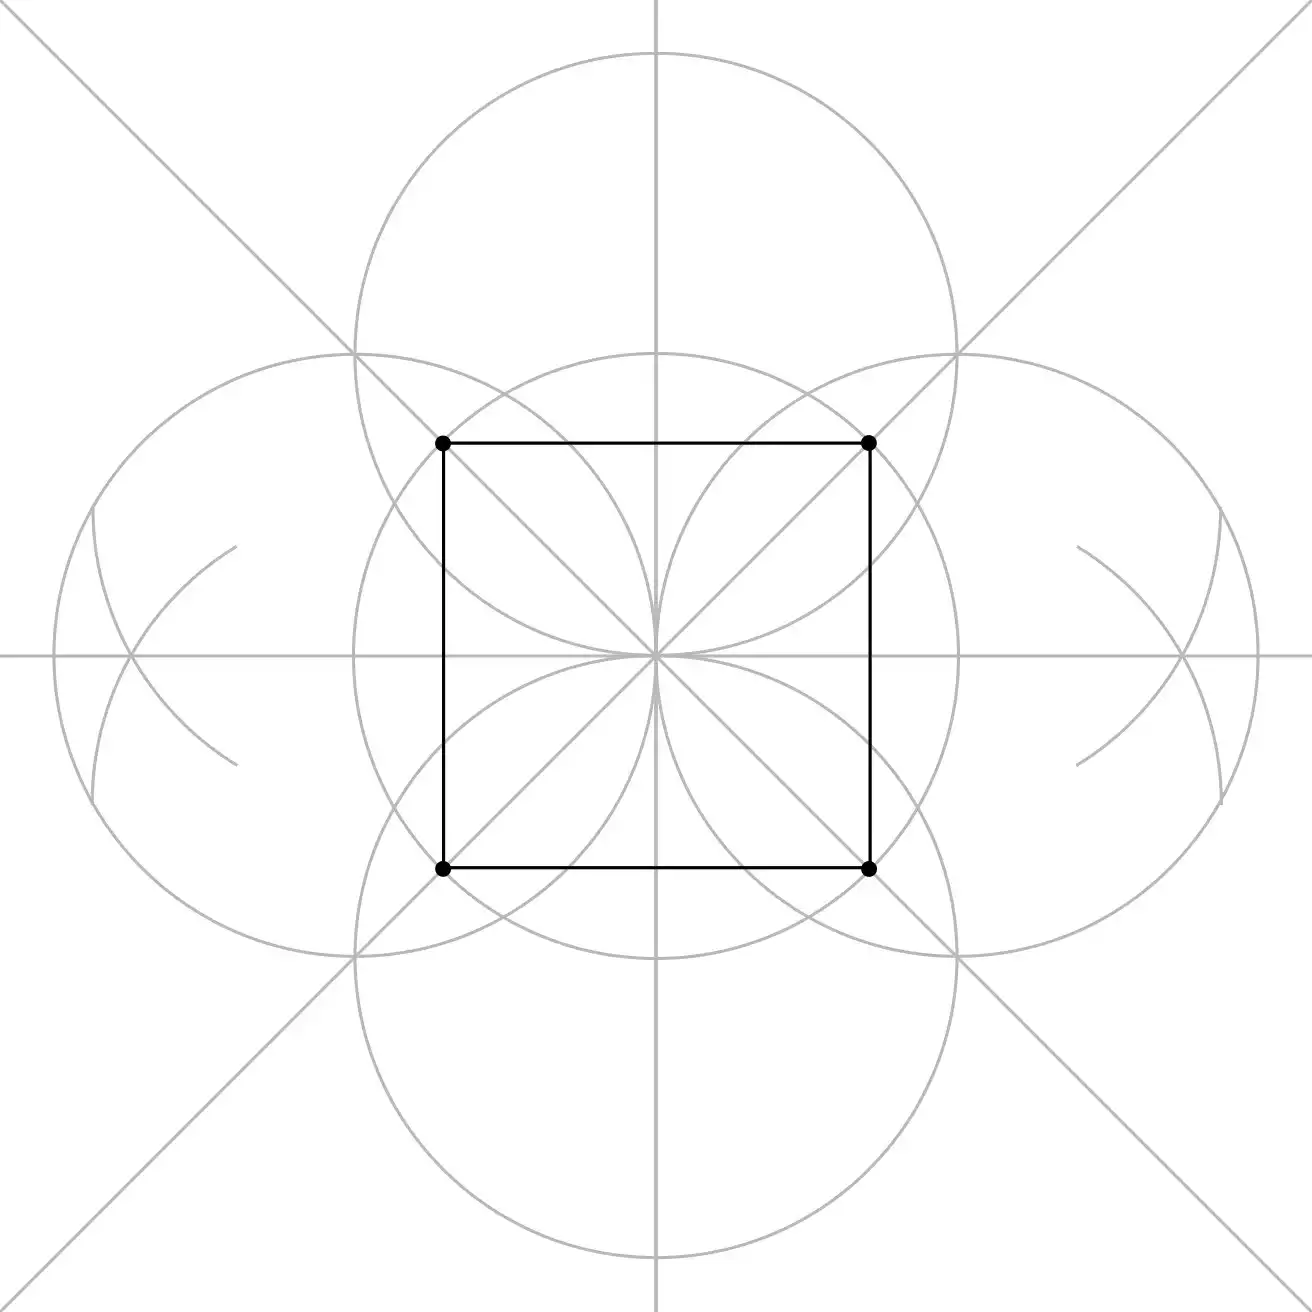
Reveal the Square
See where those diagonal lines cross the edge of the first circle?
Connect those intersections to draw a square inside the circle.
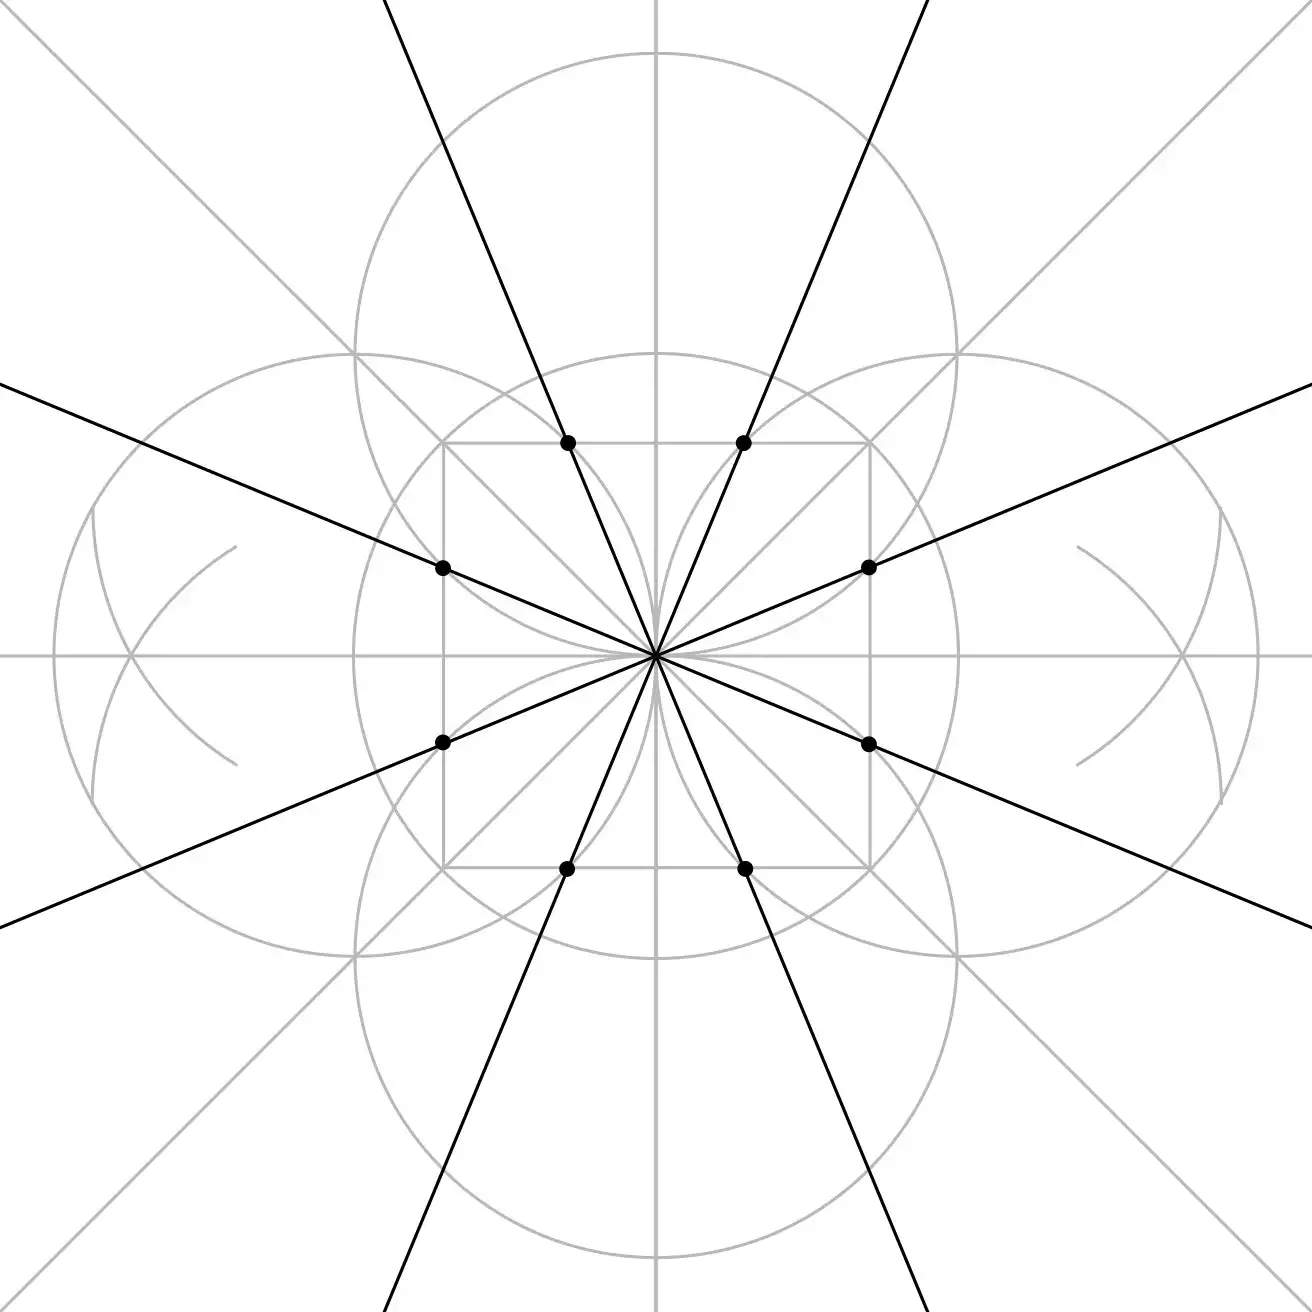
Add More Guides
See where the circles cross the square's edges?
Those are clues.
If you line them up just right, they'll divide the big circle into sixteenths.
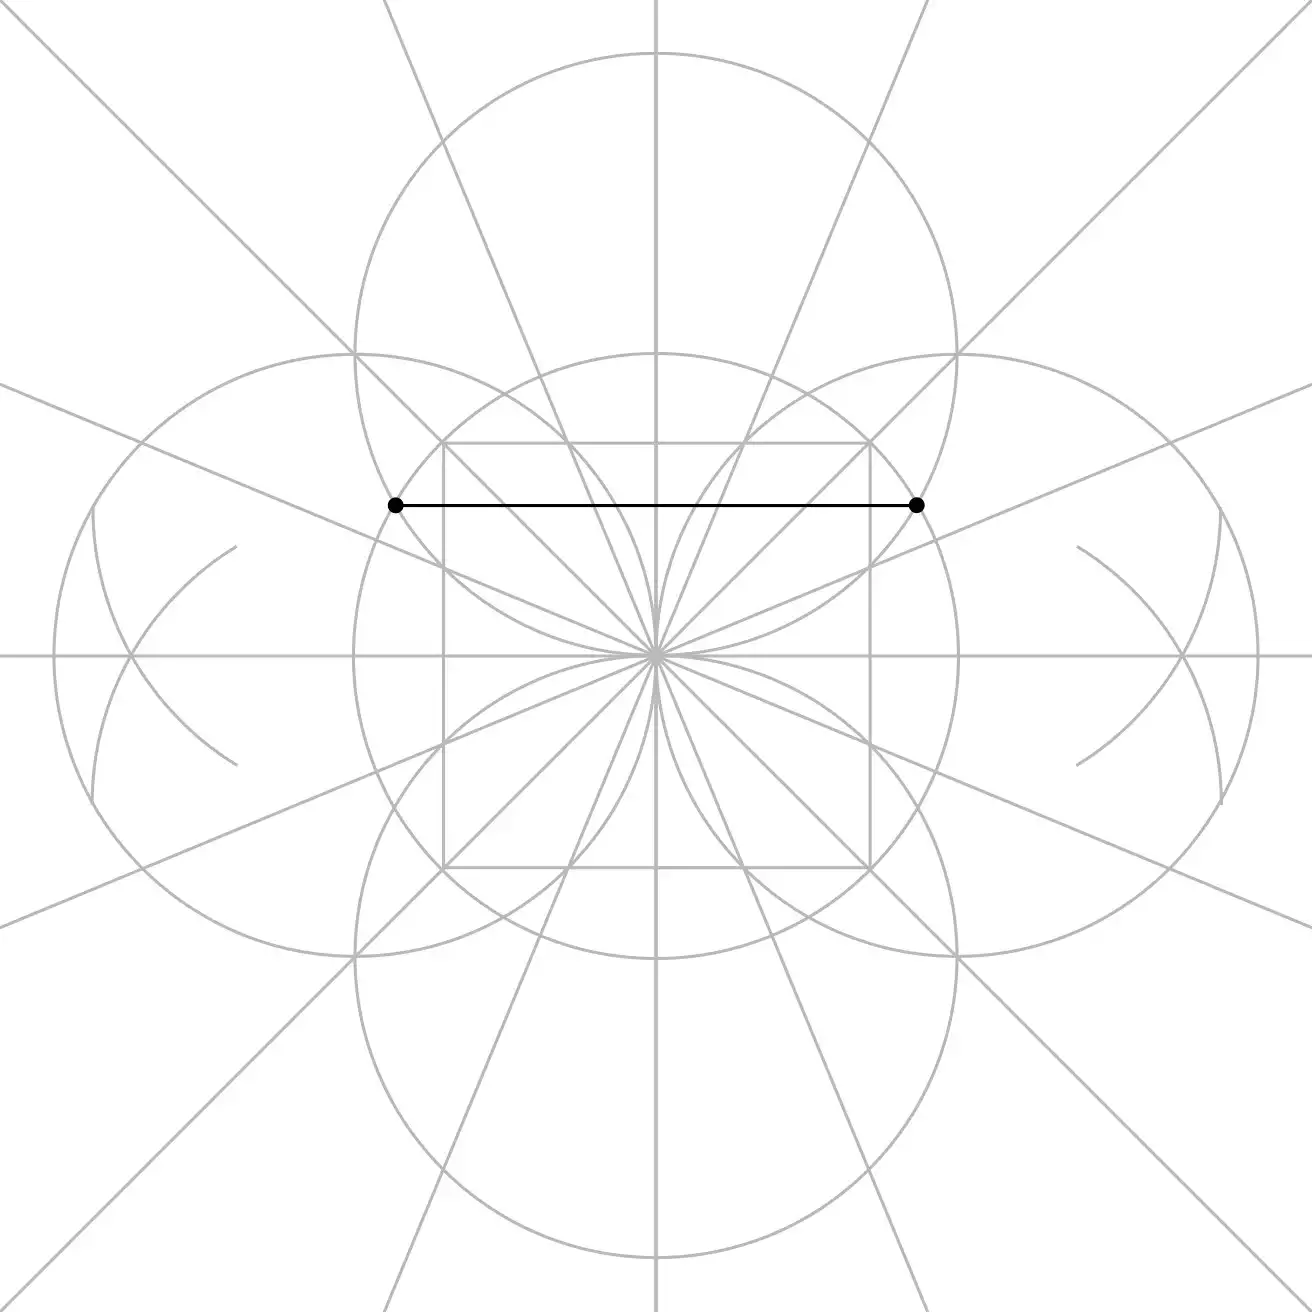
Find the Triangle Points
Now for the top of the triangle.
Draw a horizontal line that connects two very specific points—look closely.
You'll see them just outside the square, near the top.
Reveal the Triangle
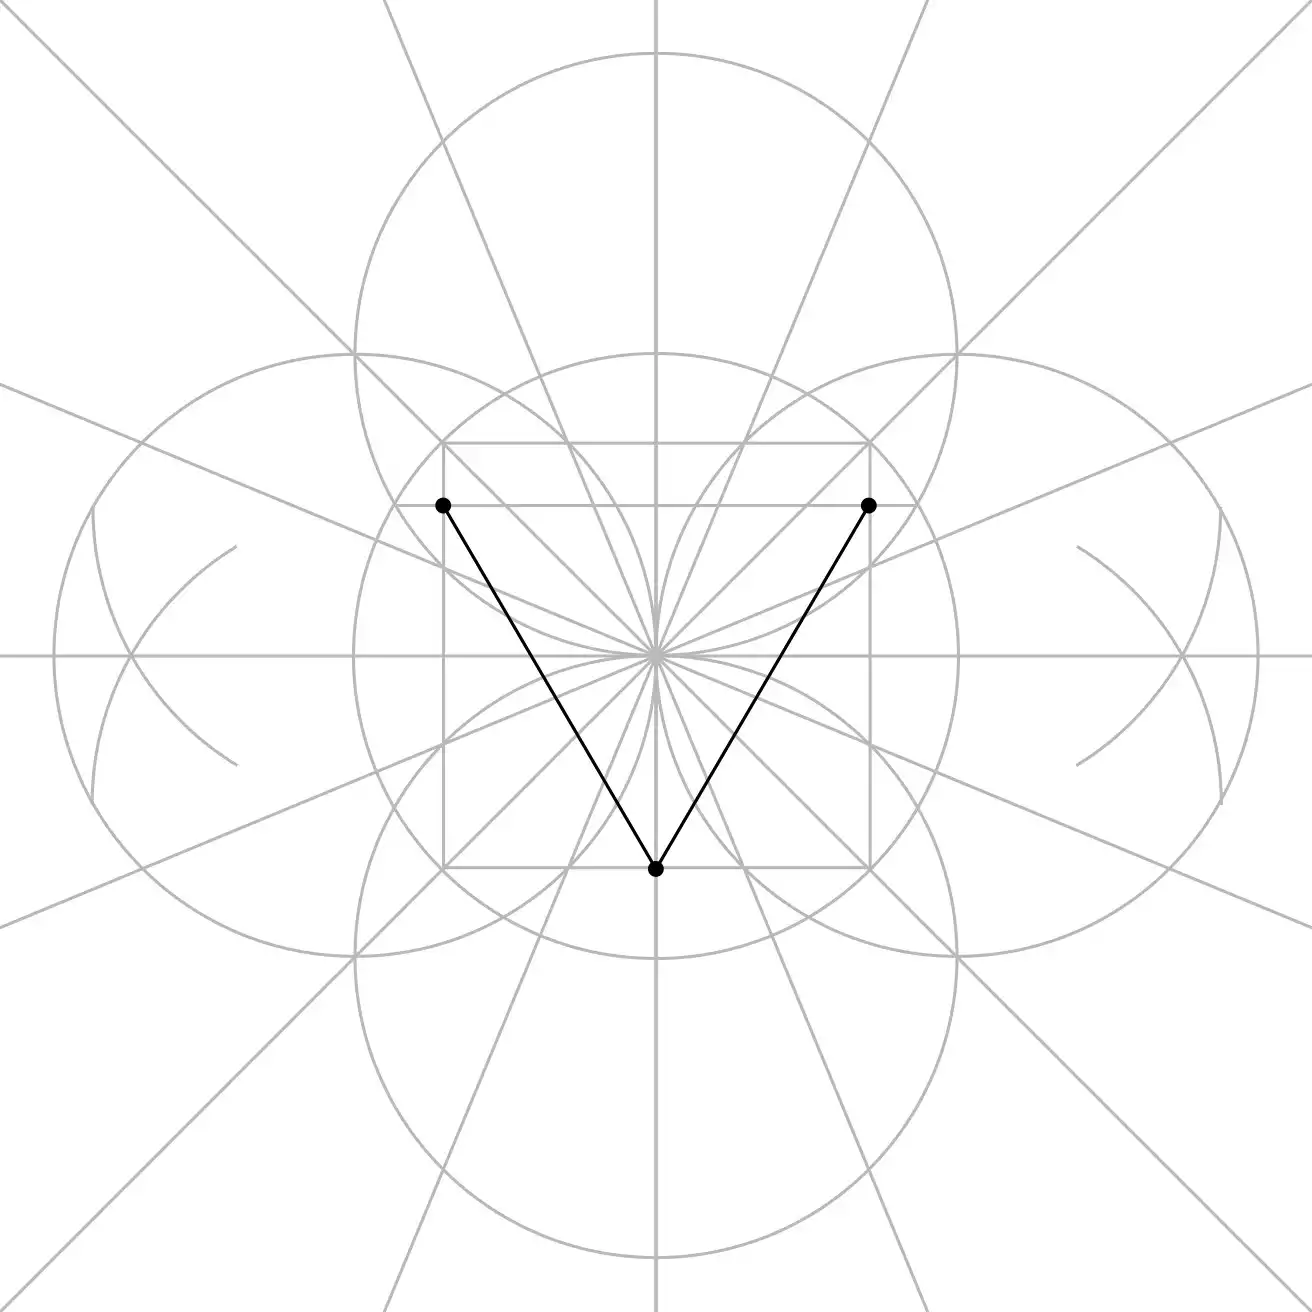
Now it's time for a triangle—a downward-pointing triangle.
Find where the vertical line meets the base of the square.
That's the bottom point.
Connect it to the horizontal line where it intersects the square.
Set the Next Circle
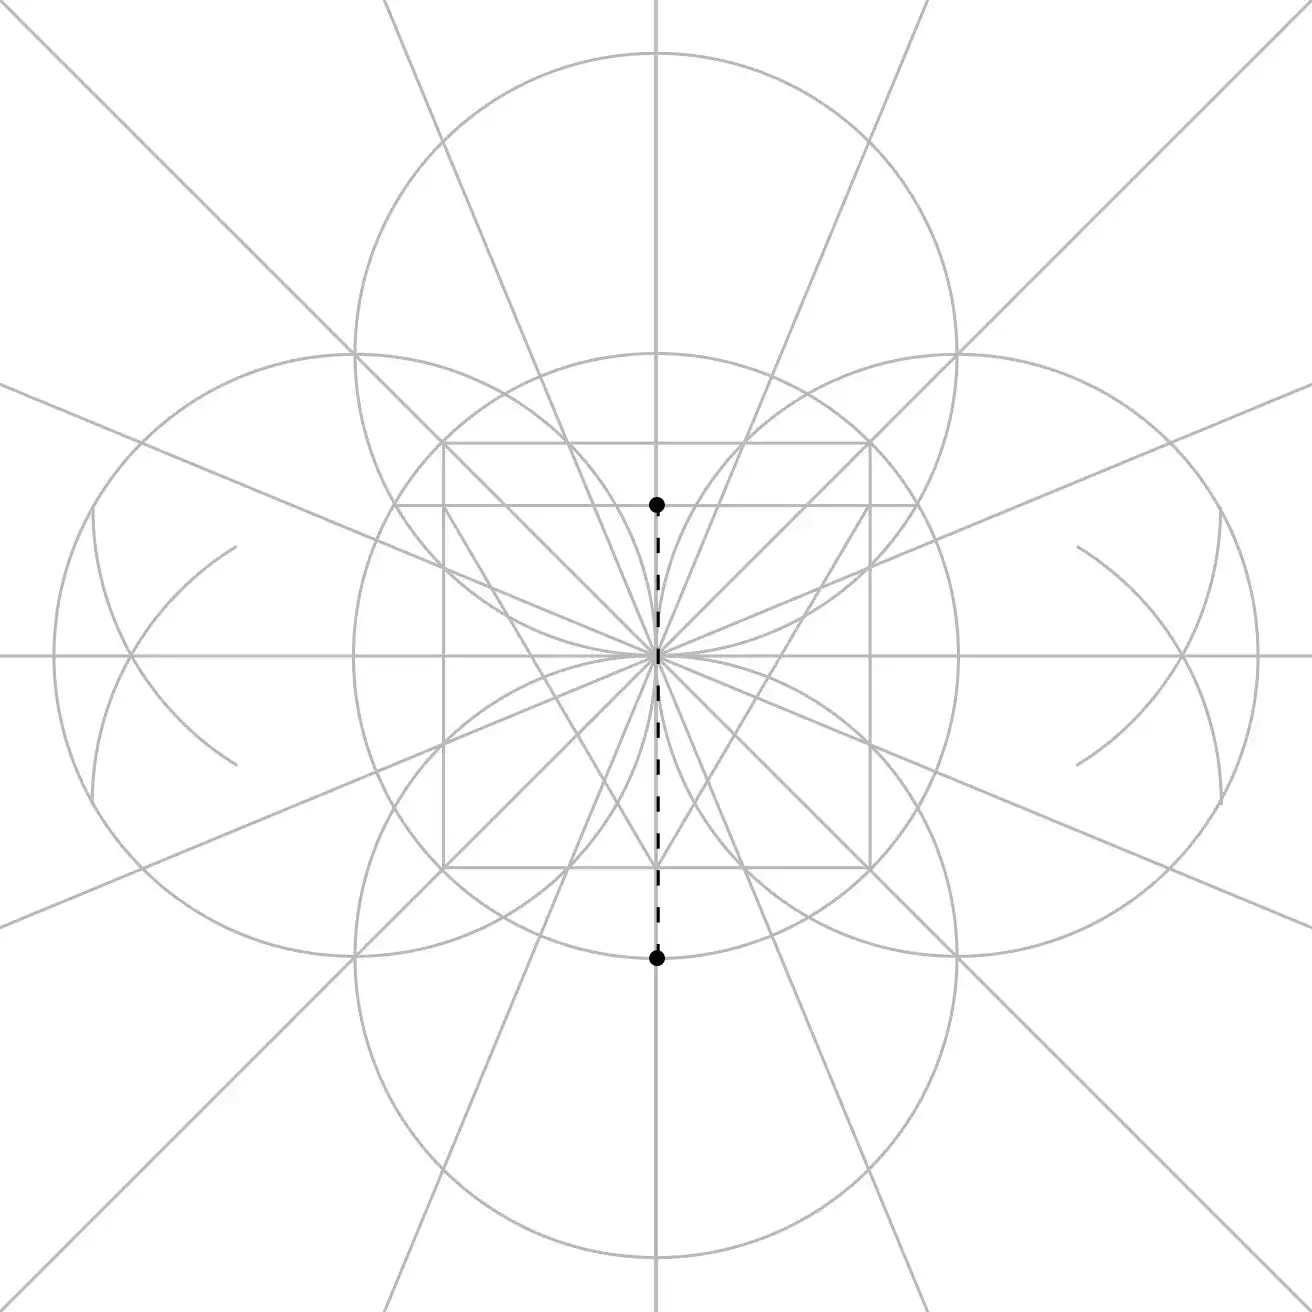
Time for a bigger circle!
Using the vertical line as a guide, change the compass size.
Set it from the top of the triangle to the very bottom of the original circle.
Draw the Inner Circle
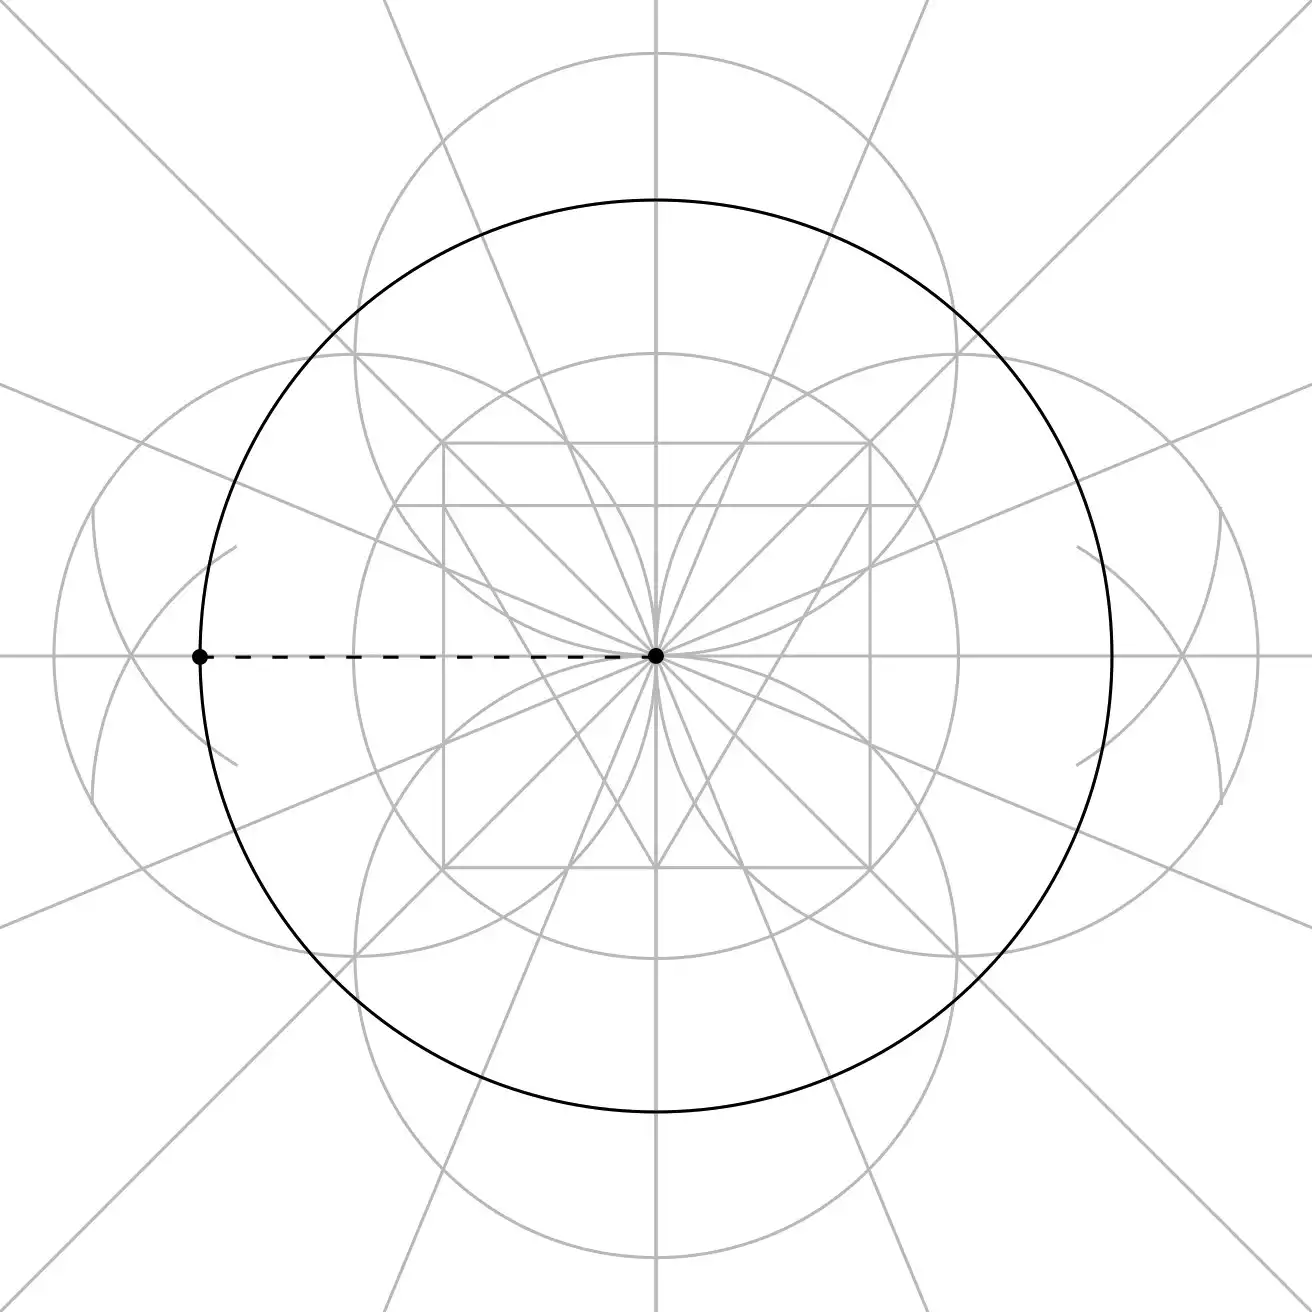
Spin the pencil in a wide, smooth circle.
And voilà! Exactly what we need.
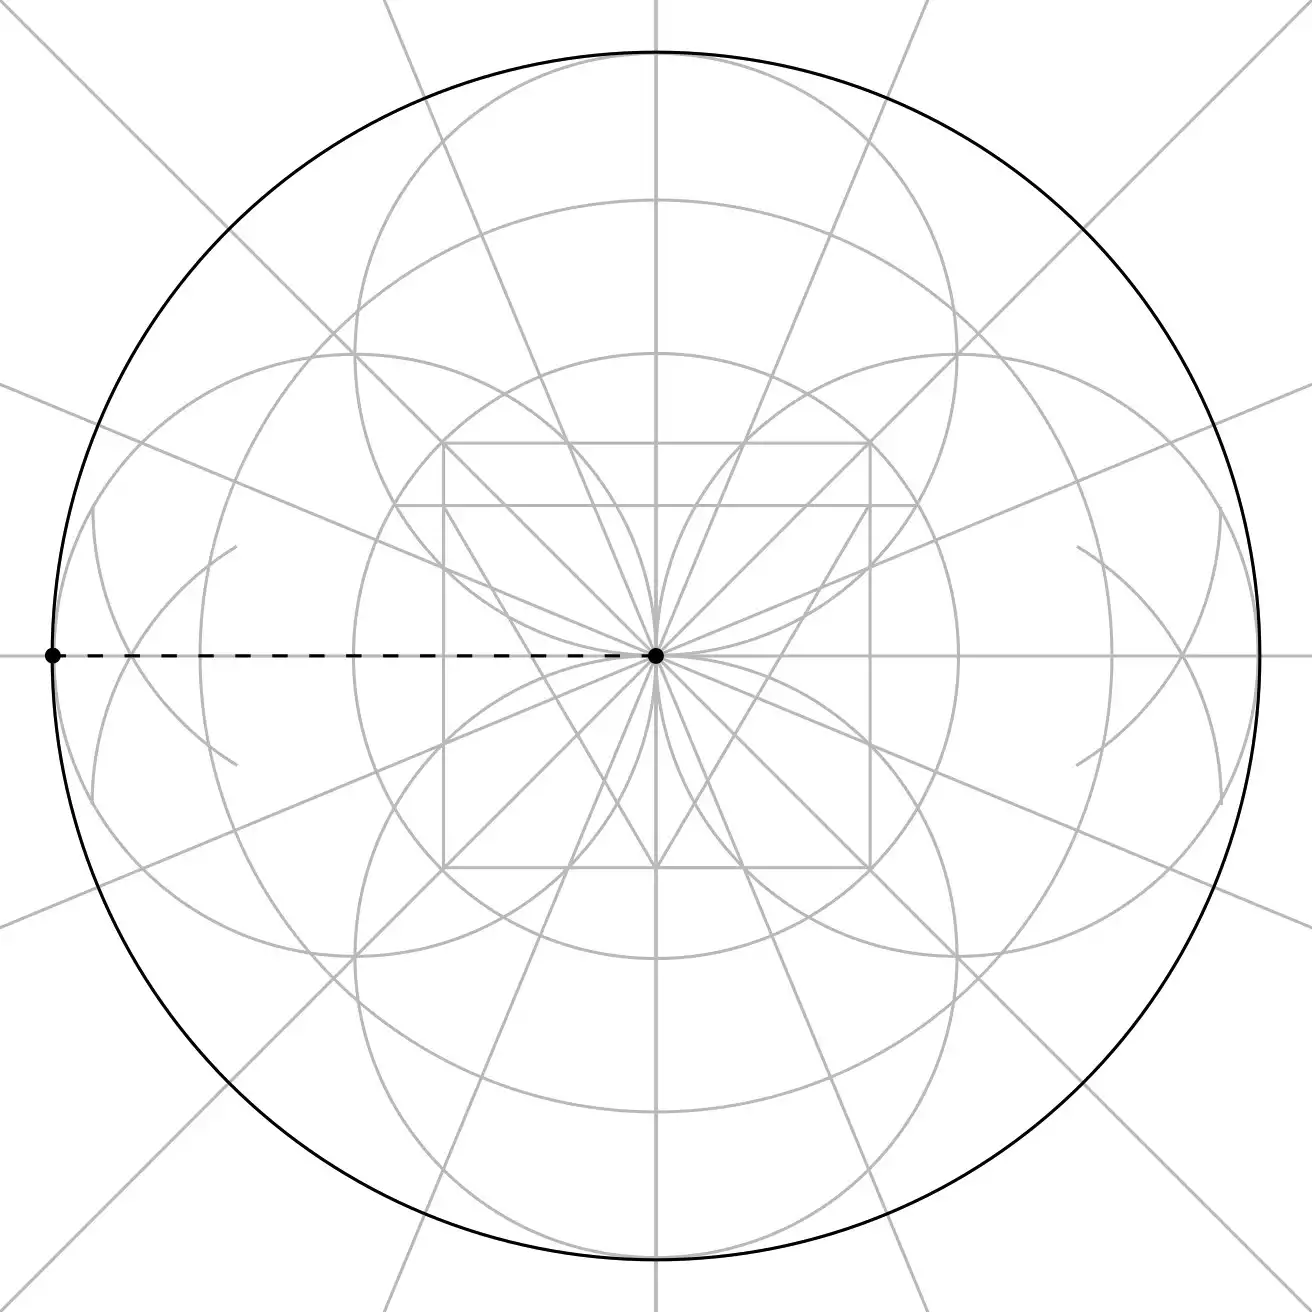
Draw the Outer Circle
Now change the compass size one more time—to reach from the centre to the edges of the outermost circles.
Then draw a circle—a biiiig circle.
Outer circle coming up!
Done? Brilliant!
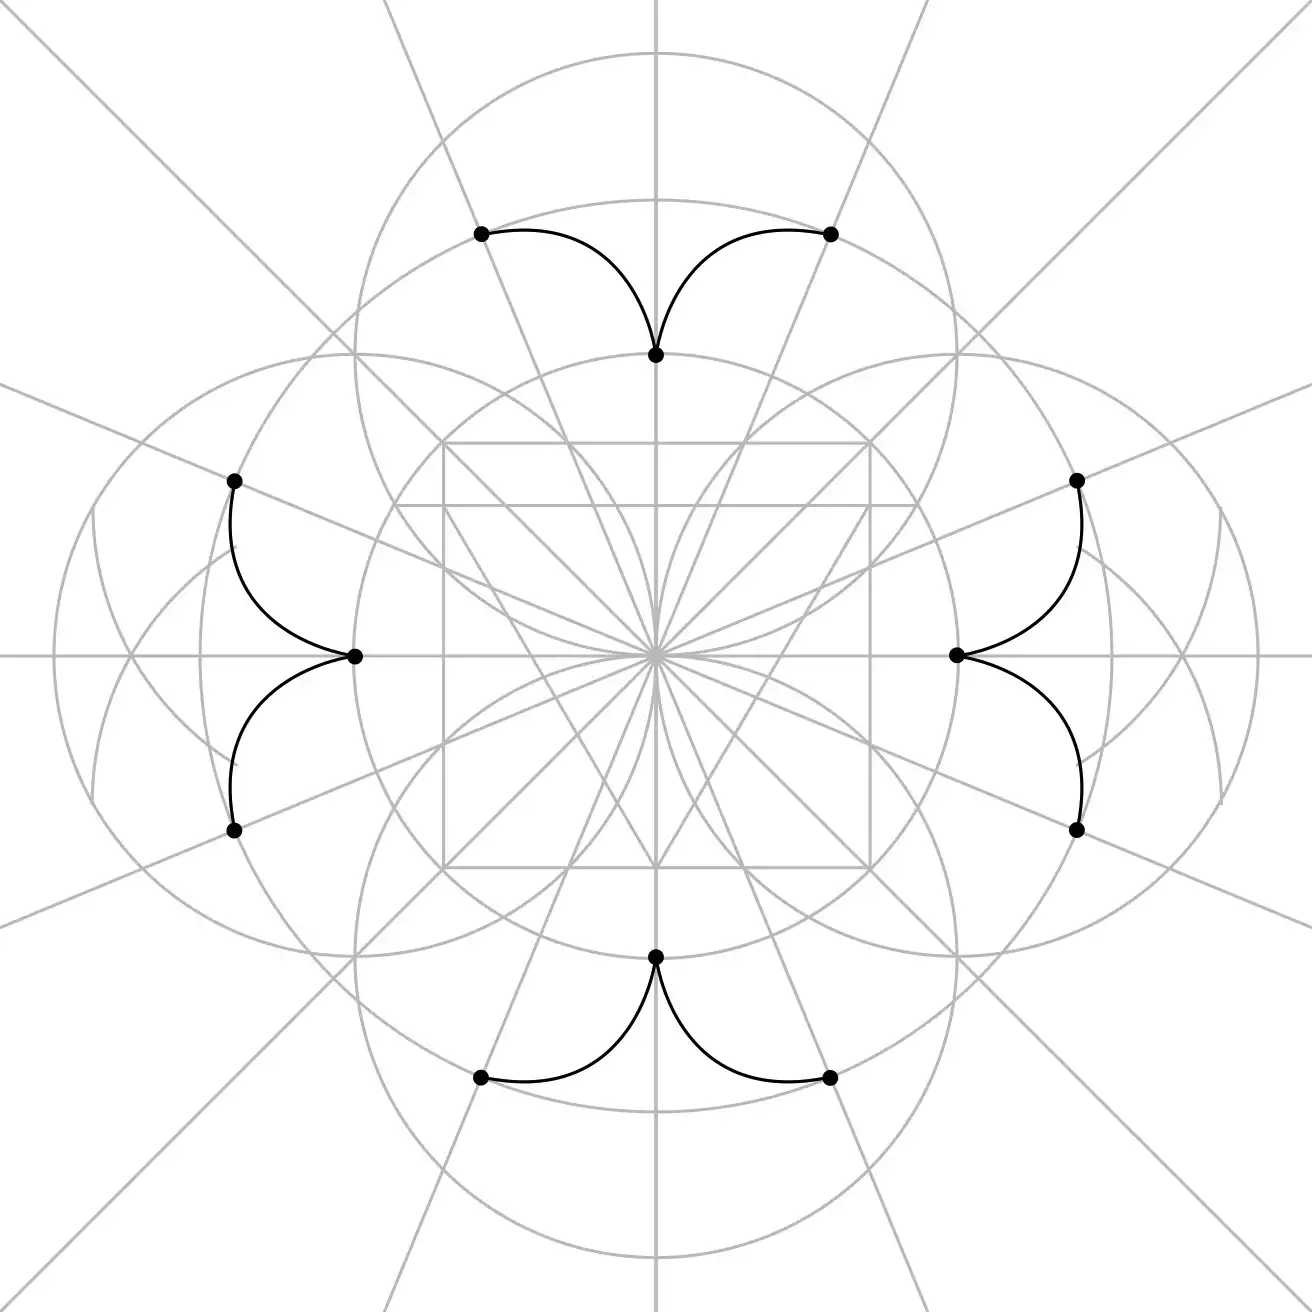
Add the Petal Bases
Now it's time for the petals.
Draw the base of the petals by hand, using soft, rounded curves between the right points.
By hand?! Gulp. Better use pencil, just in case.
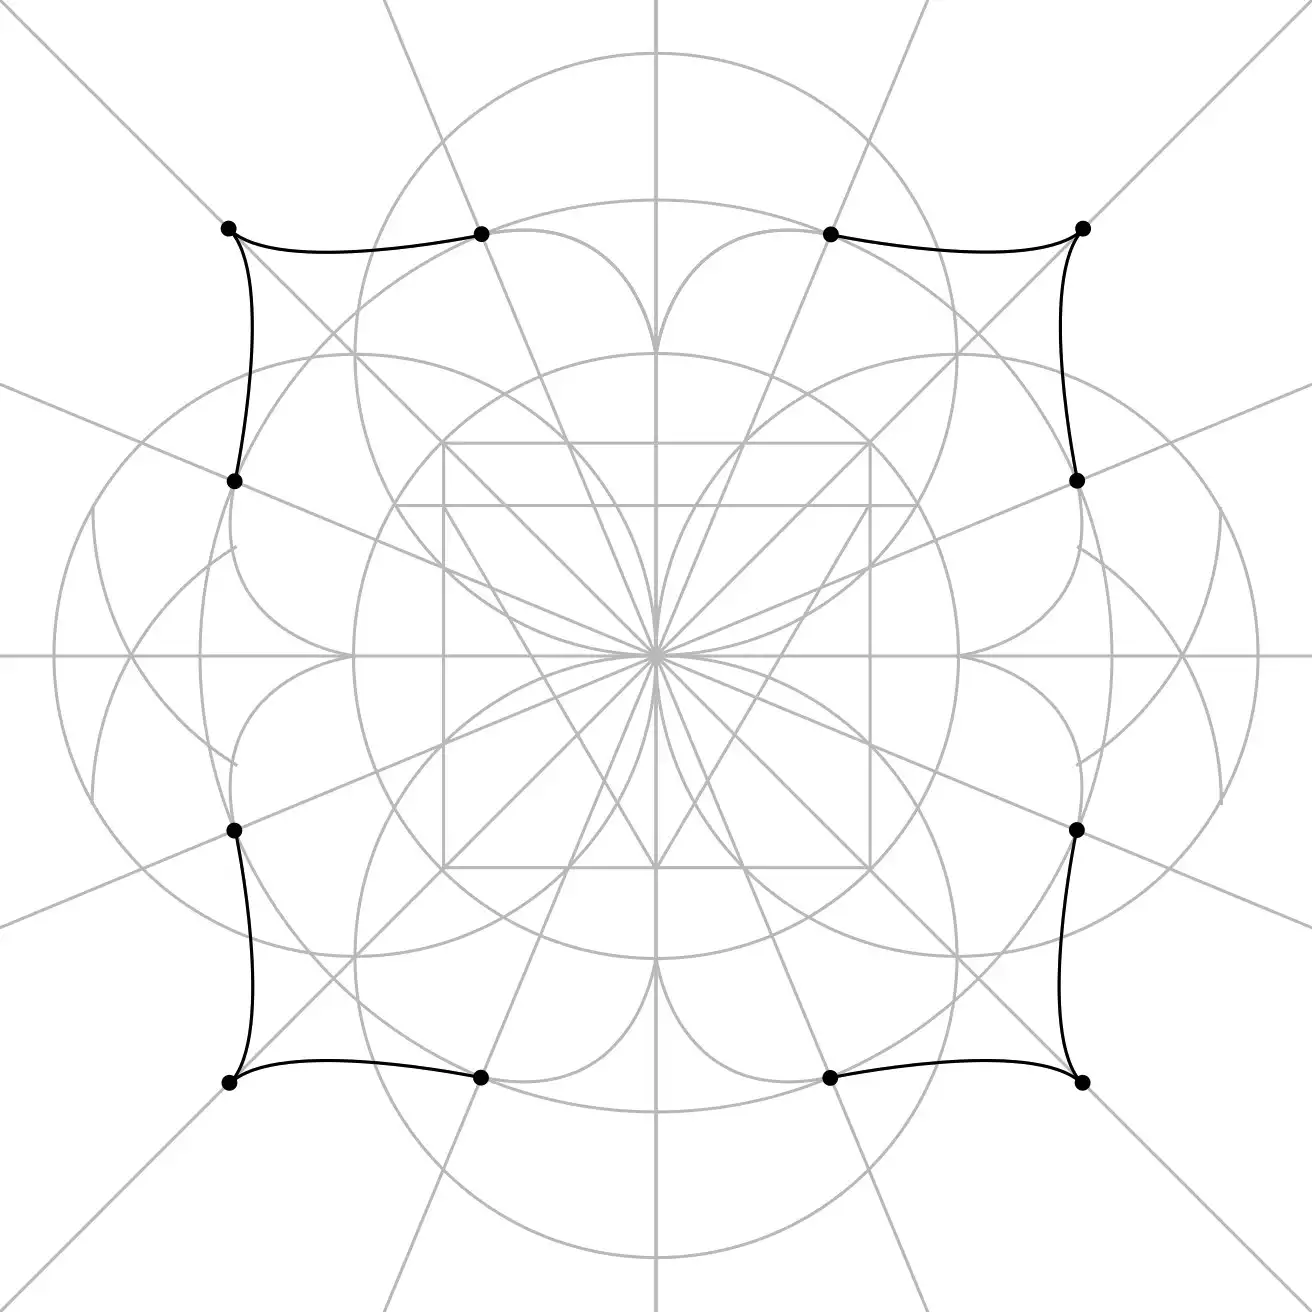
Add the Petal Tips
Now for the petal tips—curvy too, but with a nice little point at the end.
Not too sharp. Just... petally.
And that's it.
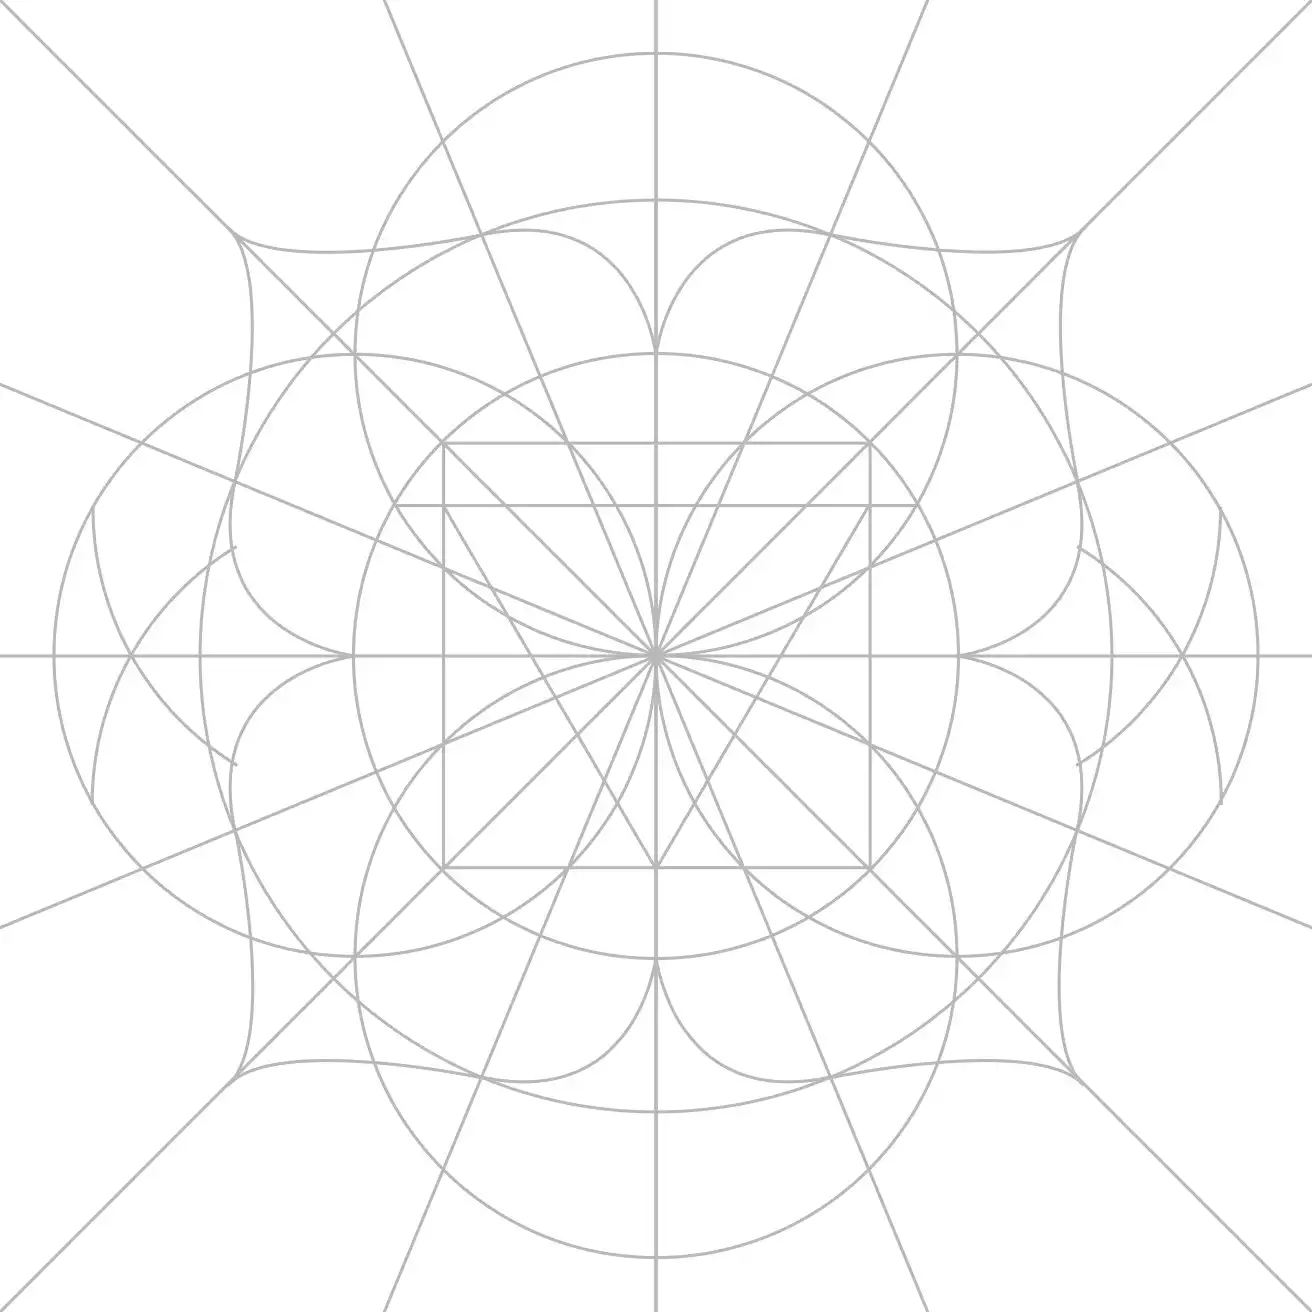
Finish the Symbol
All you need now is colour. Red. Bold, Root Chakra red. And a thick outline to make it pop.
Take It In
Pause for a moment and look at what you've made.
You can erase the construction lines you no longer need, or leave them faintly visible.
You started with circles.
Now you've uncovered a square, a triangle, and a complete symbol.
Need Another Go?
If your symbol looks slightly uneven, good news: that's exactly what practice is for. Check out the tool tips and try again.
Make It Yours
Now make it yours.
Add colour, experiment with shading, create patterns, decorate the petals, or invent your own version inspired by the construction.